Do you need something cute for your Thanksgiving dinner table? This little guy is going to be the perfect solution. Use him at each place setting on the table. If you need to assign seats then put a name where I stamped the “Happy Thanksgiving”.
This was a really fun project that my Stamper’s club got to make this month at our meeting. And today I shared it on my weekly FB Live. I’ll be uploading it to Youtube as well – and then adding that link here too.
Make these in a variety of patterns from the Plaid Tidings Designer Series paper. The paper is part of the sale this month so grab a pack now. You can get two turkey’s from each sheet of the 6×6 paper. Clip them on to a fork, or a napkin to dress up each place setting for Thanksgiving. If you need assigned seats – then write a name on the banner instead of stamping the Happy Thanksgiving.
Supply List
#153527 Plaid Tidings 6×6 Designer Series Paper
#155214 Banner Year Bundle = Banner Year stamp set + Banners Pick a Punch
So I started writing this post way back in July! It was shortly after returning from the Incentive trip to Greece. But as you can see I never finished it and never posted it. Life happens. When we got back I was trying to spend as much time as I could with my son knowing that he would be leaving the country. So I let some things slide – like my blog. He left last week on Monday. He has been gone for 1 week now and I need to get my butt in gear and get back on track. So here we go…..
I have a scrapbook page and cards to share with you using the Come Sail Away Suite. I shared these on a Facebook Live video a while ago and you can see that here.
The left page of this two page layout was what my Stamp Club made for one of their projects back in July. And the right hand page was the one I added as part of my Facebook Live video. The bottom left corner is actually a card idea that I created for a swap and then decided that I wanted to base a scrapbook page on it.
Fun Fact: in case you didn’t know I grew up sailing. That was my sport from about 10 years old until I went to college. My dad and brother are sailors and my mom used to sail too. I grew up living in a sailing club on the lake. At that time there weren’t very many girls that were sailing. I always say that I grew up in a boys world and had to join Stampin’ Up! to find some girls to hang out with.
Supply List
#147003 Neutrals 12×12 card stock
#100730 Whisper White card stock
#149481 Come Sail Away Designer Series Paper
#151006 Sailing Home Bundle = Sailing Home Stamp Set + Smooth Sailing Dies
#149483 Baker’s Twine
#149482 Sail Away Trinkets
#147110 Night of Navy Ink
#147117 Sahara Sand Ink
Since not everyone in my stamp club is a scrapbooker I also give them the option to create two cards instead of the one scrapbook page. I utilize the same supplies. Here are the two cards from this layout.
The card on the left was the one I made for my swap card and that is the one that inspired the scrapbook page. You should be able to see where the second card is taken from the scrapbook page too. And you could also use that bottom right corner on the second page to create a card layout. I hope you like these ideas.
Order online here – use host code CTTQEX3U for September 2019. If your order is over $150 in product don’t use the host code because you will earn your own Stampin’ Rewards. For orders less than $150 use the host code and I’ll send you a surprise in the mail.
This bright fun scrapbook page was one that I created for my Stamp Club and also used for a class at a Spring Scrapbook Crop that I was a Vendor at. I used the Happiness Blooms Designer Series Paper – the same as my Birthday Bingo cards – to make this happy layout – plus I have a couple of cards too. For my Stamp Club I created the left page of the two page layout. I also used those supplies to create two cards for those members that would rather have cards instead of the page. Last week I shared the two page layout and the cards in a Facebook Live.
You can view my April 22, 2019 FB live video HERE. Be sure to catch my next FB live video on Monday, April 29th.
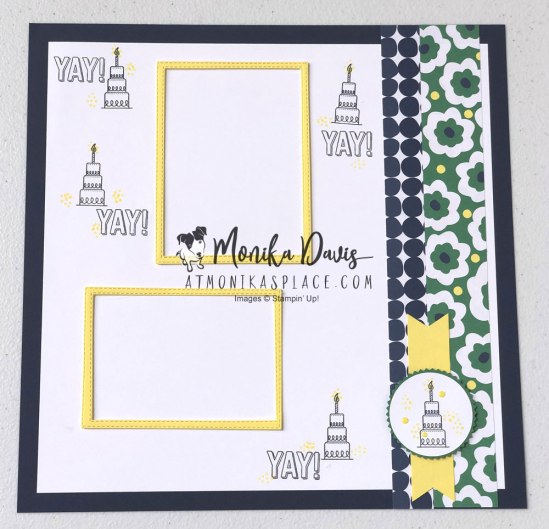
I started with a Night of Navy 12 x 12 piece of card stock. Trim a piece of Whisper White to be 11 x 11. The cake image and Yay! were just randomly stamped in the background using Night of Navy ink. Next I added Pineapple Punch little dots and colored the flames in too. I chose two patterns from the Happiness Blooms Designer Series paper and cut strips to cover the left side of the page. Cut one at 1-1/2″ and the other at 1″ wide. The photo frames/mats are cut using the Stitched Rectangle dies – since they will layer inside each other you can actually cut all the pieces with one pass through the die cutting machine. To finish the page I added a fun tag for the title at the top.
Supply List
#147003 Neutrals 12×12 Cardstock (Night of Navy)
#124302 Whisper White 12 x 12 Carstock
#148750 Amazing Life stamp set
#150624 Rectangle Stitched Framelits Dies
#150624 Amazing Life Bundle (stamp set + Framelits dies)
#148795 Happiness Blooms Designer Series Paper
#148805 Happiness Blooms Enamel Dots
#146973 In Color 2018-2020 Cardstock pack (Pineapple Punch, Call Me Clover)
#147110 Night of Navy Classic Stampin’ Pad
#147141 Pineapple Punch Classic Stampin’ Pad
#147024 Call Me Clover Dark Stampin’ Blends
#146336 Medium Night of Navy Baker’s Twine
#143717 Starburst Punch
#133782 2” Circle Punch
#138292 Banner Triple Punch
The second page of the layout is similar with an accent piece in the bottom corner featuring the cake.
For my stamp club members that don’t want to make a scrapbook page they have the option to make two cards instead. They used the same supplies which is more than enough for two cards. Because the cards are smaller the strips of Designer Series paper where changed to be 1″ and 1/2″ and the tag was shortened a little bit.
The inside of each card has a piece of Whisper White that is stamped with the cake like the background on the scrapbook page. I hope you like the projects. The Amazing Life stamp set is retiring and so is the Happiness Blooms Designer Series paper – be sure to get those now before they are gone for good.
Let’s take a look at the scrapbook layout I created for February. It’s a love, heart themed page but doesn’t actually say Valentine’s Day so it could be used for any number of things. My monthly stamp club created the left page and then I added the right page and showed them both in my Facebook Live. Be sure you watch my Facebook Live video from Sunday, March 10th and you can see both of these pages plus some bonus tags.
The Meant To Be Bundle and All My Love Designer Series Paper were perfect for a February scrapbook page. I used strips of paper in varying widths and lengths. This is a perfect way to use up scraps left from other projects. The hearts stamped in the background are 3 different ones from the Meant to Be stamp set and I mounted all three on one block so they could be inked and stamped together.
Supply List
#147003 Neutrals 12×12 Card stock
#100730 Whisper White Card stock
#46970 Lovely Lipstick Card stock
#150587 Meant to Be Bundle (Meant to Be stamp set + Be Mine Stitched Framelits)
#148576 All My Love Designer Series Paper
#148583 Heart Epoxy Droplets
#147116 Crumb Cake classic ink
#143263 Big Shot Die Cutting Machine
#148534 Well Written Framelits Dies
The Be Mine Stitched Framelits Dies have so many different elements and they even fit perfectly on some of the hearts on the Designer Series paper. You also have the option to add stitching on some of the solid hearts with the stitching dies.
I scattered the little hearts from the die cut and the epoxy hearts in with the background stamping on each page.
With some of my left over scrap pieces I also made tags. These go on the orders that customers pick up from my house.
I kept seeing these adorable heart shaped treat holders on Pinterest but everyone linked to a foreign demonstrator with instructions in french. Unfortunately for me I don’t know any french. I finally found one with some photographs with measurements in centimeters so I started with that and tried to convert to inches and round it up to make it even. Played around with it a little bit until I got measurements that worked for me. They are much easier to make than they might seem. So let’s get to it.
I started by creating this version for my Stamper’s Club. This was one of their February club projects and uses the All My Love Designers Series paper. The stamp set I used for my words is Petal Palette. The little box on the inside holds a Lindor Truffle – the strawberries & cream version for Valentine’s Day. Cut your strip of Designer Series paper to be 1-1/2″ wide and 12″ long. Fold it in half. Then put some tear & tape on the end on the outside and curl the two ends together to form the heart.
To make the box I used a 3-1/2″ square of card stock – Lovely Lipstick for this one. Score all four sides at 1″ and snip two sides and fold to form a box. The tear & tape is perfect for this project. Use it to create the box and then use it on the bottom and one end to add the box inside the heart.
Supply List
All My Love Designer Series Paper
Lovely Lipstick card stock
Petal Palette stamp set
Lovely Lipstick ink
Whisper White card stock
Whisper White Baker’s Twine
1/8″ hand held punch
Tear & Tape
After my stamp club made these I decided to make another one as an alternate project for my January Paper Pumpkin kit. I added the Animal Expedition Designer Series paper – which coordinates with the kit and the Baker’s twine to make some of these hearts out of the kit contents.
The box for this project comes from the pillow box in the paper pumpkin kit. The stamp set, ink spot and white label are all part of the kit too. If you’d like to see a Facebook Live video of this project and my other alternate projects from the January Be Mine Valentine kit go here.
Earlier in 2018 I added some memory keeping back into my Stampin’ Up! business. I used to have a regular monthly scrapbook class but had gotten away from it and I missed it. So I decided to add a scrapbook page to my monthly stamp club. Each month we make one 12″ x 12″ scrapbook page in our monthly meeting. It’s ready to just add photos. Everyone has been enjoying the pages. So now I’m trying to start regular Facebook Live videos and plan to include a scrapbook page once a month. For January I decided to take the page for stamp club and create a second page to go with it. Be sure you watch my Facebook Live video from Sunday, Jan 27th and you can see both of these pages.
The January 2019 Stamper’s Club scrapbook layout is a New Year’s celebration layout – Gold Foil, Basic Black, Whisper White, and Basic Gray are the colors I used. Watch the video to see the trick on getting the Baker’s Twine added, the little flowers added, as well as some tips on the numbers and the detailed word dies. Below is a list of supplies that I used.
Supply List
#147003 Neutrals 12×12 card stock (Basic Gray)
#100730 Whisper White card stock
#121045 Basic Black card stock
#146277 Broadway Bound Specialty Designer Series Paper
#132622 Gold Foil Sheets
#146282 Metallic Pearls
#141682 Solid Basic Black Baker’s Twine
#145055 Smoky Slate Dark Stampin’ Blends
#119868 1″ Circle Punch
#119869 1/2″ Circle Punch
#134365 1/8″ Handheld Circle Punch
#144106 Multipurpose Adhesive Sheets
#144108 Mini Stampin’ Dimensionals
#104332 Snail Adhesive
#148551 Rectangle Stitched Framelits Dies
#150609 Well Said Bundle = stamp set + Well Written Framelits
#101406 Jet Black Stazon ink
#143263 Big Shot Die-Cutting Machine
Cut strips of Designer Paper to 2-1/4″ x 9″, and also cut a strip of white. Then center four strips on each piece of Basic Gray card stock. Use the Big Shot Die-Cutting Machine to cut the Black rectangles wit the new Rectangle Stitched dies – don’t miss them in the Occasions catalog on page 28 – these are the photo mats. It’s hard to see the stitching in these photos.
The “hooray” is from the Well Said Bundle. Use the Adhesive Sheets for detailed words like this. Add the adhesive sheet to the foil sheet before running through the Big Shot. Next remove the backing and attach to your page. The Well Written die set will be a great for all kinds of paper crafts – it has so many words and you can combine with the stamps for endless possibilities. Try cutting words apart and combine different letters or parts of the words – I checked and almost the whole alphabet is included in these words.
Hi! I am a Stampin’ Up! independent demonstrator in Milton, Georgia. I love being creative and want to share it with you! On my blog I will share creative ideas using Stampin’ Up! products and you’ll also hear about my family and my dogs.
I look forward to helping you get your creative juices flowing!
Click on the Shopping cart to visit my Online Store and order your Stampin' Up! Supplies any time. Earn Stampin' Rewards when you order reaches $20 - be sure to opt in to the rewards program on your account. Any questions click on the email me button above.
Current Catalogs
Join My Stampin’ Up! Team for $99
Join Paper Pumpkin – Your Creative Escape!
For New Subscribers -
Join by the 10th of the month to start your subscription this month.
Prepaid subscriptions now available!
The content in this blog is the sole responsibility of Monika Davis as an Independent Stampin’ Up! Demonstrator. The use of and content of classes, services or products offered is not endorsed by Stampin’ Up!