Jul 29, 2009 | Blog Tour, Circle Circus, Stamps |
Hi Everyone!
Wow what a ride! Did you have a wonderful time exploring all the blogs on the Royal Blog Tour? I know I did. I have a whole list of new blogs to visit and ideas to try. I had a record number of visitors and my total visits is now over 20,000! How exciting is that!
I’d like to thank everyone that came to visit me and for all the wonderful comments. It was so nice to read them all. I will be drawing for the Blog Candy Winners later and post that tomorrow. If you asked me questions I will be working on replies to those also. Thanks again!
I am working on my post of the Kaleidoscope card tutorial and it will be up later today – it is a long post with lots of pictures so it is taking a bit longer. For right now I want to show you the card that I created (and then took down because the colors were so wrong) that matched the scrapbook page. I took a new picture and now it looks like Tempting Turquoise, Old Olive, Pumpkin Pie and Chocolate Chip. Chocolate Chip is the base of the card which is a little hard to see in the picture. The Tempting Turquoise layer is on top and scallop punched on one side. I love these colors together!

The girls coming to my scrapbook class tonight will be making the scrapbook pages that I showed as part of the tour. I am finishing up the prep-work for that class. And still working on my convention swaps. I’ll be back later with the tutorial for you. Have a great day!

Jul 25, 2009 | Blog Candy, Blog Tour, Circle Circus, Stamps |
I am so excited to welcome you to the ROYAL BLOG TOUR!
I hope you are excited to be here.
I will go back to my regular posting schedule after the tour – this post will be here until the tour is over.
Sit back and relax as you take the tour and see wonderful samples using stamp sets and accessories from the Stampin’ Up! 2009-2010 Idea Book & Catalog.
On the tour you will visit Princesses from all over showing you different styles of stamping.
Have fun on the tour!
My featured stamp set is the new CIRCLE CIRCUS stamp set! This set offers circles with all sorts of lively, fresh designs to choose from. Stampin’ Up! had another circle based stamp set that I just loved but it retired a few catalogs ago and I have missed it. When I saw the Circle Circus set I knew this would fill that void. Circles are everywhere and so fun to use. And Stampin’ Up! has plenty of circle punches and the new Circle Scissor Plus that work perfectly with this set.
 My first project is a card that I made with a kaleidoscope in mind.
You know the little toys we had as kids that you turned and they made pretty colorful designs.
It is a spinner card and when you rotate the wheel the beads spin inside the window.
The colors I used are Old Olive, Pumpkin Pie and Ballet Blue along with white and black. These are the large beads from the Bead Duos and I happened to have blue and orange ones so I was pretty much pointed in that color direction. The main stamp set here is of course the Circle Circus stamp set. Other sets that I used to make this into a birthday card are the Family Phrases stamp set and on the inside I used the Birthday Wish stamp.
Visit my blog next week to see a tutorial on how to make the window with the beads and the spinner for the card. EDITED TO ADD: Instructions were posted on 7/29/2009.
 My second project is another card that is a totally different style of card. This one has a more elegant look to it and while I used it as a Thank You card I think it could even be a wedding/anniversary type card too.
This is what I call a Tile card because it is supposed to look like tiles. The colors I used are the new Soft Suede, More Mustard and Very Vanilla. I added the Soft Suede Polka Dot ribbon which I love. One side has the polka dots but the other is plain so it is like getting two ribbons for the price of one. The main stamp set is Circle Circus but I used only one image from the set. The greeting is the Elegant Thank You stamp.
I will have instructions on creating this card posted after I return from the Stampin’ Up! convention which is Aug. 5 – 8.
My third project is my favorite and I have had such a hard time keeping it under wraps. I was ready to share as soon as I finished it!
 It is a 2-page 12×12 scrapbook layout with the title “Hangin’ Out Together”.
While on the last card I used only one image from the Circle Circus stamp set this time I think I used them all! And lots of circle punches too.
The colors are so fun – Chocolate Chip, Tempting Turquoise, Old Olive and Pumpkin Pie. I like layouts with lots of pictures and you could even take the large Old Olive mats and add collages of smaller pictures. You can use one of the Pumpkin Pie mats as a journaling block too.
The various circles are layered some with and some without Stampin’ Dimensionals. Some have brads in the centers too – Silver, Old Olive, Tempting Turquoise and even a Filgree flower brad.
We will be making this fun layout in my scrapbook class on July 29th.
I have the perfect pictures of this page of my son, Tyler, and my niece, Emily, together on the beach one night just hangin’ out. I have to get the pictures printed and will post these pages again with pictures later.
And one more card…. I loved the scrapbook page so much I wanted to use the same idea to create a birthday card. The colors in this picture are off – it is the same color combination that is on the scrapbook page, not sure what happened to my picture this time. I have decided to remove the picture of the card so I can retake it – it looked worse this morning than I though it did yesterday – totally the wrong colors. I’ll repost after the tour so come back and visit again or sign up to receive email updates and you will know when I make updates. Thanks so much.
I hope that you like my samples and that you will bookmark my blog or sign up for email updates (see my side bar) and visit me again.
I’ll be giving away some Blog Candy after the tour is over. Here are the details:
I will have two Blog Candy prizes – one for blog tour visitors that are Stampin’ Up! customers (and live in the US) and one for Stampin’ Up! demonstrators.
For both prizes you need to do two things:
1. leave a comment on this blog post with your name and if you are demonstrator or customer and which project is your favorite.
2. send me an email to [email protected] with the same information including your contact information so I can get your prize to you.
Blog Candy prize for Customers:
A Designer Paper Sampler – it will include one 6″x6″ piece of each double-sided print in the 12 new Designer Papers introduced in this catalog (not including the In-Color patterns).
Blog Candy prize for Stampin’ Up! Demonstrators:
One of my Class To Go Kit Tutorials – instructions only in a pdf file – you can choose one from a prior month (some products may be retired but you can always substitute current product and stamp sets) or choose my August tutorial which will be released after the tour.
And don’t forget to visit the main Royal Blog Tour Blog (that should have been where you started – the crown at the top of this post will take you there) for a chance to win a BIG SHOT die cut machine! That’ very exciting so be sure to read the rules on how to enter.
Good luck! Thanks for stopping by!
Jul 25, 2009 | Chipboard, class, Designer Series Paper, Embellishments, Embossing, SU Ribbon, Upsy Daisy |
I made the cutest little desk frame out of two 4×4 coasters the other day. This is one of the projects we made/are making in my class this month. 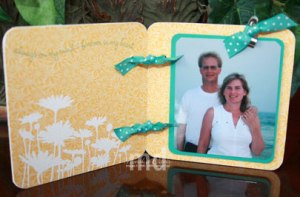
The paper is from the Pink Flamingo paper and I used the Summer Sun print with the flowers. Each piece is cut to 4×4 and I used an Anywhere Glue stick to adhere the paper to the coasters. I trimmed the edges with my paper snips. The reason I don’t use my corner rounder punch is because it is not the same corner as the coasters so it is easier to just use paper snips. Then I like to sand the edges with a sanding block. We embossed on the designer paper using the Upsy Daisy stamp set – stamp in VersaMark ink and use white embossing powder. Then heat set the embossing powder. I did one before applying the paper to the coaster and I did another one after applying the paper to the coaster. I felt like the heat tool caused the coaster to warp a little but after lying flat over night it wasn’t noticeable any more so it might not really make a difference. I put the two coaster together and marked and punched the holes using my Crop-A-Dile. Then tied the Bermuda Bay ribbon through to hold the two coaster together. I stamped “always on my mind, forever in my heart” from the Stem Sayings stamp set using the Bermuda Bay ink above my flowers. The Bermuda Bay card stock is corner rounded with the corner punch and stuck on the right side with Stampin’ Dimensionals. My pictures is actually just held on by the little clip from the Clips Assortment. I tied a piece of the Bermuda Bay Polka Dot Ribbon on the clip.
The picture is Greg and I at the beach earlier this month. You might remember me telling you about the infection Greg had in his lymph nodes/neck area. If you look carefully at the picture you can see that on the left side of the picture his neck is swollen and the other side his neck is normal. In this picture he was already getting better (it was worse the week before) and now it is almost completely gone. I think he has one more follow up with the doctor in a couple of weeks.
Don’t forget to join me for the ROYAL BLOG TOUR that starts at midnight!
Have a great day!
Jul 24, 2009 | Blog Candy, Blog Tour |
Hi Everyone!
The Late Night Stampers Royal Blog Tour is almost here. I hope you will be able to join me. The Tour will last for three days – July 26th, 27th, and 28th. There are four different tour lines that you can follow. Each tour will have 20 different blogs connected together through links at the end of each Royal Blog Tour post. Each blog on one tour will feature a different stamp set. If you get on another tour you may see repeats of stamp sets but since it is a different demonstrator the projects will be different. You can start all four tours from the main Royal Blog Tour blog – so be sure to visit that one – click on the princess crown on my blog. There are interviews with many of the demonstrators that will be on the tour – you can read about them and see some samples of their work.
Some blogs will offer blog candy and I will be one of those offering blog candy. I will have two different drawings – one for Stampin’ Up! demonstrators and one for Stampin’ Up! customers. You’ll need to follow the instructions in my tour post to be entered in the drawing – be sure to complete both steps so you will be eligible. I’ll draw the winners after the tour is over. I hope you will come on the tour!
Here are some little peeks at my projects!


Jul 23, 2009 | Embellishments, In Colors, SU Ribbon |

The July Ribbon Share is going to be the new In-Color Polka Dot Ribbon on page 182 in the new catalog. There are 6 new In-Colors (Bermuda Bay, Crushed Curry, Dusty Durango, Melon Mambo, Rich Razzleberry, and Soft Suede) and you will receive 3 yards of each color. The ribbon is ½” Grosgrain with white polka-dots on one side and solid on the reverse side. These are going to be fun to use!
This is a great way to get some of each of the ribbons without having to buy the full roll of each. Each Ribbon Share will be a group of 5 people. Group 1 is full so I am now filling a second group. Full rolls of ribbon are 15 yards. You’ll be seeing this fun ribbon in lots of my projects.
The Ribbon Share will be $15. If you want it mailed to you please add $2 for shipping. Payment due to me by July 29th.
$15 for July Ribbon Share
$15 + $2 for July Ribbon Share shipped to you
Please contact me by email to arrange payment – [email protected]
Have a great day!









