Aug 2, 2009 | Uncategorized |
It’s a little bit early for Christmas but here is one to share with you anyway. This was another swap card from the STARZ meeting – I think Joyce ade this one.
Season of Friendship is a set from the Holiday Mini catalog and I was so glad to see it in the new 2009-2010 catalog. It is another one of my favorites.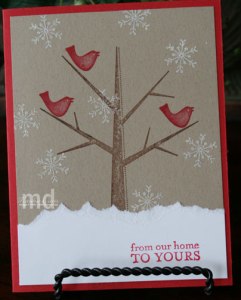
List of Supplies:
- Real Red card stock
- Kraft card stock
- Whisper White card stock
- Real Red classic ink
- Chocolate Chip classic ink
- Iridescent Ice Embossing Powder
- Season of Friendship stamp set
The edge of the white card stock is torn so it looks like a snow covered hill.
This would make a quick and simple holiday card.
Have a great day!

Jul 31, 2009 | Big Shot, Great Friend, In Colors, Stampin' Up! Events, Stamps |
Here is another STARZ swap card. This one was designed by Michelle Scileppi. Another set that I really like – it must be the butterflies!
Here is a list of supplies:
- Dusty Durango card stock
- Soft Suede card stock
- Certainly Celery card stock
- Whisper White card stock
- Vellum card stock
- Great Friend stamp set
- Soft Suede classic ink
- Certainly Celery classic ink
- Whisper White craft ink
- White Gel Pen
- Distresser tool
- Big Shot Die Cut machine
- SU Little Leaves Sizzlet Die
- 1-3/4″ circle punch
But this card has a surprise – it is a pop-up on the inside….  how fun is that.
If you remember last week I posted a tennis card and this is the card I modeled it after.
We saw this kind of pop-up card at convention last year but I hadn’t tried to make one until I saw Michelle’s card. Sometimes it is better to have an actual example in hand to work from that just a picture. That’s why swap cards are so great. I’m headed to convention next week and will be back with lots of swap cards. I’m participating in a Shoebox swap on Tuesday night – I’ll tell you more about that later. We have a STARZ meeting at convention and we’ll do a swap there as well as make some projects that various demos are sharing. And then we’ll have Make-n-Takes during convention and general swapping with any demos we run into along the way – at the airport, at the hotel, walking the around Salt Lake City, in between classes, standing in line, …… you get the picture.
Have a great weekend!
Jul 30, 2009 | Baroque Motifs, Big Shot, In Colors, Stamps, Thank You Kindly |
Earlier this month I went to my upline’s group meeting and we had a card swap. Over the next few days I’ll be sharing some of those swap cards with you. Here is the first one:
 This card was designed by Cindy Schuster. This card has a lot of elements that I love – the Baroque Motif swirl, the die cut butterfly, and right now my favorite of the new In-Colors is Rich Razzleberry and Soft Suede.
Supplies used:
- Rich Razzleberry card stock
- Soft Suede card stock
- Old Olive card stock
- Whisper White card stock
- Medium Window Sheet
- Soft Suede classic ink
- Old Olive classic ink
- Baroque Motif stamp set
- Thank You Kindly stamp set
- Scallop Edge Punch
- Big Shot Die Cut Machine
- SU Beautiful Butterflies die
- SU Texture Plates Backgrounds 1
- Vintage Brads
- Stampin’ Dimensionals
I love this card and think Cindy did a great job. You can visit her blog at http://nutmegcreations.blogspot.com/
Have a great weekend. We are headed to the State USTA junior tennis finals.
Jul 30, 2009 | Blog Candy, Blog Tour, Designer Series Paper |
I was totally thrilled with all the nice comments I received during the blog tour. I hope everyone will return and leave me comments again – it makes me feel good!
I had two drawings for Blog Candy and the winners are:
Customer Drawing – Designer Paper Share of the new papers in the catalog:
Winner is: Jessica Gosline from Seattle, WA
Jessica G. Says: July 28, 2009 at 6:46 pm
Loving the scrapbook pages! (customer)
Demo Drawing – one of my class tutorials:
Winner is: Tracey Clay from Deland, FL
Tracey Says: July 26, 2009 at 9:18 pm e
I like the elegant thank you card the best. I am a newbie demo and I am enjoying the blog tour. THANKS FOR SHARING
****************
I will be sending both winners an email to work out the details. Thank you again to everyone that participated in my blog candy drawing.
I hope you enjoyed the tour. My scrapbook class enjoyed the scrapbook pages – we made them tonight.
I’ll have more details about the tile card after convention – if you are part of Wendy Randall’s STARZ group – this is my project for the group meeting on Wednesday night at convention.
Have a great day!
Jul 29, 2009 | Blog Tour, Circle Circus, Circle Scissor Plus, Shaker Card, Spinner Card, Stamps |
As promised here is my tutorial for the Kaleidoscope card. The pictures weren’t sticking in the positions that I wanted so I have added captions on them in case they get in a wacky order when they display on your computer. You can click on the pictures to see a larger version. At the end is a pdf file which you should be able to download and it might be easier to follow than the actual post on the computer.

This is my Kaleidoscope card made with the Circle Circus stamp set featured in the July 2009 Royal Blog Tour
Basic Supply List:
- Card stock – Old Olive, Pumpkin Pie, Ballet Blue, Whisper White
- Window Sheets – Medium
- Ribbon – Old Olive wide Grosgrain
- Punches: 1-3/4” Circle, Word Window
- Classic Ink – Pumpkin Pie, Ballet Blue, Basic Black
- VersaMark Ink
- Black Embossing Powder
- Stampin’ Write Markers – Pumpkin Pie, Ballet Blue
- Bead Duos – Blue, Orange
- Bone Folder
- Paper Cutter with Scoring Blade
- Jumbo Brad
- Circle Circus stamp set including the extra rubber after mounting your stamps
- Family Phrases stamp set
- Circle Scissor Plus and Glass Mat
- Adhesive – Snail, Crystal Effects and Stampin’ Dimensionals
Card Instructions
Steps to complete the shaker box:
- Stamp the image in VersaMark ink on Whisper White card stock, cover with black embossing powder and heat set with the heat tool. Color image with Stampin’ Write Markers.
- Use the left over rubber from the die-cut stamp set. And cut away the outline of one that fits over your image. Trim away the corners. I use my Craft & Rubber scissors.
- Remove the backing from the rubber and adhere over your image. Then peel up the rubber leaving only the gray foam attached to your stamped image.
- Add some of the large beads from the Bead Duos to the center of the foam, covering about 1/3 of the image. I used Orange and Blue Bead Duos.
- Cover the foam with a piece of clear Window Sheet. Trim everything as needed.
- To cover the front I cut a circle out of Pumpkin Pie using the Circle Scissor Plus – cut it at 2-3/4”. Punch a hole in the center with the 1-3/4” circle punch.
- Cut a circle out of Ballet Blue using the Circle Scissor Plus – cut it at 2-1/2”. Punch a hole in the center with the 1-3/4” circle punch. I stamped on this piece with Ballet Blue ink using the dotted circle image.
- Layer the Ballet Blue circle on top of the Pumpkin Pie circle and then attach that to the top of the shaker box over the window sheet covering up the gray foam.

Shaker Box - Step 1

Shaker Box - Step 3

Shaker Box - Step 2

Shaker Box - Step 6- 8

Shaker Box - Step 4

Shaker Card - Step 5
Steps to complete the spinner:
- Create the base of the card. Mine is Old Olive card stock cut at 4-1/4” x 11” and scored at 5-1/2”. Fold this in half.
- Add the front layers to the card. I have a Pumpkin Pie layer that is 5” x 3-3/4” and a Ballet Blue layer that is 4-3/4” x 3-1/2”. The Ballet Blue layer is stamped with the dotted circle image in Pumpkin Pie ink.
- To the back of the shaker box add a 5/8” Jumbo Brad. I used a small dab of Crystal Effects so that it would not come off.

Spinner - Step 3
- Position the shaker box on the front of the card so that it is near the edge where you can add the punch out to create the notch for spinning it. Punch a hole for the brad. And then punch your notch through the layers.
- Cut a 3” circle using the Circle Scissor Plus. I used Pumpkin Pie card stock. Punch a hole in the center. Place this on the inside of the card. Feed the brad on the back of the shaker box through the front of the card and through this circle on the inside of the card. Flatten out the brad on the inside and then use a piece of plain tape to hold the brad in place on the circle. If you don’t do this then the card stock will turn around the brad rather than turning the brad which turns the shaker box. I hope that makes sense.

Spinner - Step 4

Spinner - Step 5

Spinner - Step 5
(Excuse the mess in the Step 5 picture, if you don’t pull your tape up multiple time your card stock won’t look like this – 🙂
Steps to complete the card:
- In order to make the inside look nice and cover the workings of the spinner I cut another piece of Old Olive card stock – 5-1/2” x 4-1/4” and punched a notch in it to match. Adhere this to the inside front of the card making sure your adhesive doesn’t interfere with the circle.
- Also punch a notch out of the back of the card. And I stamped a greeting on the inside.
- On the front of the card I tied a piece of Old Olive wide grosgrain ribbon around the left side of the card. Stamped ‘happy birthday’ on Whisper White card stock and punched it out with the Word Window punched. I pulled the edges across my Pumpkin Pie ink pad and attached with Stampin’ Dimensionals to the front of the card.

Complete Card - Step 1

Click Here to download a pdf file.
Have fun!









