May 18, 2015 | Big Shot, Cards, Retired List, Stamper's Club, Thinlits, Tutorial |
It’s true right – you can never have too much happy!

I’d love to be able to make everyone happy all the time. This past weekend was my Stamp, Scrap & Create retreat at my house and it seemed to me everyone was very happy for the whole weekend. We had so much fun creating and getting to know each other better. I loved having everyone here. There were 13 of us this time – a full house! We had a birthday theme for the retreat and everything was bright and colorful – a rainbow of goodie bags and balloons, bright Make&Take projects, good food, and birthday presents for everyone. I can’t wait to do it again.
With happy and rainbow and bright colors on my mind I thought I would share this fun happy card that my stamper’s club made earlier this month. It’s not as hard as it looks and I even wrote a step-by-step tutorial for how I made it. Look for it at the end of my post.

(I actually wrote a post for this card over the weekend but couldn’t find it in my drafts folder in order to finish and post it so I had to start over.)
To make this card you need the Bright Collection of ink pads and a bunch of the sponge daubers to make the rainbow – Real Red, Tangerine Tango, Pumpkin Pie, Daffodil Delight, Old Olive, Bermuda Bay, Tempting Turquoise, Pacific Point, Rich Razzleberry, and Melon Mambo. The scallops are from the Striped Scallops Thinlits die – I cut it out in black. I did use the Transfer Adhesive Sheets – they are on the retired list! So get them now they make this project so quick and easy and my tutorial shows you how I used them.
Other retiring products on this card are the Label Collection Framelits, the Festive Paper piercing pack, the Yippee Skippy stamp set and the Painted Petals cotton twine is in the Occasions catalog which is ending June 2nd also.
rainbow card tutorial <==== Get the tutorial
Enjoy! Thanks for stopping by today.

Mar 2, 2015 | Occasions Catalog 2015, Tutorial |
Have I told you that Sheltering Tree is my favorite stamp set in the Occasions Catalog? Yes it is. What about you – do you have a favorite set? There are many that I like and many that I bought but if I had to pick just one that would be it. At leadership I participated in several swaps including 2 card swaps and this was the card I made for one of them.
 And if you asked me what my new favorite accessory was from the Occasions Catalog it would probably be the Cotton Twine – it is so soft! I just want to touch it and hold it! I used the Soft Sky Twine on this card.
I call it a window card because I cut an Oval window out of the front layer of the card and the tree is stamped on a Whisper White layer that peeks through underneath. I used Early Espresso, Soft Sky and Crumb Cake.
I do have just a little secret to tell about this card – I made about 25 or so of them and about the time I got to the very last one and finished stamping the Crumb Cake ground piece on each one – that was when I realized I mounted my stamp backwards on my block! Oops – no wonder my image wasn’t looking the same as the one in the catalog I was using the back of the stamp! But I decided to leave them like they were since I was finished stamping. But it made me think if I had a reason to have a “shadow” of the image I just stamped behind it – I could just turn over and stamp the back of the stamp in a really light shade of ink over the correct image. What do you think? An idea to try out maybe.
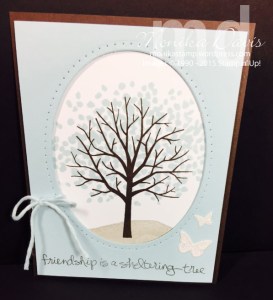 I stepped up this card by adding the piercing around the oval and then the two little butterflies cut from Dazzling Details Glimmer paper. I hope you love this card as much as I do.
If you are interested I have the Stamps In the Mail class featuring this stamp set and a Desktop Calendar Tutorial available and if you have the stamp set and want to order just the tutorial you can do that too – visit my Tutorials page – there is a link at the top of my blog.
Thanks for stopping by – have a great day!

Mar 5, 2014 | Birthday, Designer Series Paper, Envelope Punch Board, Mini Scrapbook, Tutorial |
I thought I would do something fun on my blog for today to celebrate my birthday. I’d like for you to leave me a comment and let me know which project/blog post has been your favorite on my blog. I’ll pick a winner to receive a free tutorial of the project I’m sharing with you today. And if you place a Stampin’ Up! order in my online store I’ll send you the tutorial for free. You can shop my store here. You’ll have through Friday to leave your comment and/or place an order. I’ll send the tutorials out via email this weekend.
This is one of my favorite projects that I’ve made in the last few months.

It is so pretty in person. The combination of Basic Black and Very Vanilla from the Modern Medley Designer Series Paper along with the GOLD accents and the pop of color from the Coastal Cabana it’s just beautiful!
There are touches of gold and the natural elements from the Linen Thread and Cotton Ribbon are unique combination.
 The book has multiple pages made out of coasters. Plus a fun pocket page in the center.

The tutorial has all the details to make this project including lots of photos. I hope you’ll leave me some love today!

Dec 21, 2012 | Big Shot, Christmas, class, Punch Art, Tags, Tutorial |
Look at these CUTE Holiday Tags that I made for my Bags & Tags class last week!

I saw on Pinterest a photo of some stickers and thought I bet I can make those with my punches and dies and they would be so super cute. I stayed up late one night finishing these cute things because once I got started I was so excited with how they were turning out. I have one more that I want to create but haven’t had a chance to sit down yet to do it. And guess what I created a tutorial to share with everyone! Merry Christmas from me to you! The link will be at the bottom of the post. Here are some close up pictures for each tags.

Mr. Snowman

Cute Penguin

Rudolph the Reindeer

Santa
Aren’t they the cutest tags? I loved them and so did all the girls that came to class last week.
CLICK HERE if you would like the tutorial on how to make these cute tags.
Merry Christmas!

Aug 7, 2012 | Create with Connie & Mary, Tutorial |
Gosh what happened to Monday (and Saturday and Sunday)? I was busy with family things and the days just quickly disappeared. Kyle and Tyler came home Saturday night from California. Kyle is finished with his summer internship. He came home with a cough and I asked him if he was sick – “no”. How long have you had the cough – “probably a month”. So I made a doctor appointment for Monday and figured he could have walking pneumonia – well yes he does have a mild case. Now he is on meds and has a recheck next week before he heads back to college. See mom’s do know!
So I have had some questions about some of my posts last week and I’ll try to hopefully answer them all –
The ribbon shelves – I got them from Ikea – they are called Ribba picture shelves – for my ribbon wall I used two long ones and one short one. I have some more that I plan to put up over the window to use for display of projects and cards.
The little basket – here is how I made it – start with a piece of card stock 6″ x 6″. First score like a tic tac toe board – so 2″ on all the sides. Now in the 4 corners on opposite sides score every half inch. On the same sides mark the center square in the center to cut a triangle – from the center mark to the inside cross point of the tic tac toe. You are going to cut between the 1/2 inch strips on the corners and cut to create triangles on the two centers (all on the same side – and do two opposite sides). Then you cross over the strips over the triangles and attach with a brad. Add a handle.
Here are some pictures that hopefully clear up the description I just gave.

basket scoring guide

basket cutting guide

assembling the side of the basket
The basket idea was shared by Fran Kennedy at my demo meeting and she got the idea from another demonstrator. Here is my post for the finished and decorated basket – click here. It was my Create with Connie & Mary project for last weeks Thursday challenge.
You should be able to make a bigger basket by starting with a bigger square.
Where did I stay at convention? I stayed at the Shilo Inn the past few years. But have a reservation next year at the Raddisson – the Shilo was full already.
And in case you are wondering I am going to the Chattanooga Regional in September. Registration is open for demonstrators and guests.
If you have other questions let me know – leave a comment on my post.
Sep 11, 2011 | Big Shot, Halloween, Stamper's Club, Tutorial |
What do you get when you cross a mini milk carton idea from the Stampin’ Up! Convention with a bat idea from Shelli Gardner at a Stampin’ Up! Regional?
 Vampire Bat Milk Carton Boxes!
Aren’t they fun?
We made these at my Stamper’s Club September meeting and my PAWS Downline meeting this weekend. Now do you want to know how to make one? Well you are in luck because I’m going to tell you. I’m writing a tutorial and will attach here as a pdf file for you to download.
Stampin’ Up! Supplies:
Stamps: Wicked Cool
Ink: Basic Black
Card Stock: Basic Black, Daffodil Delight, Pumpkin Pie, Whisper White
Accessories: Big Shot Die-Cut Machine, Mini Milk Carton Bigz Die, Perfect Pennants Bigz Die, Spider Web Embossing Folder, 1-1/4” Circle Punch, ½” Circle Punch, Bitty Shapes Punch Pack Circle, Scallop Oval Punch, Large Oval Punch, Two-Step Bird Punch, Brights Brads, Crop-a-Dile, Basic Black 1/8” Taffeta Ribbon, White Gel pen, Paper Piercer, Mat Pack, Illuminate Top Coat Smooch Pearlized Accent Ink, Stampin’ Sponge, Sticky Strip
CLICK HERE to download the tutorial on how to make these. It also includes the instruction for how to make the hexagon shaped milk carton box with pictures of how to assemble the bottom in case you just want that part on not the bat in particular. Enjoy!


