Sep 16, 2013 | Cards, Designer Series Paper, Washi Tape |
What do you get when you combine the Bitty Butterfly punch, a Doily and some Washi Tape? A really cute card of course!
 This cute card was part of a set and a cute little box (I’ll show the rest later – still need pictures of those) that we made over the summer. It was a project that my friend Cindy created for our retreat just before convention. I made this version for a some of my classes here at home. I used a different stamp set for the greeting (I didn’t have the one Cindy used). And I believe Cindy use card stock for the little butterfly and I used designer paper. Here are some details on how to put this card together.
- Punch a strip of Daffodil Delight card stock with the Scallop Border punch. Attach to a Whisper White card stock layer.
- Attach a piece of Designer Series paper – this one is from the Gingham Garden collection
- Attach the paper doily
- Add a piece of the Gingham Garden Washi tape (the floral pattern) – over the doily along the top of the deisgner paper. Trim at the edges of the Whisper White card stock.
- Attach the white later to a Melon Mambo card base.
- Create tag – stamp greeting and notch the ends. Add Baker’s Twine to the end and tie in a bow. Attach to the front of the card with Stampin’ Dimensionals
- punch butterfly using the Bitty Butterfly punch (it’s part of the bundle special this month) add to card front
- finish with the Rhinestones
I love that all of the Stampin’ Up! products coordinate together so well – the Gingham Garden collection includes the Designer paper and the Washi tape – it makes it easy to use together on a project.
Enjoy the rest of your day!

Sep 9, 2013 | Big Shot, Designer Series Paper, Mini Scrapbook, Stamper's Club |
Prior to attending convention I went to a retreat at my upline’s house in Utah. Wendy and her husband and family are always the best hosts. The girls stamp and craft and Ted cooks and serves us – it is so nice to be pampered this way! Everyone that attends the retreat brings a WOW project to share with everyone. The project that Wendy shared with us was a fun mini scrapbook inside one of our Clear Stamp set cases. I created an alternate version of this project for my stamp clubs in August.

Some of the main products used for this mini scrapbook
- I am Me Designer Series paper
- Around the World stamp set
- Happy Day stamp set
- Square Framelits dies to create Polaroid style photo frames
- Epic Day Washi Tape

 I like that the scrapbook is inside the clear case because you can close it up and stick it in your purse or bag and not worry about any of the pages getting messed up.
Thanks for stopping by!
Aug 23, 2013 | Designer Series Paper, Embellishments, Retired List, SU Buttons, SU Ribbon |
Saturday August 24t- 12 noon – 6:00 pm.
Brand NEW special event!!
Buy One Get ONE FREE! Sale!!!
First ever BOGO sale.
Whatever you purchase at my retired sale you will get EQUAL value for FREE from the Stampin’ Up! Annual catalog and/or Holiday catalog!
I have stamp sets, designer paper, ribbons, buttons, brads and other embellishments, and lots more. All priced and ready to sell AND then you get to have equal dollars of NEW product for Free!!
Yep…. it’s really true! What an amazing deal! Bring a friend, or 5…. everyone is welcome!
Join me on Saturday, August 24th. You have one day to shop! Anytime from 12:00 noon to 6:00 pm on August 24th.
Please park along the street – not on the grass or in the driveway (I have to keep Greg happy).

buttons, brads, and more

card stock, ink pads, refills, markers

Big Shot dies, punches

Holiday stamps

designer paper, scrapbook and card kits, chipboard

lots of ribbon

lots of stamp sets

rainbow ribbon
COST: Free to stop & shop
or $10 for the Mini Class – if you want to make some cute projects.
I hope to see you on Saturday if you live near me.
Aug 16, 2013 | Designer Series Paper, Scrapbook Pages |

Today I’m going to share a traditional scrapbook layout. It’s a very spring looking layout. But outside today we are having a very fall like day. It’s August in Georgia and we didn’t even reach 70 degrees – the news said it has been a decade since we have had an August day with temperatures this low.
Now on to the scrapbook layout…..

This layout idea came from Wendy Randall – she made hers last spring uses papers and embellishments from the Stampin’ Up! spring catalog. I changed it to use the Epic Day This & That Designer paper – it was a great pack of paper to use for the layout since it had the greens and blues in it plus some neutrals – Crumb Cake & Basic Gray and a pop of color with the Daffodil Delight. All of these were perfect colors to use with the For the Birds stamp set.
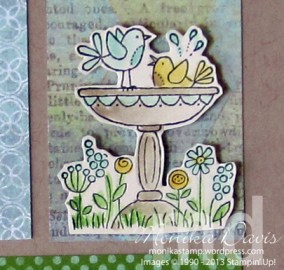
The images from the For the Birds stamp set were stamped with Black Stazon ink and then water-colored with an aqua-painter and the ink colors. Then each image was cut out. I didn’t use the words except for one phrase for the bottom of the layout.
 The layout is all ready for photos. I hope you like it!
I think I may make some cards with this stamp set and colors – I really like the combination.
You can shop online here at my website Online Store.
Upcoming Events you don’t want to miss:
Saturday August 24th – Buy One Get One free Sale & Mini Class
Wednesday August 28th – Card Maker’s class
Friday August 30th – Wow Scrapbook class
September 27th – 29th – Stamp, Scrap & Create Retreat

Jul 30, 2013 | Designer Series Paper, Embellishments, Stampin' Up! Convention, tools |
At the Stampin’ Up! Convention there are always lots of display boards. I think this year there were more than ever before. So many that I didn’t even have time to look at most of them. Part of the displays include Product Display Boards – these always showcase products from the catalog in a fun way – here are some from this year –
 Accessories – including Designer Series paper, Ribbons, Candy Dots, buttons and more.
 Color Coordination – this is one of the best things about Stampin’ Up! products – the color coordination! And look how pretty when they are displayed on a board like this.
 Kits and This & That – fun new product lines in the catalog.
 Stamps – new stamp sets are in every catalog. You can choose wood mount or clear mount plus we now have the photopolymer sets too. And the new stamp cases for the wood mount sets are awesome! I have been adding a package or two to every order so I can move my existing sets from the old boxes to the new ones.
 Tools – lots of tools and the newest one is the Magnetic Platform for the Big Shot. It is so popular that what Stampin’ Up! predicted would be a 13 week supply sold out in only 3 weeks!! So if you are wondering why you don’t have yours or why you can’t order it right now that is the reason. They are filling all the backs orders as they get in a new supply and plan to be caught up hopefully in a month or so. I’m thinking wow – I wonder if it will be the #1 selling item for this year?
And now for a NEW PRODUCT ANNOUNCEMENT!
Yes this was a surprise new product that they showed us at convention and I can’t wait to get my hands on it. It is an Envelope Punch Board – I can’t show you what it looks like yet – but this is what you can make.
66 Different Sizes of Envelopes!
 I don’t know the exact date yet but when it is available I’ll let you know.
Have a great day!
Jul 23, 2013 | Big Shot, Cards, Designer Series Paper, Paper Pumpkin, Stampin' Up! Convention |
I’m home – actually got home Sunday evening. After a full week of creative fun with friends from all over the country my body is exhausted and my brain is full of new inspiration and ideas. I spent Monday doing not much – it was actually my anniversary – 24 years – and I made an anniversary card for Greg – I really love how it turned out. He brought roses home for me – just not because he remembered our anniversary 🙁 – but just because he loves me :). We went out to a nice dinner and that was all we did for our anniversary. Now to plan the 25th and a trip to Alaska – that is the plan anyway – now that I know when Convention is – well at least what week it will be – I can plan that trip for next summer. Look at the beautiful roses –

And here is the Anniversary Card that I made for Greg –

Here are some quick notes about this card –
- Cherry Cobbler for the card base
- A piece of Marina Mist Designer paper from the Polka Dot Parade pack (don’t forget there is sale this month on designer paper)
- The arrow strip is from the Modern Medley Designer Paper pack – I cut out just a strip of the arrows and then colored in between the arrows with Stampin’ Write Markers – Marina Mist and Cherry Cobbler
- A strip of Silver Glimmer paper
- A circle of Very Vanilla punched with the 2-1/2″ Circle punch, stamped and pierced – first stamp “Love you” from Seasonal Sayings stamp set in Marina Mist on Very Vanilla card stock – punch out; stamp again in Cherry Cobbler and cut out the “you” into a banner; and punch out the little heart with the little circle in the Cupcake Builder punch; use the Essentials Paper Piercing Pack, Pierce Mat, and Paper Piercing tool to pierce the circle.
- Stamp “Seriously” in Cherry Cobbler ink on Very Vanilla card stock – the stamp is from one of the monthly Paper Pumpkin kits (there are some great stamps in these kits and a sign up special right now too – ask me about it); cut out with the Chalk Talk Framelit label and the Big Shot – line up on one side – cut and then line up the other side to make the shorter label when you cut a second time.
- Attach everything to the card base – designer papers, glitter paper – flat with adhesive, the circle with dimensionals and the punched/cut pieces with dimensionals
- Finish the card by adding the little heart clip (or an arrow which is current) tied with some Cherry Cobbler Baker’s Twine.
Greg didn’t remember it was our anniversary until he read the card which says – happy anniversary on the inside – but he did bring me flowers.
Happy Stamping! I’ll be sharing convention pictures and more so be sure to come back again!
 This cute card was part of a set and a cute little box (I’ll show the rest later – still need pictures of those) that we made over the summer. It was a project that my friend Cindy created for our retreat just before convention. I made this version for a some of my classes here at home. I used a different stamp set for the greeting (I didn’t have the one Cindy used). And I believe Cindy use card stock for the little butterfly and I used designer paper. Here are some details on how to put this card together.


