Do you need something cute for your Thanksgiving dinner table? This little guy is going to be the perfect solution. Use him at each place setting on the table. If you need to assign seats then put a name where I stamped the “Happy Thanksgiving”.
This was a really fun project that my Stamper’s club got to make this month at our meeting. And today I shared it on my weekly FB Live. I’ll be uploading it to Youtube as well – and then adding that link here too.
Make these in a variety of patterns from the Plaid Tidings Designer Series paper. The paper is part of the sale this month so grab a pack now. You can get two turkey’s from each sheet of the 6×6 paper. Clip them on to a fork, or a napkin to dress up each place setting for Thanksgiving. If you need assigned seats – then write a name on the banner instead of stamping the Happy Thanksgiving.
Supply List
#153527 Plaid Tidings 6×6 Designer Series Paper
#155214 Banner Year Bundle = Banner Year stamp set + Banners Pick a Punch
Hello my friends. It’s time for our monthly A Paper Pumpkin Thing Blog Hop. A blog hop filled with alternate ideas using contents from the monthly kit. This month our kit is – Hello Pumpkin – a fun kit for all things fall!
This kit makes adorable treat holders that can be decorated for any fall occasion – Halloween, Thanksgiving, or just fall colors. There a ton of die cut pieces to mix and match. The cracker box style treats are double sided so you can choose to show the plaid or the striped side. I’m planning to make mine to use at Thanksgiving this year – I’ll put one on every spot at the table – fill them with something yummy – maybe caramels! Yum!
With my left over pieces I decided to make some fun fall note cards. The great thing about the Note Cards & Envelopes – is that they are quick because your card base is cut and scored. All you have to do is decorate the front and add your note on the inside.
Fall Note Cards – Cornucopia
The first thing I thought of was to take the witch hat and turn it into a cornucopia. To do that, flip it over and add lines to the back with a Cinnamon Cider Stampin’ Blends. Use both the dark and light blends and leave some open spots so it looks like a basket or straw and not solid. To give it some texture I ran it through the Stampin’ Cut & Emboss Machine with the Tasteful Textile 3D Embossing folder. To give it more of a cone look I trimmed off part of the brim.
I thought the scalloped edge of the cracker box would be a fun edge on my note card. To do that trim off 1/4″ from the front of the note card. Trim one end off the cracker box. Then glue that to the front lining the bottom edge up with the base of the card back. Stamp Give Thanks. Add flowers, leaves, curly bits, and a little bow to complete the look.
Supply List
The additional supplies that I added to complete this project were:
Card stock – Whisper White Note Cards & Envelopes
Paper Trimmer
Cinnamon Cider Stampin’ Blends
Paper Snips
Stampin’ Cut & Emboss Machine
Tasteful Textile 3D Embossing folder
Basic Black Stampin’ Write Marker
Fall Note Cards – Hello Tiles
The die cut tile pieces were pretty all on their own just added to the front of a note card. Stamp Hello across a strip of Whisper White card stock to add over the front. I actually cut the stamp apart so I could just use the Hello. When I want to use the full phrase I’ll just mount both pieces on the block together again. The coordinating colors of flowers were from the kit. This turned out to be such a clean and simple look.
Supply List
The additional supplies that I added to complete this project were:
Card stock – Whisper White Note Cards & Envelopes, Whisper White card stock
Basic Black Stampin’ Write Marker
Fall Note Cards – Hello Pumpkin
Trim down the center panel of the cracker box and use it as a layer on a card like I did for this third idea. It has the scored lines to give it just a little extra interest. This card is quick and easy to finish with the pumpkin element and a banner from the kit.
Supply List
The additional supplies that I added to complete this project were:
Card stock – Whisper White Note Cards & Envelopes
I hope you like this trio of note cards. Adding a pack of Whisper White Note cards & envelopes makes it easy to get creative with the left over elements and pieces from your monthly kit. Leave me a comment and let me know your thoughts.
The Blog Hop Continues
To continue through go and click on the next blog in the list below. If you are reading this in an email you may need to click on the title and visit my blog post online to see the full list of participants.
Don’t forget you have until the 10th of the month to subscribe to Paper Pumpkin and get that month’s kit.
Next month is a special global kit called Joy to the World. The Paper Pumpkin team at Stampin’ Up! has even created a special FB group just for this kit. It’s meant for people to connect and spread joy around the world by finding pen pals to write too. There was a flyer included in the September kit with more info
Sign up by the 10th of the month to get the next kit – go here.
Are you ready for some alternate ideas with the August Paper Pumpkin Kit? It’s time for our monthly A Paper Pumpkin Thing Blog Hop. A blog hop filled with alternate ideas using contents from the monthly kit. This month our kit is – World’s Greatest. A kit with some fun cards to celebrate some everyday hero’s in our lives like teachers, coaches, kids and our friends.
This kit makes 3 different cards with fun matching envelopes – that’s always one of my favorites! One card style is a shaker card.
I decided to mix up the pieces and cut up the card bases for the two cards that were not the shaker card. By cutting each of those card bases into 4 pieces I can create 8 cards instead of just 2. Here are two new cards that I made.
Blue card
For this card I wanted a little bit more of a feminine feel to it. Cutting up the blue card base into four pieces allows me to make 4 new cards. Each piece is 2-3/4 x 4″. I added Thick White Whisper White card stock for a new card base. You’ll also want some more medium sized envelopes. The yellow water-colored rectangle was also cut in half and used on this card. I trimmed down one of the white rectangles to fit the words. For the little touch of ribbon use paper snips to cut a 3-1/2″ piece into small strips and then tie in a knot.
Supply List
The additional supplies that I added to complete this project were:
Card stock – Thick Whisper White
Whisper White envelopes
Paper Snips
Green card
For this second card I used the green card base and also cut it into 4 pieces. Trim one of the white rectangles to be 3/4″ wide and then I stamped the medal ribbon image twice so the end of it met in the middle – that part will be covered up. Use one of the vellum leaf pieces and cut it into two so one part can go on each side. To add a bit of contrast I did pull out a piece of Bumblebee card stock to layer behind that argyle piece.
Supply List
The additional supplies that I added to complete this project were:
Card stock – Thick Whisper White, Bumble Bee
Whisper White envelopes
Paper Snips
I hope you liked this alternate idea for the monthly Paper Pumpkin kit. Leave me a comment and let me know your thoughts.
The Blog Hop Continues
To continue through go and click on the next blog in the list below. If you are viewing this in an email click on the title to go to my blog and see the rest of the list to finish the hop. There are lots of creative ideas to see!
Don’t forget you have until the 10th of the month to subscribe to Paper Pumpkin and get that month’s kit.
Get ready for fall – choose Halloween or Thanksgiving or just general fall when putting together the September kit. Sign up by the 10th – go here.
Did you receive the happy yellow box from Paper Pumpkin this month? I sure hope you did because it was a bright happy box full of fun supplies to help you spread sunshine! And today is our monthly A Paper Pumpkin Thing Blog Hop. A blog hop filled with alternate ideas using contents from the monthly kit. This month our kit is – Box of Sunshine – a kit inspired by Stampin’ Up! CEO Sara Douglass.
If you didn’t already hear about the Box of Sunshine idea let me tell you about it. The box for this month’s kit is actually part of the project. There are extra stickers and a label in your kit that you can use to decorate the box once you’ve made all your cards. Then fill the box with yellow treats add one of your cards and send it to someone special. It will be a little bit of sunshine to brighten their day. I’ll be sending mine to my son Ryan and his girlfriend.
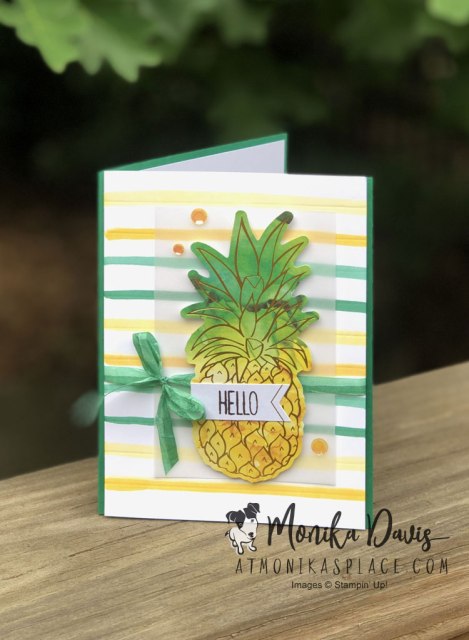
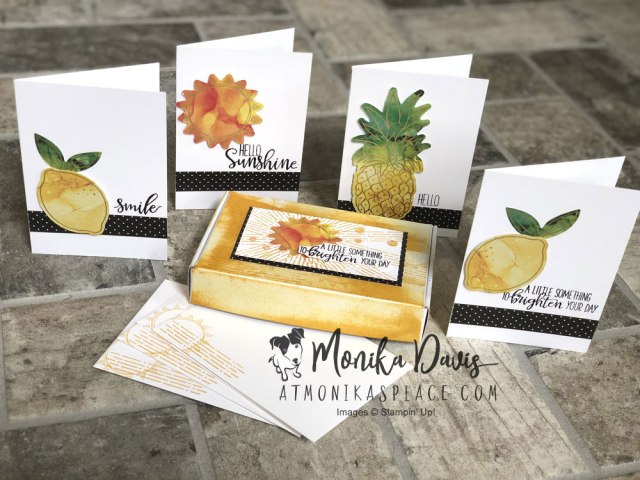
For my alternate idea this month I created a card using one of the extra pineapple die cut pieces. I used the same color palette of yellow and green and a fun background technique with Stampin’ Blends. And then my second idea uses a mini Paper Pumpkin box which perfectly fits a set of note cards. I decorated those with extra bits from the kit and created another little gift to brighten someones day.
Striped Pineapple Card
For this card I made a fun background piece to go behind the pineapple die cut. Use the Paper Trimmer to score the card stock at every 1/2″ – these are basically to create guidelines for drawing with the Stampin’ Blends. Use the Stampin’ Blends to add stripes. I also colored my White Crinkled Seam Binding to with the Stampin’ Blends to match. The card is finished with a piece of Vellum Card Stock, sequins from the kit and a piece of one of the labels.
Supply List
The additional supplies that I added to complete this project were:
We have a fun new product in the Annual catalog – mini Paper Pumpkin Boxes! And they are the perfect size to fit a set of Note Cards & Envelopes. So I used extra pieces from this months kit to decorate four note cards and envelopes to put inside my box. I decorated the outside of the mini paper pumpkin box first by swiping a Crushed Curry ink pad across all the sides and the top. Then added some stamping. I finished with some elements from the kit and some stamping.
Supply List
The additional supplies that I added to complete this project were:
Card stock – Whisper White
Whisper White Note cards & Envelopes
Mini Paper Pumpkin box
Crushed Curry ink
Paper Snips
Here are some more pictures of this project.
I hope you liked this alternate idea for the monthly Paper Pumpkin kit. Leave me a comment and let me know your thoughts.
The Blog Hop Continues
To continue through go and click on the next blog in the list below. If you are reading this in your email you will need to click on the title to get to my blog and see the rest of the links.
Don’t forget you have until the 10th of the month to subscribe to Paper Pumpkin and get that month’s kit.
Next month’s July kit will be a kit to celebrate the magic of summer nights. In this exclusive fun-filled kit, you’ll unbox enough supplies to create nine postcard-style cards, coordinating envelopes, and die-cut tealight bags. What’s even more spectacular about July’s kit is the add-on you can purchase along with it! The Summer Nights Add-On includes 24 card bases and envelopes in coordinating Summer Nights designs. Sign up by the 10th to get the July kit – go here. AND you can order the Add-on beginning July 1st! Just $10 for 24 card bases and envelopes – I think that is an amazing deal!
Since I can’t have in person classes right now I am offering a class kit ToGo this month featuring the brand new Ornate Garden Suite.
I’ve designed the cards so that you could easily use another stamp set in your collection but I’ll provide a list of items you will need to complete the cards exactly as I did. See below.
Class Kit ToGo options
Kits will includes supplies to make the 6 cards (2 each of 3 designs), along with the tutorial and a video plus a surprise from me. All the cut card stock, paper, envelopes, ribbon, gems and die cut, embossed and punched pieces will be included. You will need to stamp, color and assemble.
Class Kit – Porch Pickup $15 (if you are local to me)
Class Kit – By Mail option $20
Class Kit – free with orders over $40 (use host code)
Register by April 24th. Register Here ==> https://atmonikasplace.com/event-registration/
Kits will be mailed the following week and you’ll receive an email with the tutorial and video link.
I’ll add a post in the event with the flyer for the Ornate Garden Suite and a link to the Facebook Live video from 4/13/2020 where I showed the whole suite along with some additional cards.
Additional supplies you need to complete cards exactly as I did. Or substitute with items in your collection:
#149471 Ornate Thanks stamp set
#152572 Ornate Style stamp set
#148618 Itty Bitty Birthdays stamp set
#147114 Early Espresso ink pad
#144597 Old Olive Stampin’ Blends combo
#146875 Soft Suede Stampin’ Blends dark
#149557 So Saffron Stampin’ Blends combo
Adhesive of your choice
Hi! I am a Stampin’ Up! independent demonstrator in Milton, Georgia. I love being creative and want to share it with you! On my blog I will share creative ideas using Stampin’ Up! products and you’ll also hear about my family and my dogs.
I look forward to helping you get your creative juices flowing!
Click on the Shopping cart to visit my Online Store and order your Stampin' Up! Supplies any time. Earn Stampin' Rewards when you order reaches $20 - be sure to opt in to the rewards program on your account. Any questions click on the email me button above.
Current Catalogs
Join My Stampin’ Up! Team for $99
Join Paper Pumpkin – Your Creative Escape!
For New Subscribers -
Join by the 10th of the month to start your subscription this month.
Prepaid subscriptions now available!
The content in this blog is the sole responsibility of Monika Davis as an Independent Stampin’ Up! Demonstrator. The use of and content of classes, services or products offered is not endorsed by Stampin’ Up!