Well I’m really behind on sharing about the Spring 2017 Stamp, Scrap & Create Retreat. It was a few months ago and I didn’t share about it on my blog then but I’m going to do that now. And be sure to save the date for the Fall retreat – September 29-October 1. I held the retreat at a beautiful cabin in the North Georgia Mountains. I’m actually heading back up there later this month to host a Demonstrator Getaway Weekend. It is so much fun to getaway for the weekend and be creative with friends.
At the Spring Retreat we had Make&Take projects for everyone there. We had a project for Friday night and another one for Saturday.
For Friday night we stuck with a fairly simple project – a card and a little 3-D succulent.
These use products from the Oh So Succulent Suite from the Occasions Catalog. We used the Popcorn Box die and cut it shorter to create the container for the succulent. The card uses 4 x 5-1/4 piece of designer paper that is cut at a diagonal. You can mix and match the patterns from a pack of designer paper. Everyone at the retreat got a piece of all the different patterns in the pack.
On Saturday we had a bigger project and taught 5 different water coloring techniques. We used the Dragonfly Dreams stamp set and dies to create a set of 4 cards – each with a different technique and a card holder with a 5th technique.
Everyone also made a 3D project to match the cards using the Window Box Thinlits Dies. Since I prepped everything ahead I did a ton of Big Shot cutting for this one!
Inside the Window Box was a battery operated tea light – the back of the box opens up so you can turn on your light. We strung a wire through so you could hang it from a hook somewhere.
The projects turned out great and everyone enjoyed making them and learning the new techniques. I hope you can join me in the fall.
It’s Independence Day here in the United States. I wish you all a very happy 4th of July.
I have a little Red, White and Blue project for you.
I’ve used several of my favorite new products from Stampin’ Up!
Wood Words Bundle – includes the Wood Words stamp set and Wood Crate Framelits Dies
Wood Textures Designer Series Paper Stack
Dapper Denim Baker’s Twine
Colors are Real Red, Whisper White and Dapper Denim – the perfect red, white and blue for this project. Pick your favorite wood texture paper from the paper stack and cut the two pieces for your crate. I used Tear & Tape to assemble. Then I cut a piece of Real Red card stock to slip inside – its’ 3-1/4″ wide, 5″ long with a score line at 1-1/2″ on the long side. Fold and slide in so it covers the bottom of the crate for some added support and the panel in the back – oh and I stamped the flowers across the back.
I stamped stars and cut them out with the Framelits. Use the 1/16″ handheld punch for two of them. Fill a 3×6 cello bag with red, white and blue taffy and tie with the Baker’s Twine – attach a star to the end of the strings and then I also attached one to the front of the crate.
My Stamper’s Club got to make one at our last meeting. If you want to join my monthly club please contact me for more info. We meet in my classroom once a month.
One of my favorite items in the new Stampin’ Up! catalog is the A Little Wild stamp set. I just love the little elephant and I love that the animals have fronts and backs and the dies cut out both into a little tag. You can use them like that or cut them apart.
And another one of my favorites is the new Embossing Paste. That along with the dies and palette knives make it easy and fun to create interesting textured backgrounds.
For my card I paired them together – I created this for a swap card – so I’ve already made a whole stack of these.
I used the brick mask from the Pattern Party Decorative Masks and a small amount of the Embossing Paste. I didn’t want full coverage on my card stock so I just smeared it through the mask where I wanted it. Every card turns out just a little different. The paste dries quickly if you are using a thin layer. I wish you could feel the texture!
The little elephant was stamped on Shimmery White card stock and then I watercolored with Soft Sky ink using my Aquapainter. I also lightly watercolored on the cloud – which is really the Pretty Label punch. I finished the card with some Pool Party Baker’s Twine around the Crumb Cake Layer.
You can get the A Little Wild stamp set as part of a bundle with the Little Loves Framelit Dies. Be sure to look for bundles throughout the catalog – they save you 10%.
One of my favorite new dies in the Stampin’ Up! Catalog is the Happy Birthday Thinlits Dies. It comes bundled with the Happy Birthday Gorgeous stamp set. Besides the new In-Colors that I have been showing you since the catalog started this die is my most used item so far. Here is another card I made – actually I made this one first and then the one using the In-Colors which is the exact same layout.
This one uses a different Designer Paper which is where the color combination came from. I think these colors are more suited to a guy or a pre-teen/teen aged birthday. This paper is the Pick A Pattern Designer Series Paper. It has lot of fun hand-drawn patterns and detailed images and some bright colors. I used the Crushed Curry pattern with the fun circles and paired it with Sahara Sand and Basic Black.
It’s a quick and easy card design – just alter your designer paper piece and choose coordinating colors for the card stock and twine. You could actually make this card with no stamping at all if you just use the die. I added the little “belated” stamp from Happy Birthday Gorgeous set.
Thanks for visiting today. I have my oldest son in town from Seattle for a few days and the middle one is here too. We have some family time schedule for this weekend. I hope you all do the same.
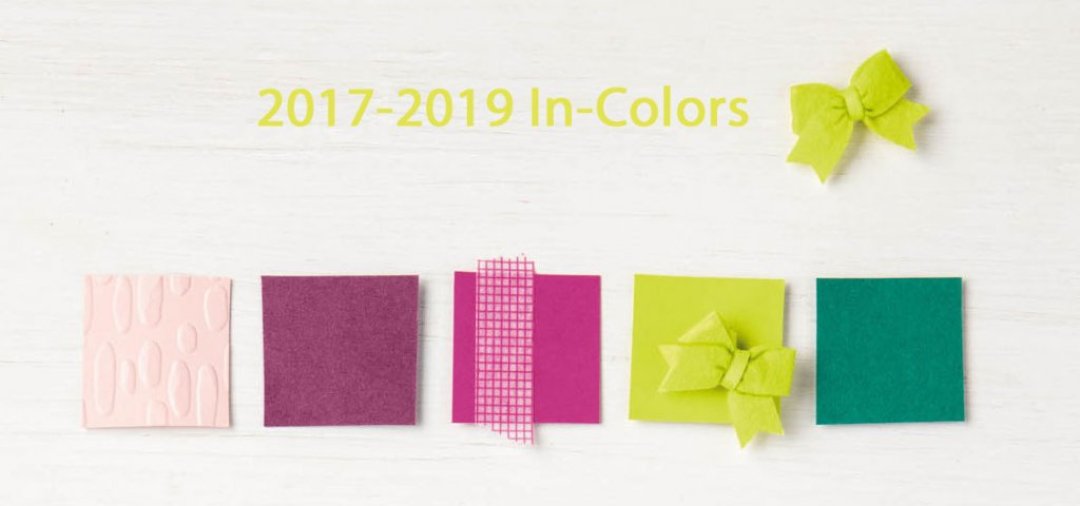
And finally the last color in the 2017-2019 In-Color Collection is Lemon Lime Twist!
All 5 of these new In-Colors come in your basics – Card Stock, Ink, Refills, and Stampin’ Write Markers. Plus the added embellishments – like ribbon, the Itty Bitty Bows, and the Designer Paper.
Now some more about Lemon Lime Twist:
Lemon Lime Twist is our new party color! It’s fun, a bit loud and kind of neon. We don’t really have anything like it in our existing colors. You might not be so sure about it in the beginning but I bet you will love it once you have used it.
Here is a card I made – it really pops against the black:
I created this card layout for a swap I was in but originally made it with some different designer paper and colors. I needed a card that showcased one of the new In-Colors and I decided to use the same layout and switch out the colors. I really love the pop of the Lemon Lime Twist against the Black.
I’ve also used a couple of other new products – the Happy Birthday Thinlits die and the Happy Birthday Gorgeous stamp set. You can even order these two as a bundle and save 10%!
Here is a peek at this project in all 5 of the In Colors.
A new JUNE promotion for hostesses – you can earn an extra $35 in free product – contact me to schedule your party and earn enough to get these new In Colors for free!
Do you have your copy of the new catalog yet? Email me at [email protected] I’d love to be your Stampin’ Up! demonstrator if you don’t already have one.
If you are local to me you can pick yours up in my classroom during class, stop by, or at my Catalog Kickoff Party & BOGO Sale on Saturday, June 17 – visit my calendar HERE.
The next color I’m introducing in the 2017-2019 In-Color Collection is Tranquil Tide.
I meant to showcase this photo with the Itty Bitty Bows with the Fresh Fig color that used these bows but I got my photos all mixed up. So even though today’s card doesn’t use these little bows I wanted to show them to you. They are pre-tied and self-adhesive and will be fun and easy to add to your projects.
Now some more about Tranquil Tide:
Tranquil Tide is an interesting blue green color and seems to take on a slightly different look depending on the other colors around it. It will be interesting to use it with different combinations of colors. It’s also featured in one of the little frames. The idea was from a card I saw online. I love how the design showcases each of the new In-Colors.
Here is a card I made:
This card might look familiar to you. I took the idea from the catalog and just made a few changes. I’ve used Tranquil Tide card stock, one of the Tranquil Tide prints from the Fresh Floral Designer Series Paper Stack. And the Tranquil Tide Finely Woven ribbon – it’s really soft.
I’ve also used a couple of other new products – the Eastern Medallions Thinlits dies and the Happy Birthday Gorgeous stamp set.
Here is a peek at this project in all 5 of the In Colors.
A new promotion for hostesses – you can earn an extra $35 in free product – contact me to schedule your party and earn enough to get these new In Colors for free!
Do you have your copy of the new catalog yet? Email me at [email protected] I’d love to be your Stampin’ Up! demonstrator if you don’t already have one.
If you are local to me you can pick yours up in my classroom during class, stop by, or at my Catalog Kickoff Party & BOGO Sale on Saturday, June 17 – visit my calendar HERE.
Hi! I am a Stampin’ Up! independent demonstrator in Milton, Georgia. I love being creative and want to share it with you! On my blog I will share creative ideas using Stampin’ Up! products and you’ll also hear about my family and my dogs.
I look forward to helping you get your creative juices flowing!
Click on the Shopping cart to visit my Online Store and order your Stampin' Up! Supplies any time. Earn Stampin' Rewards when you order reaches $20 - be sure to opt in to the rewards program on your account. Any questions click on the email me button above.
Current Catalogs
Join My Stampin’ Up! Team for $99
Join Paper Pumpkin – Your Creative Escape!
For New Subscribers -
Join by the 10th of the month to start your subscription this month.
Prepaid subscriptions now available!
The content in this blog is the sole responsibility of Monika Davis as an Independent Stampin’ Up! Demonstrator. The use of and content of classes, services or products offered is not endorsed by Stampin’ Up!