Jul 17, 2014 | Big Shot, Cards, Washi Tape |
If you saw my photo from my craft room of the craftermath left from working on one of my swaps then you were probably wondering what was the result of that pile of products and mess. Well here you go – it’s this card.
 It’s a remake of a card I created a few months ago. I wanted it to be current so I changed out the Washi Tape that I used and made it again with these new colors. The Washi Tape is called Sweet Sadie. I thought using the Washi tape on the vases made them look like decoupage.
To create this card I put the washi tape on a piece of whisper white card stock. Then stamped the vases over the top with Black Stazon ink. Then i cut them out – yes I cut out a lot of vases! Stamp the whole Vivid Vases image on another piece of Whisper White card stock (the layer on the front of the card) – then glue the cut out vases over the top of those stamped vases. I filled in the flowers with my Stampin’ Write markers.

The Twine tied to the frame is the Thick Baker’s Twine. I pulled apart the 3-ply for the Pistachio Pudding and Crisp Cantaloupe twine and took a piece of each and tied it around to add a little something to the frame.

Here is the list of everything I used. Remember you can click on the items to view or order them in my online store.
This was my swap card for the dinner Wednesday night with all my friends. I hope they like this card.
Jul 16, 2014 | Cards |
I am leaving Wednesday morning to head to Utah for the Stampin’ Up! Convention! It is such a fun trip and I get to see so many friends from all over North America. We have a small group leaving here from Georgia and then we are meeting our roommates and friends at the hotel and for dinner Wednesday night. I made a special swap for them and will share that with you on Thursday – I want them to get it first.
Today I’m going to share this bright Little Smile card with you. I made it for a swap at my last team meeting.
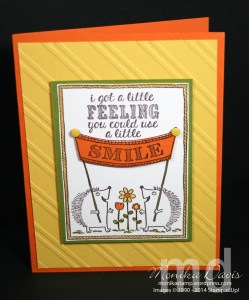 well actually I made it for one of my classes first and then decided to make more for the team meeting. I used the Brights color family and the stamp set is called A Little Smile. It is one of the new single stamps in the Stampin’ Up! catalog.

Don’t you just love those cute little hedge hogs on there. I stamped the banner a second time on the Pumpkin Pie card stock so that I could cut it out and pop it up on the card. I cut a bit bigger around the two little pole knobs so that I would have a place to attach the little candy dots.

Here is a full list of the supplies that I used:
Thanks for stopping by today. I plan to be sharing about convention over the next few days – mostly on Facebook but I’ll also post some on here too – including roomie gifts, downline gifts and some swaps.
Jul 14, 2014 | Big Shot, Birthday, Cards, Designer Series Paper |
Today is my baby’s 18th birthday! Now I’m feeling old. My youngest child is 18. How can that be? I’ve been looking through old photos today and posting them in an album on my personal FB page – its’ like watching him grow up all in one day. Now I started with digital photos in 2002 so that is where I started. I’d have to go find the real baby pictures and scan those in. That’s a future project not for today. I’m also finishing up getting ready for convention. The Stampin’ Up! convention is this week and I’ve been waiting all year to see a bunch of my friends from all over North America. This year worked out well with convention squeezed in right between Ryan’s 18th birthday (today) and our 25th wedding anniversary (on the 22nd). Usually convention runs into one of the other of those special days.
Anyway on to the card I want to share today – it’s the card I made for Ryan for his birthday – and also used for one of my stamp club projects which was on Friday night. Ryan thought it was one of the cooler cards that I’ve made in a while – I’m glad he liked it so much.

I used the star framelits to make a star shaped card. Once I was done though the largest star doesn’t fit in a regular size envelope so the solution was to use the envelope punch board and make one to fit it! Plus I was able to use that extra star from the center to add to the envelope. Now this is not one I would mail out to anyone – it’s one you want to hand out to someone special – you don’t want the start to get smushed – its got some dimension to it – and then the specialty designer paper that I used for the envelope is the thinner paper and probably wouldn’t make it through the mail system.

Happy Birthday Ryan!
Here is what I used to make this card:
Thanks for the visit today.
Jul 11, 2014 | Cards, Masculine, Photopolymer |
You may have noticed in the new Stampin’ Up! catalog we no longer have Stampin’ Around Wheels. They all retired with our last catalog. I know that for me I really hadn’t used any in a long time – and I guess others weren’t either. In fact some people were unmounting their wheels so they could use them on a clear block. It was something I had considered but hadn’t gotten around to doing. Well Stampin’ Up! gave us a new solution – new photopolymer stamps in our catalog that are borders or what I call long stamps. These are designed to replace the wheels. Because they are the new clear photopolymer they are very easy to place and position on your project. For this project I used the new Draw the Line stamp set. This card is a slightly modified version of a card from our Stampin’ Success demonstrator magazine.

The open circles, the arrows and the full circles are all just one line of images – but so easy to repeat and place on the card because the stamps are photopolymer and you can see exactly where you are placing them.
I have a couple of tips for using the photopolymer that work for me. Make sure you get ink on the whole image – the new Stampin’ Up! ink pads work well the old style not so much. When you stamp hold the image on the card stock briefly to give the ink a chance to transfer from the stamp to the card stock. Don’t go down and up really fast – you want full contact between the stamp and the card stock. Clean your photopolymer stamps on a paper towel sprayed with Stampin’ Mist. I found that when I use my scrub my stamps pick up any residual ink left from other projects. Inks that are red, yellow, brown will leave a faint stain on the stamps – I can’t find any way to avoid it. The blue, greens don’t seem to do that. I have not tried using Stazon on my photopolymers.

FYI the little clip at the top of the card is attached with a glue dot not actually clipped to my card – i wanted to see the whole clip and if you slide it on part of it ends up in the back where you can’t see it.
Here is everything I used on this card:
Jul 10, 2014 | Big Shot, In Colors, Tags |
What? A Fry Box full of tags? Stampin’ Up! has a new Big Shot die that creates a Fry Box. I wish I had that last year when I had cut about 25 fry boxes! Now with the new die it’s quick and easy to make a bunch of Fry Boxes. Here is a project that we made in my hands on class last month – a fry box full of tags.

For this project I wanted to use the new In-Colors but while I was creating my project ended up being way to busy with all the new In-Colors so I decided to focus on two – Hello Honey and Blackberry Bliss – why those? Well they were both part of the prints in the Moonlight Paper stack. If you look closely at the Moonlight paper stack on one side of the prints you have the Hello Honey, Blackberry Bliss colors and on the flip side you have the Hello Honey and Lost Lagoon colors. The fry box is lined on the front panel and inside back panel with the Moonlight Paper. Then the front has the Linen thread and flowers added to it.
 For the tags – I had 6 in the box – 3 featuring Hello Honey and 3 featuring Blackberry Bliss. I used the Scallop Tag Topper punch to make my tags – love it! I prefer to round the corners on my tags when I used the scallop top – so I used the Project Life corner rounder punch to do that. To create the back grounds on my tags I used the new Decorative Masks – hearts & stars – with Stampin’ Sponges to add the images to the back. Then each tag has flowers added and a little message from the And Many More stamp set. I finished with a piece of ribbon added to the top.
Here is a quick look at the tags for the other in-colors – I did not use these in my final project but thought you might want to see them.

Thanks for stopping by today!
Here are the products I used for the Fry Box full of tags:
 It’s a remake of a card I created a few months ago. I wanted it to be current so I changed out the Washi Tape that I used and made it again with these new colors. The Washi Tape is called Sweet Sadie. I thought using the Washi tape on the vases made them look like decoupage.


