Hello my friends. It’s time for our monthly A Paper Pumpkin Thing Blog Hop. A blog hop filled with alternate ideas using contents from the monthly kit. This month our kit is called Sending Hearts and it’s about sending love for Valentine’s or any time at all. Some sweet card come in the kit and you can purchase an add-on if you want to make treat boxes too. Or check out my alternates for a way to turn your cards into treat holders.
This kit comes with supplies to make 8 cards plus the stamp set, ink spot and a roll of ribbon (that was a fun surprise I thought). This year Paper Pumpkin had cards in the kit with an add on option to create treats. I think last year it was the other way around. But not everyone needs treats so the main kit is cards.
I have two ideas for you today – well three actually – two with the kit and one with the add-on.
Snail Mail card
This first idea is just an alternate card that I want to make and include the cute Snail Mail Designer Series Paper from the mini catalog. I also wanted to take each printed card base and cut it into two pieces to create 2 cards. So I added card stock, the designer paper, and I used Stampin’ Blends for coloring. The tiny epoxy heart from the kit was colored with a Poppy Parade Stampin’ Blends to make it red instead of pink.
Supply List
The additional supplies that I added to complete this project were:
Card stock – Smoky Slate, Basic White
Snail Mail Designer Series Paper
Memento Black ink
Stampin’ Blends – Smoky Slate combo, Bermuda Bay light, Pool Party dark, Poppy Parade dark
Snail Triangle Treat
My second idea was to take the card and cut it in half to create treat holders. The existing score line is at 4-1/4″, so I added two more score lines half way – 2-1/8″. Then folded them up to create a triangle treat holder. Each original card would make two treats. Stamp the hearts and flowers in the background, stamp and color the snail and cut him out. I added ribbon and some of the epoxy shapes that I colored to make them red. To secure the candy inside use some glue dots – my candy is a small york peppermint patty. Yum!
Supply List
The additional supplies that I added to complete this project were:
Card stock – Basic White
Memento Black ink
Stampin’ Blends – Pool Party combo, Poppy Parade combo
Little Love Boxes
This bonus project uses the Little Love Boxes add-on. I didn’t actually use the Paper Pumpkin kit because I got the add-on first and wanted to make something quick. I used ribbon and a stamp set from my stash. If you turn over the little labels you can use the white side instead of the pink. The Add-on comes with the tiny boxes, the snail die cuts and the label die cuts. These are still available to order with a regular Stampin’ Up! order.
Supply List
These are the supplies for this project (I didn’t use the regular Paper Pumpkin kit but you could use those stamps instead):
Card stock – Basic White
Real Red Ink
Lovely You stamp set (or use the set that came in the Paper Pumpkin kit)
Playful Pets Trim Combo Pack
I hope you liked this alternate idea for the monthly Paper Pumpkin kit. Leave me a comment and let me know your thoughts.
The Blog Hop Continues
To continue through go and click on the next blog in the list below. The ideas from everyone in the blog hop are always so amazing! If you are seeing this in your email you may need to click on the title of this to view the full post on my website and see the blog list.
Don’t forget you have until the 10th of the month to subscribe to Paper Pumpkin and get that month’s kit.
The February kit is called a Bouquet of Hope – see a sneak peek below. Sign up by the 10th – go here.
Hello my friends I hope you and your families are healthy and that you had a wonderful Christmas. It’s time for our monthly A Paper Pumpkin Thing Blog Hop. A blog hop filled with alternate ideas using contents from the monthly kit. This month our kit is – Beary Comforting. I wish you a safe and happy new year – thanks for visiting me on this monthly blog hop!
This kit was sweet and full of supplies to send a big bear hug to someone special. It includes 12 cards – 3 different designs.
For my idea I wanted to take all the supplies for one set of cards and create double the number of cards. So each card base was cut into two 4″ x 5-1/4″ panels, each of the circle and rectangle elements were cut in half and I divided up the animals, the fun image pieces and the labels. I added Basic Gray card bases and used ink out of my stash for the stamping and Stampin’ Blends for some coloring.
Double Take Cards
I turned each card into to two cards. With a few supplies from your craft room you can double the amount of cards from this kit very easily. For the bear card I stamped a second bear on Whisper White card stock and colored him with Stampin’ Blends and cut him out. The background of the Soft Seafoam panel was stamped multiple times with Basic Gray ink. I kept the basic layout of the card exactly the same.
For the Koala cards cut the two of them apart so they can each be on one of the cards. Both the circle and the long label were cut in half also. On the plain Calypso Coral panel I stamped the leaf image in Calypso Coral ink. These make sweet birthday cards – one holding the gift and one the cupcake.
Finally the little racoon and the flowers were used on the third pair of cards. The flower stamp was used to cover the background on the Rich Razzleberry piece using the same color ink. For these cards I decided to add a little piece of gold twine to each element. Easy and sweet and ready to send to a friend.
Supply List
The additional supplies that I added to complete this project were:
Card stock – Basic Gray, Whisper White
Ink – Basic Gray, Calypso Coral, Rich Razzleberry (ink spot in the kit)
Forever Greenery Trim Combo Pack (that’s where the gold twine comes from)
I hope you liked this alternate idea for the monthly Paper Pumpkin kit. Leave me a comment and let me know your thoughts.
The Blog Hop Continues
To continue through go and click on the next blog in the list below. If you are viewing this in your email you’ll need to click on the header of this post to view the list on my blog.
Don’t forget you have until the 10th of the month to subscribe to Paper Pumpkin and get that month’s kit.
For January we have a special kit for sending cards to those you love PLUS an add on that you can purchase separately if you want to create Valentine treat boxes from your kit. Sign up by the 10th to receive the January Sending Hearts Kit – go here
And you can begin ordering the Add-on kit January 1st as part of your regular Stampin’ Up! product order. The Little Love Boxes Add-on will be available beginning Jan. 1st while supplies last – Item number: 156842, Price: $8.
The Year-End Closeout is happening now at Stampin’ Up! Stock up on your favorites from the Aug-Dec Mini Catalog (all the holiday stuff) before it retires. Some items are on sale up to 50% off – the Tag Buffet Project kit (one of my favorites) and the Christmas Countdown Project Kit (use for storage or other holiday or celebration countdowns). And the Clearance Rack has been updated – so there are some amazing deals out there right now.
Click below to download a PDF with the Year End Closeout & Retiring Items. Or look under the tab in the online store.
Are you in need of some quick Christmas cards – order the Tag Buffet Project kit, the Tag Buffet Stamp set, the ‘Tis the Season 6×6 Designer Series Paper Pack, some Thick Whisper White card stock for card bases, and medium Whisper White Envelopes. You can make 30 cards in no time at all like I did below.
All orders over $40 receive a free Tutorial Bundle from me via email. This month it includes 15 projects that are perfect for Stocking Stuffers and Last minute gifts. Here is a sneak peek.
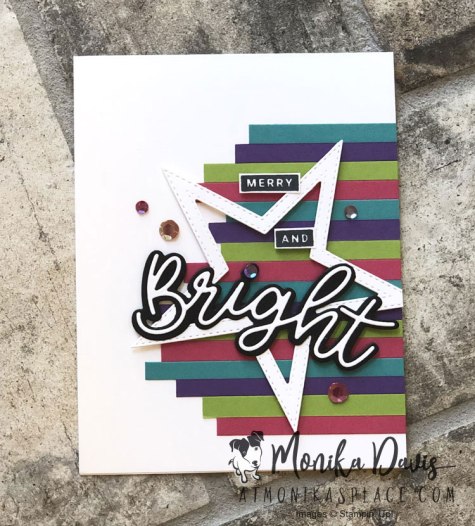
Today I have two Merry & Bright Cards to share with you AND the Merry & Bright Online Extravaganza Sale is TODAY! It’s a one day sale on Tuesday, November 24th only. Almost everything in the Stampin’ Up! Annual Catalog is on sale for 10% off. Stamps, dies, cardstock and paper, tools, ribbons and embellishments! Don’t Miss it!
There are some exclusions to the sale and you can see those below.
Speaking of Merry and Bright I have these two cards to show you today. I featured these on my FB Live yesterday – 11/23/2020 – on my FB page. See it here.
Supply List
#155167 Peace & Joy Bundle (Peace & Joy stamp set + Joy Dies)
#153074 2020-2022 In Color 8-1/2 x 11 Cardstock Assortment (Bumblebee, Just Jade)
#121045 Basic Black cardstock
#100730 Whisper White cardstock
#132708 Memento Black ink
#150457 Holiday Basic Jewels
#144108 Mini Dimensionals
#152344 Adhesive Sheets
#103579 Paper Snips
#110755 Multipurpose Liquid Glue
#127853 Silicone Craft sheet
#149653 Stampin’ Cut & Emboss Machine
#149655 Take Your Pick Tool
#102300 Bone Folder
The first one was in the Regals colors which are your more traditional holiday colors. This second one is the same card using the Brights collection. I swapped out the card stock colors to #146975 Brights 8-1/2 x 11 Cardstock Assortment (Melon Mambo, Granny Apple Green, Bermuda Bay, Gorgeous Grape) and the bling to be #152477 Artistry Blooms Sequins. Everything else was the same. And if you want to use this same design for a birthday card just switch out the words!
I hope you like these fun colorful cards. They are the perfect design for using up thin scraps of cardstock – these are 1/4″ strips.
Do you need something cute for your Thanksgiving dinner table? This little guy is going to be the perfect solution. Use him at each place setting on the table. If you need to assign seats then put a name where I stamped the “Happy Thanksgiving”.
This was a really fun project that my Stamper’s club got to make this month at our meeting. And today I shared it on my weekly FB Live. I’ll be uploading it to Youtube as well – and then adding that link here too.
Make these in a variety of patterns from the Plaid Tidings Designer Series paper. The paper is part of the sale this month so grab a pack now. You can get two turkey’s from each sheet of the 6×6 paper. Clip them on to a fork, or a napkin to dress up each place setting for Thanksgiving. If you need assigned seats – then write a name on the banner instead of stamping the Happy Thanksgiving.
Supply List
#153527 Plaid Tidings 6×6 Designer Series Paper
#155214 Banner Year Bundle = Banner Year stamp set + Banners Pick a Punch
Hi! I am a Stampin’ Up! independent demonstrator in Milton, Georgia. I love being creative and want to share it with you! On my blog I will share creative ideas using Stampin’ Up! products and you’ll also hear about my family and my dogs.
I look forward to helping you get your creative juices flowing!
Click on the Shopping cart to visit my Online Store and order your Stampin' Up! Supplies any time. Earn Stampin' Rewards when you order reaches $20 - be sure to opt in to the rewards program on your account. Any questions click on the email me button above.
Current Catalogs
Join My Stampin’ Up! Team for $99
Join Paper Pumpkin – Your Creative Escape!
For New Subscribers -
Join by the 10th of the month to start your subscription this month.
Prepaid subscriptions now available!
The content in this blog is the sole responsibility of Monika Davis as an Independent Stampin’ Up! Demonstrator. The use of and content of classes, services or products offered is not endorsed by Stampin’ Up!