Oct 4, 2009 | family, My Digital Studio |
Oh my goodness….I haven’t posted much in several days. I had too many things on my plate and ran way short of time.
Friday was a big day – it was 8th grade night with the high school Marching Band. So normally on 8th grade night the 8th grade band is invited to join the marching band at the football game. They play in the stands with them and watch the half-time show. It is a way to show the 8th graders a little about being in the marching band. That was pretty much the scope of it. The 8th grader normally get a t-shirt and some other little treat – one year I stamped the CD envelopes and filled them with cookies – here is what they looked like:
 The ones I made for the band were in our school colors and I used an old retired music stamp set. I made about 80 of those that year. I think that was 2 years ago. Anyway since I have an 8th grader and a junior in the marching band I figured it was appropriate for me to help with 8th grade night this year. So about 3 weeks ago we started planning our 8th grade night and somehow I ended up in charge.
So here is what we did this year – we had a tailgate party before the football game. We grilled over 300 hotdogs and served all the marching band students, 65 8th graders plus their families, plus all the parent volunteers. Gave the 8th grader t-shirts and pom-poms, had a prize drawing, a parent meeting, the 8th grade parents got an overview of what the marching band does and a tour around the stadium to get their tickets, seats, etc. Anyway it turned out to be a much larger event that what I thought it was going to be and coordinating all the volunteers was a bigger job that what I had planned for. But it was an AWESOME event and the biggest turn out of 8th graders that they have had in years. If all of the kids join marching band next year it will exciting – we have a large group of seniors graduating and we need an even larger group of 8th graders to replace them so that the band will grow.
I was totally exhausted on Friday night. But my weekend didn’t end there.
Saturday was my Holiday Bazaar. So I was working on items for that all week too and got up early Sat. to do final preparations, pack up my car, I made muffins (we had to bring food to share – but I was the only one that baked, everyone else did store bought – I should have done the same). I was over there shortly after 10 to set up my table and the bazaar ran from noon to 7:oo PM. It was a long day but I met lots of nice new people and saw many people that I already knew. It was a new experience and I’ll be sharing this week the projects that I made. I wish I had taken a picture of my table set up but I forgot. I think it turned out well and I set up my son’s laptop to run a slide show of my first My Digital Studio album. I haven’t had a chance to get a printed book so I ran the slide show instead. I think this will be a great alternative to printing the albums to send to some of my family – I can create the movies or slide shows for them to see and a printed version for me to have.
 This is the front cover of my album – the picture is Cloudland Canyon in the Northwest corner of Georgia – yes we have our very own canyons out here – they aren’t all out west. This was a trip we took in 2006 that I never put in a scrapbook. Using the My Digital Studio I was able to get the whole album together in a few days. I did decide that I am still a slow scrapper even in digital. I tend to dwell to much over the little details, moving and adding and changing and resizing – but the great things about the digital is I can do all that without wasting a lot of card stock.
So anyway I have had an extremely busy week and now I have to catch up on all the things I neglected to do for the last week (or longer). If you are waiting on a reply about buying some of my retired stamps – I am getting those out tonight and in the morning. I’m going to go back through all my email to make sure I haven’t missed any questions from anyone.
This week I’ll have out the new Wow Scrapbook Kit and I’ll be finishing up the tutorial for the September Class Kit to Go. I’m working on my October newsletter too for those of you that are on my mailing list.
Thank you for stopping by. I have plenty of things going on this week too – a band exhibition, a band competition, a Decor Elements party, a club meeting and then just the kids practices and stuff.
Have a productive week – I sure hope I do!

Oct 3, 2009 | Holiday Mini Catalog 2009 |
| Halloween Treat Box |
 Stamps
- Pumpkin Patch (from Holiday Mini Catalog)
Paper - Pumpkin Pie card stock
- Whisper White card stock (1-1/2″ x 1-3/4″)
Ink - Basic Black Classic Stampin’ Pad
- Chocolate Chip Classic Stampin’ Pad
- Old Olive Classic Stampin’ Pad
- Pumpkin Pie Classic Stampin’ Pad
Accessories - Stampin’ Dimensionals
- Box Pattern #48 from Pattern Library
|
Instructions
- Using treat box pattern from the Pattern library(contact me for a copy), trace pattern on Pumpkin Pie card stock, then cut out and score. Stamp grass image in Pumpkin Pie ink on unassembled box. Assemble box.
- Stamp pumpkin image in Pumpkin Pie ink, face and stem images in Chocolate Chip ink, and grass and curly vine images in Old Olive ink on Whisper White card stock. Adhere to treat box using Stampin’ Dimensionals.
- Stamp “From our patch to yours” in Basic Black ink on top of treat box.
Sep 30, 2009 | Designer Series Paper, family, In Colors, Scrapbook Pages |
Just a quick post since I have a million things to do and not enough time to do them.
Here is a quick share of a scrapbook page that my sister-in-law made for me – it is the same layout as the one my niece (her daughter) created that I posted a couple of weeks ago.
 The picture is my boys and I at the beach this summer. We always watch the families that go down to the beach and wear their pretty white shirts and khaki’s so this year we thought we would try to do the same. Except that Kyle didn’t bring a white shirt – so he borrowed one from my nephew that had a logo on it – so he is standing behind me so I’m covering the logo. The same thing with Greg (although he isn’t in this picture) – he borrowed a shirt from my brother-in-law and then we stood one of the kids in front of him to cover the logo on that shirt. The things we do sometimes to have everything the way we want it.
The layout uses the Baja Breeze In-color from last year and Chocolate Chip as the two main colors, the Retired Parisian Breeze Specialty Designer Paper and an assortment of buttons and ribbons.
I love it!
Thanks for checking in today.
Sep 29, 2009 | Decor Elements, My Digital Studio |
I’m having a Stampin’ Up! Definitely Decorative Party for my friend Laura next week. I only have the regular Stampin’ Up! workshop postcard invitations which weren’t appropriate for this party so I decided to create my own flyer using the new My Digital Studio software. This is Stampin’ Up! newest product that will be available to customers beginning October 1st.

I removed her personal information from my file before posting it. I have this saved and can use it for future parties too. So far she has 6 or 7 people attending including one man (and its not her husband). Now I need to prepare for my presentation – I have some photos from the presentation that demonstrator Christina Crawford made at convention this year. I’m going to look back through my notes from her class and hopefully have an awesome party next week. If you are local to Woodstock, GA and want to host your own Definitely Decorative Party – give me a call. There are exclusive hostess items that you can earn for Free.
I am working on my items to sell at the Holiday Bazaar that is this weekend. Come see me and some of my friends and get your Christmas Shopping started. There will be my hand made items, designer purses, metal art jewelry, glass beaded items, candles and more. Here are the details for that:
HOLIDAY BAZAAR
October 3, 2009
12 noon – 7:00 pm
Towne Lake Hills East Subdivision
1053 Towne Lake Hills East
Woodstock, GA 30189
I hope to see you there!
Thanks for stopping by today.
Sep 28, 2009 | Designer Series Paper, Holiday Mini Catalog 2009 |
I made this card a few weeks ago for the STARZ meeting. It was my project demonstration and share.  I needed to show a project using the Sweet Treat cups from the Holiday Mini Catalog. I really like these little cups – I have many in progress projects with these little cups – ideas I have had and started on but they aren’t yet finished. But this one was finished for the STARZ meeting. It is mostly a copied idea from a Demonstrator named Mike – yes he is a man and there are quite a few male Stampin’ Up! demonstrators. Men are quite creative and Mike came up with this awesome idea that created a “trap door” (now I’m not sure that is what he called it) so that you can get out the candy without tearing up the card.
So notice on the front of the card the Basic Black card stock with the EEK circle that actually slides into a pocket created by the stamped image from the Sweet Centers stamp set and the Sweet Treat cup. To let the candy out you pull up the tag.
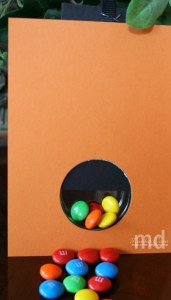 Here is a view of the inside of the card when the tag is pulled up. The circle is opened and the candy falls out!
Then you can refill it and close it back up. Isn’t it a clever idea?
The punch I used is the 1-3/4″ Circle punch which is exactly the right size for the Sweet Treat cups. For the front of my card I have several layers – the card base Pumpkin Pie, then Old Olive card stock, then the Cast-A-Spell Designer Series paper. The punch will only punch through one layer at a time. So I punch the card base first – slide the punch in as far as it will go. Then add the next layer line up your punch with the previous circle and punch again. Then do the next layer.
When adding the Sweet Treat cup you have two layers of card stock – one is Basic Black with the hole punched out of the center. Adhere the Sweet Treat cup to this one – remove the backing on the edge of the cup to reveal the adhesive. Then adhere the stamped Whisper White cards tock (again with the hole punched out of the center) over the sweet treat cup. The EEK is the piece that was punched from the center of this layer. When adhering the cup piece to the front of the card put adhesive only on the two sides and the bottom so you don’t close up the pocket.
This was a fun card to make!
Thanks for stopping by today!









