Oct 29, 2009 | Designer Series Paper, Scrapbook Pages |
For my October scrapbook class – which was early this month – we made this Pumpkin Carving layout.
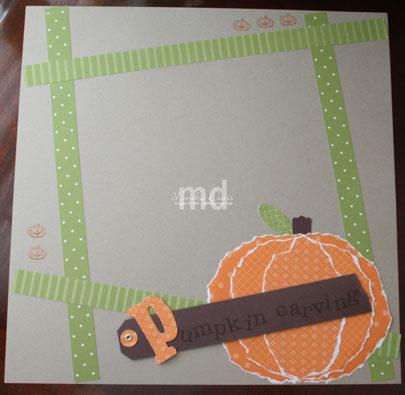
 This two page layout was from one of Wendy’s WOW scrapbook class a year or two ago. This is a very quick and easy page to put together.
We also used this layout for an Apply Picking page – changed the colors and using the Tart& Tangy set as accents. Instead of a large pumpkin shape we cut out an apple shape from Designer Series Paper that was a shade of red.
Here the little pumpkin stamp is from one of the Family Accessory stamp sets. The alphabet stamp set is the Just Perfect Alphabet – and it was just perfect for this title – anything bigger I would have run out of room. The background is Sahara Sand and the other colors are Pumpkin Pie, Old Olive and Chocolate Chip. The Modern Label punch was used to cut the stem of the pumpkin and the Small Oval punch was used for the leaf.
The hardest part of this layout is tearing the Designer Series Paper to create the layered pumpkin shape. Normally I trace my patterns on the back of the piece to cut it out. But for this one it worked better to trace on the front and then carefully tear away the traced line to give you the pumpkin layers.
I bought a nice big round pumpkin yesterday – now to have someone carve it for Saturday. I know I have old pictures of the kids when they were little and they each carved a pumpkin – if I don’t take new pictures this week I’ll have to go find those and put them on this cute layout.
Have a great day!

Oct 28, 2009 | Big Shot, In Colors |
Finally – I made a card for the Stamping 411 challenge. I think I participated the first 2 weeks when they started and then tried a couple more but kept missing the deadline. I think this time I made it. And I’m pleased with my card too.
I wanted to make a card to send to all the wonderful new ladies that I met this month either at events or workshops. Just a little note to says thanks and to invite them to join me for stamping. If you are one of those people and you gave me your mailing address – then you should be getting one in the mail soon. As an added bonus this little card includes a special coupon for $5 off one of my stamping classes. I have been thinking on this for a while but nothing popped into my head as being the right thing until I saw the sketch for this weeks 411 challenge.
 The sketch was a square card and while the measurements given on the blog – by the way it is here – were for a 5-1/4″ square card I had an idea…….
If I make a regular size card – 4-1/4″ x 5-1/2″ but here is the neat part – I’ll trim the front of the card to be a square – so 4-1/4″ x 4-1/4″ and leave the back with the extra 1-1/4″ showing and that piece becomes my class coupon! I used the handy little perforating tool on the Cutter Kit to perforate that extra piece so that you can rip that part off to bring it back to me and still keep the little card.
I sketched it out on my grid paper last night and got to work – what stamp set and colors to use were my next decision – but that didn’t take long – I have had the “For All You Do” stamp set on my desk ready to work with and decided it would be perfect. Colors – the Rich Razzleberry and Old Olive colors have been very appealing to me and in the front of the catalog where the color families are pictured they used these colors along with So Saffron – which is what I ended up with. I created my flowers like they did on that sample.
So here is my creation…………….
I also used the Elegant Bouquet Embossing Folder on the Rich Razzleberry card stock. The embossing folders are so cool – I hope Stampin’ Up! creates lots more.
The butterfly was inked with So Saffron ink and then I used the Rich Razzleberry Stampin’ Write Marker to outline the edges of the wings and color the body before I stamped it on Whisper White card stock. The Butterfly and flowers are all hand cut. That’s the part that is taking me the longest. I am in production mode so I have the different pieces of card stock cut and the images stamped and now I’m cutting all the flowers and butterflies before I put all the pieces together. They should be going out in the mail tomorrow – I hope.
The coupon information was put on a label and I added a few stamped flowers. This concept could be used for any kind of coupon – have the kids make mom or dad (or a grandparent) a personalized coupon card. Or use the tear off part to make a little bookmark – just decorate to suit your need.
So I think it fits into the Stamping 411 challenge and it is perfectly suited to what I wanted to send out. I hope everyone likes them.
Thanks for visiting today – go get creative!
Oct 27, 2009 | Big Shot, Just Soccer, Just Tennis, My Digital Studio, Scrapbook Pages, Sporting |
Well I had planned to post this yesterday but the rest of the day got away from me. Sorry about that…
I actually made these scrapbook pages last month – in September for my scrapbook class. The two-page 12×12 layout was easy to adapt to any sport. I made the Soccer layout for my class sample and then created the Tennis layout during the class. At the class the ladies did a variety including baseball/softball layouts and football/cheer layout. If you didn’t want sports at all you could have used Circle Circus or other circles or flowers. The layout itself was an old one from a magazine that has been in my stack of layouts to work with. I also created the same layout using My Digital Studio – I was able to play around with the photos in the layout before printing them. My Digital Studio has the Sporting stamp set with all the words but not the individual Just sports sets. But you could do a hybrid version and print the My Digital Studio version and then add the stamped sports images. One cool thing about the My Digital Studio that didn’t really work with the traditional scrapbook page was putting the words directly on top of the picture. In my traditional layout I cut my picture shorter and put the GO TEAM underneath it. The tennis layout doesn’t have pictures on it yet – I’ll be adding those as soon as I get them printed.

Soccer - left page

Soccer - right page
Supplies used include:
– Sporting stamp set
– Just Soccer stamp set
– My Way Punch
– Circle Punches – several sizes
– Spiral Punch
– Big Shot & GoGo Boots Alphabet die
– Night of Navy, Real Red, Summer Sun card stock and ink
The one thing I couldn’t do in My Digital Studio was the Spiral Punch – I’ll have to look at that more and see if I can find that – if may have been there and I missed it. So you see that here in my traditional layout.
The Tennis version uses the same supplies except the Just Tennis stamp set for all the accent pieces – here it is without pictures on it.

Tennis - left page

Tennis - right page
For the Tennis layout I may add some White Gel Pen lines by the tennis balls at the bottom of the page – I wanted them to look like they were bouncing and right now they look kind of out of place so I think I’ll add that when I put my pictures on.
So then the My Digital Studio version is done with the Soccer pictures – I’ll show you the Left page – it just has white circles where the soccer balls should have been. I didn’t actually print the My Digital Studio version as a 12 x 12 but I was able to export it to a jpg file so I could share it here and I printed it just on paper to take to my craft room as my sample. So the My Digital Studio software can be used for a design tool – where you can play around with elements and photos without cutting card stock or printing photos until you know what size and where you want everything.

Soccer - My Digital Studio
I didn’t finish adding all the stamped words in there but wanted to have an idea for comparison. The font is different since the Big Shot dies aren’t actually in My Digital Studio – you can add text by using the fonts that you have loaded on your computer and you can change them to any of the Stampin’ Up! colors.
So what do you think? How do they compare?
I have this month’s scrapbook pages ready to share later this week so come back again.
It’s a rainy day (again) and a good day to stay inside and stamp (no one really wants to clean house so go stamp instead).
Oct 26, 2009 | Birthday |
It is the last week of October and the last Deal of the Week. Maybe Stampin’ Up! had costumes on their mind as this week the special items are the Pirate and Princess Party Kits. These are perfect if you have young children or grandchildren that you need to plan a party for. Regular price the kits are $15.99 and this week they are only $9.99. Each kit has supplies for 8 little munchkins – that’s just over a$1 per child – And here is what you get in each kit:
– 8 invitations and envelopes
– 8 treat boxes (purses or treasure chests)
– 8 crafts (crowns or eye patches)
– 24 food toppers with picks
– 20 pennant decorations
Assembly is required and no adhesive is included. You can visit my website by clicking here to watch a video showing you all the pieces and some of the completed projects for these two kits. There are also matching stamp sets and personalized stamps if you want to do more than what the kit provides.
I have done some pirate parties but no princess parties. The kit would have been perfect too. My boys still remember the Pirate Ship cake that I made… the reason they remember it is that I made it 3 times – it kept falling apart – I figured out not to use cake batter with all the butter in it – it is too soft to crea te a Pirate Ship. I need to find the picture of that cake.
This was my second post today – I’ll try to get one more done with an actual stamping project but I need to get Ryan going on homework, unload the dishwasher and try to get some more wallpaper off the bathroom wall.
Get creative this week! And call or email if you want to order these kits – you only have until Oct. 31st for the special price.
Oct 26, 2009 | Christmas, class, Holiday Mini Catalog 2009 |
I think I’m going to have several posts today – to make up for being late. First my next class is this Friday. Everyone is welcome to attend.

Holiday Card Making Class
Oct 30
10:00 AM
And again at
7:00 PM
This is my monthly hands-on stamping class and this month we will be making a variety of holiday cards.
The picture above shows some of the cards we will be making.
We will use a variety of stamp sets from the Stampin’ Up! Idea Book and the Holiday Mini Catalog.
(This is class is a week later than normal)
Class fee is $15 and you will receive $10 off if you place a product order for $50 or more.
Please bring adhesive (or I can order you some) and your own paper snips. RSVP for this class by 10/28/09. I hope to see you there.
My email is [email protected] – or visit my events on my website and click RSVP from there.









