Oct 24, 2009 | Designer Series Paper, Rub-Ons, Stampin' Up! Events, SU Ribbon |
Yesterday was girls day at the Chattanooga Half-Day Regional. Stampin’ Up! started offering half-day regional events this year – just a little taste of what their larger events are like. Danette met me at my house in the morning and we drove to meet Sue and then headed north – in the POURING RAIN – to Chattanooga. After a few wrong turns in the Chattanooga area we finally found our way to the Convention Center and the parking garage. We grabbed a bite to eat at the sandwich shop inside and ran into Shannon West and Cari Cudney from  Stampin’ Up!. They were the regional presenters along with Pam Morgan.
Pam started by welcoming us and then showed us a cute little WOW project that we all wanted to make – I’m really planning to make one so I’ll show it when I do. Shannon did a presentation on The Way of Workshops and showed us a handful of different ideas. Carrie showed us Tempting Techniques which I now have to play with too – Crystal Effects Glaze, one with waxed paper (I didn’t hear the name of that one), Faux Alligator/Snake skin, Brushless Watercoloring, and Custom Rainbow pad. Shannon did another presentation on Scrapbooks and Photo Tips. If you are a Stampin’ Up! Demonstrator and didn’t get to attend one of the Fall regionals – these three presentations are included in the Front Row Regional DVD.
We saw Workshop Wow presentations from several local demonstrators Susan Barron from Alpharetta, GA; Paige Butler from Chattanooga, TN, Julie Salva, Theresa Clark from Lawrenceville, GA, and Joan Wiemers from Alabama. I hope I spelled all their names correctly. They each had great ideas that they shared with us and I have a whole list of new things to try.
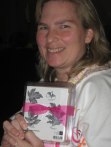 There were prize drawings throughout the afternoon – the odds are good when there are only 100 people in attendance – and guess what – I won a prize! The Autumn Splendor stamp set from the Mini Catalog. I was hoping someone else from our table would win – but not this time.
I met lots of new friends, and talked to some of you who visit my blog – that was exciting! In the parking lot we met Kim from West VA. Then we met Rhea from Louisiana who is a new demo trying to meet new friends. Later we had Diane and Beth from South Carolina come join us at our table.
I’m trying to remember everyone else I talked to – Mandy and Abby, LeAnne, Diane, Susan and more. It was a great time. 
I made only a few swaps on Thursday night –  it was a the exact design from a card that my sister-in-law had sent me a couple of months ago. I just changed the colors and the Designer Series Paper.
Supply List:
- Out of the Box stamp set (hostess level 1)
- Chit Chat Rub-ons
- Tall Tales Designer Series Paper
- So Saffron card stock and ink
- Chocolate Chip card stock and ink
- Old Olive card stock
- Whisper White card stock
- 1-1/4″ Square Punch
- Paper Piercer and Mat pack
- 1/16″ circle punch
- Earth Element brads
- Old Olive Striped Ribbon
- Stampin’ Dimensionals
I had a few other misc. swaps left from my classes or other events and then I swapped some little bags of tags. I hope everyone that attended had a great time.
We drove back after it ended, stopped and had dinner – I ran into Cari from my stamp club at dinner. Then came home and headed up to the high school to see the end of the football game. Etowah won. I missed the band performance but today I am chaperoning for the competition which we will go to shortly. So I’ll see the show later today again – they are doing such a good job this year. Have a great rest of the day! Thanks for stopping by~

Oct 22, 2009 | Big Shot, Scrapbook Pages |
 Stephanie wanted to work on scrapbook pages while I was visiting. Some of the pictures that she had printed were from our family reunion this summer. Every summer at 4th of July Greg’s family gathers at his uncle’s farm i
 n south Georgia for a Saturday of playing, eating and talking. Stephanie wanted to use a retired stamp set that she had called Independence Day.
She stuck with traditional Red (Real Red), White, and Blue (Night of Navy) and used the star punches to create her accents.
The swirls are stamped in Whisper White Craft ink. The title is cut using the Big Shot and the GoGo Boots Alphabet Dies.
The pictures are in a collage toward the center of the 2-page layout with the same pattern on each side – just flipped. She had them printed as both wallet sized and 4×6 size.
I thought the layout turned out great!
Tomorrow I am off to the Stampin’ Up! Half-Day Chattanooga Regional Seminar. Sue and Danette (two of my downline) are coming with me. We are looking forward to a fun day. We will hear business tips, see stamping demonstrations from both the corporate team and local demonstrators and get to do our own Make-N-Takes while we are there. And we will do some swapping too – I need to get up stairs and see what I have already and maybe make a few more tonight.
Thanks for stopping by today!
Oct 21, 2009 | Christmas, Designer Series Paper, Holiday Mini Catalog 2009 |
I had my eye on this stamp set when it first came out and for some reason never ordered it – I guess I always had something else to get so I would wait. And then Stampin’ Up! puts out cute stuff in the Holiday mini so I get that stuff and wait. At Christmas time last year I still didn’t have this stamp set – and I still thought it was the cutest thing – so when do you think I finally bought it – in JANUARY and when do you think I finally got it out to actually use it – in OCTOBER! How bad am I?
Last week while I was at Stephanie’s I brought the Holiday Lineup stamp set with me – because I was determined to make something with it. On Thursday, Stephanie’s friend, Kara came over for the day to stamp with us – guess what she brought – Holiday Lineup! She also had plans to make a card with this set for her co-workers. So we got busy. And look at how CUTE these cards turned out!
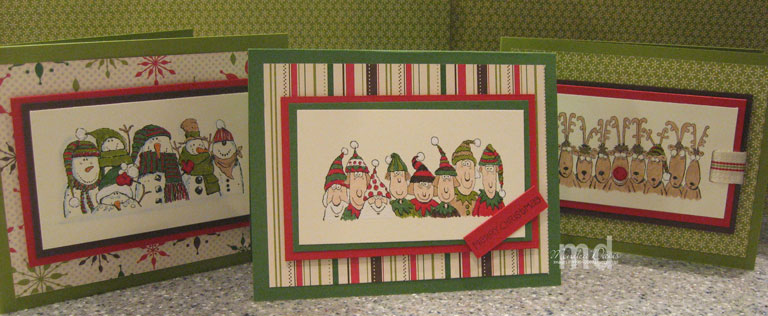
The one with the elves is the one we designed for Kara to use for her co-workers. I played around with the others for me. I’m thinking about using the snowmen for our family card – I need to leave off one snowman to make it a family of 5 instead of 6. And the little reindeer are funny too! The Designer Series Paper is Merry Moments from the Idea Book and uses traditional colors – Real Red, Garden Green, Old Olive, Chocolate Chip, and Very Vanilla. Everything on these is colored with Stampin’ Write Markers and the White Gel Pen was used to add the white on the hats and beards. This set was a lot of fun to play with because the characters have such personality to them!
Have a happy day!
Oct 20, 2009 | Big Shot, Holiday Mini Catalog 2009, In Colors |
While I was visiting Stephanie (my sister-in-law) last week in Virginia we did a lot of stamping. This idea came from one of the blogs we were looking at while I was up there – now that I am home I can’t find it and I don’t remember whose blog it was. I have searched google for all the key words in the project and found many other ideas but not the original that we saw. So time to move on and just share it with you. This is a little treat holder for Halloween – it hold a mini hershey bar on the inside.
 The original idea we saw used the Pumpkin Patch stamp set from the new mini catalog. I didn’t have that one so instead I used Autumn Harvest for the pumpkin on the front. The tag is made using the Stampin’ Up! Two Tags die for the Big Shot. When you use the die to cut the tag it scores it for you and adds the notch to tuck in the bottom of the tag. In order to hold the candy I added a second score 1/2″ away from the first.
  That gives you room for the candy but now the tag won’t shut – so you need the decoration on the front to be large enough to make up the gap.
Since the pumpkin I used was short and wide a circle punch didn’t work so well but the Wide Oval punch did so that was what I used – the pumpkin is stamped in Black StazOn ink and watercolored with Classic Inks. I’m pretty sure I used Whisper White card stock but it looks like Very Vanilla in this picture – I did sponge the edges so that tones down the white.
I also punch two Large Ovals in Chocolate Chip that I layered behind the top and bottom of the wide oval. Then I punched two Round Tabs out of Pumpkin Pie – if you layer then together they form a perfect 2″ circle. Which I used here as a layer behind the wide oval. This tucks into the slot.
The white gel pen stitching is on the inside and outside of the tag. I added ribbon through the top.
After making the pumpkin one I decided I wanted to make more – knowing I didn’t have another class for Halloween projects I thought I would try snowmen – and ended up with this one.
 This one uses the In-Colors – Bermuda Bay and Melon Mambo and all the markers to color the snowmen from the Holiday Lineup stamp set. They were punched with the 1-3/4″ Circle punch and then the two Round Tabs layered behind them. Now I have to find candy to match.
So then I started thinking about Thanksgiving and we like to have a little treat on the table for everyone – so I tried a Thanksgiving one.
I used More Mustard for the tag and the Gobble, Gobble turkey from the Mini Catalog – didn’t he turn out cute! To color the turkey I used Stampin’ Write Markers – from lightest to darkest it is More Mustard, Pumpkin Pie, Really Rust and Chocolate Chip. He is punched with the Scallop Circle and another Scallop Circle is layered behind and off set between the petals. Again the two Round Tab Punches are behind. If you didn’t want to use those you could cut 2″ (or larger) circles using the Circle Scissor Plus and the Glass Mat.
We counted up how many of us we expected to gather for Thanksgiving and decided that might be too much chocolate. And maybe we needed a smaller place card for everyone.
I came up with the idea to use the other tag on the Two Tags die and the turkey that I just made and this is what I ended up with. This one we decided would fit a small mint like an andes mint on the inside. I scored the tag at 2″ and 1-1/2″ to create the base. I cut 30 tags before I left, scored them all and began working on the Turkey’s. Stephanie will finish them all before Thanksgiving when all the family will gather at her house this year.
Someone emailed me about Thanksgiving ideas – here are a couple and I’m pretty sure I posted the Big Shot Turkey box last month. I’ll see what else I have. And share more of our girl’s week creations later.
And one more thought – I think I want to reorganize the categories on my blog – I thought I wanted to list them by stamp set but I think the list is so long now it is hard to go through and that more general categories might be better. Like have the holidays individually, birthday ideas, treat holders, etc. I’ll keep the technique section but get rid of the individual stamp sets that I have listed. What do you think?
Have a wonderful day – thanks for stopping by!
Oct 17, 2009 | Big Shot, Circle Scissor Plus, Designer Series Paper, Season of Friendship, Stamper's Club |
At the Stamper’s Club meeting last Friday we made another gift project. This time it was a Seasonal Decorative Plate. This idea was presented at convention I think 2 years ago as a monthly idea. Using a glass plate the presenter made a circle that fit in the center of the plate for each month of the year. Since that time I have seen many variations on this idea some with the decorated circles behind the plate and others on the front. A few months ago Stampin’ Up! had one of their stamping challenges and a plate project was submitted by Mary Beth Brown – it didn’t win the challenge but it was shown on the demonstrator website. It was a seasonal plate using the Season of Friendship stamp set which is one of my favorites. So I put together this project for my club using Mary Beth’s idea with current Designer Series Papers. I loved how it turned out.
 Today I’ll share the fall and winter inserts and when I get home I’ll share the others. It is such a dreary day here – raining and COLD. The news said tonight there could be snow flurries mixed with the rain. I’m in VA and I think the weather in Georgia is very similar.
The fall plate insert uses the Autumn Meadows Designer Series Paper. The colors are Chocolate Chip, More Mustard, Really Rust, Taken with Teal and Very Vanilla. This paper is so much prettier in person than it is in the mini catalog.
 The Winter plate uses the Merry Moments Designer Series Paper – the piece with the Chocolate Chip snowflakes. The other colors I used are Chocolate Chip, Bashful Blue, Ruby Red, and Very Vanilla.
I will say though that my feet are nice and warm since we just got back from getting a pedicure. Girl time sure is fun!
Tonight is Homecoming at Etowah where my boys go to school and Tyler is going to the dance – with a girl – and I’m not there… I think he is glad about that so I can’t fuss over him. I had most things taken care of before I left – got a new jacket, had it altered, had a new shirt, got it dry-cleaned, got a new tie, had the shoes and pants, ordered the corsage. Today Greg had to take care of picking up the flowers, and being the chauffeur and taking pictures – I hope he takes pictures! And I hope he calls me with all the scoop…
Stay dry and warm – thanks for stopping by today.









