Jan 30, 2019 | 2019 Occasions Catalog, Big Shot, Designer Series Paper, Scrapbook Pages, Stamper's Club |
Earlier in 2018 I added some memory keeping back into my Stampin’ Up! business. I used to have a regular monthly scrapbook class but had gotten away from it and I missed it. So I decided to add a scrapbook page to my monthly stamp club. Each month we make one 12″ x 12″ scrapbook page in our monthly meeting. It’s ready to just add photos. Everyone has been enjoying the pages. So now I’m trying to start regular Facebook Live videos and plan to include a scrapbook page once a month. For January I decided to take the page for stamp club and create a second page to go with it. Be sure you watch my Facebook Live video from Sunday, Jan 27th and you can see both of these pages.
Watch the video here – Facebook Live Jan. 27th.

The January 2019 Stamper’s Club scrapbook layout is a New Year’s celebration layout – Gold Foil, Basic Black, Whisper White, and Basic Gray are the colors I used. Watch the video to see the trick on getting the Baker’s Twine added, the little flowers added, as well as some tips on the numbers and the detailed word dies. Below is a list of supplies that I used.
Supply List
- #147003 Neutrals 12×12 card stock (Basic Gray)
- #100730 Whisper White card stock
- #121045 Basic Black card stock
- #146277 Broadway Bound Specialty Designer Series Paper
- #132622 Gold Foil Sheets
- #146282 Metallic Pearls
- #141682 Solid Basic Black Baker’s Twine
- #145055 Smoky Slate Dark Stampin’ Blends
- #119868 1″ Circle Punch
- #119869 1/2″ Circle Punch
- #134365 1/8″ Handheld Circle Punch
- #144106 Multipurpose Adhesive Sheets
- #144108 Mini Stampin’ Dimensionals
- #104332 Snail Adhesive
- #148551 Rectangle Stitched Framelits Dies
- #150609 Well Said Bundle = stamp set + Well Written Framelits
- #101406 Jet Black Stazon ink
- #143263 Big Shot Die-Cutting Machine

Cut strips of Designer Paper to 2-1/4″ x 9″, and also cut a strip of white. Then center four strips on each piece of Basic Gray card stock. Use the Big Shot Die-Cutting Machine to cut the Black rectangles wit the new Rectangle Stitched dies – don’t miss them in the Occasions catalog on page 28 – these are the photo mats. It’s hard to see the stitching in these photos.
The “hooray” is from the Well Said Bundle. Use the Adhesive Sheets for detailed words like this. Add the adhesive sheet to the foil sheet before running through the Big Shot. Next remove the backing and attach to your page. The Well Written die set will be a great for all kinds of paper crafts – it has so many words and you can combine with the stamps for endless possibilities. Try cutting words apart and combine different letters or parts of the words – I checked and almost the whole alphabet is included in these words.

Be sure to register for upcoming classes – just click on Registration under the Events tab.

Order online here – use hostess code BNNC9A9C for January 2019.
Jan 23, 2019 | 2019 Occasions Catalog, Big Shot, Boxes, Designer Series Paper, Valentine's Day |
At the Made to Love class Heather showed us how to make these mini Red Velvet Bundt cakes. And they are just the perfect size to fit inside the little Baker’s Box. These are a carry over item from the Holiday Catalog. She filled the pans and put the cakes in the oven, and then showed us the truffles (I posted those yesterday). Then everyone came into my studio and I showed them all the stamping projects. When they finished all their stamping they decorated their cake and put it inside the box.
I showed everything we made on a FB live video on Jan. 21, 2019. You can see it here. Here are some more details about the Baker’s Box project for the mini cakes.

I cut 2″ wide strips of the All My Love Designer Series paper and a 2″ x 4″ long piece of Crumb Cake card stock. The strip of the Designer paper won’t quite fit all the way around the box to create the belly band. So I used the Crumb Cake piece to bridge the gap in the back. Glue the designer paper to the card stock, then you can slide the band on and off to get inside the box. If you watch my video you can see what I’m talking about. Then decorate the front – I used the hearts from the Be Mine Stitched Framelits Dies and the Braided Linen Trim. The stamp set in this photo is Label Me Pretty but some of the girls used the Meant to Be set instead.
Supply List
- #150587 Meant to Be Bundle = stamp set + framelits
- #148576 All My Love Designer Series paper
- #147899 Baker’s Boxes
- #147808 Braided Linen Trim
- #148578 All My Love Card stock pack (use Crumb Cake & Lovely Lipstick)
- #147116 Crumb Cake Classic Stampin’ Pad
- #100730 Whisper White card stock
- #146927 Share What You Love Artisan Pearls
- #143715 Pretty Label Punch
- #138995 Tear & Tape
- #143861 Label Me Pretty Stamp set (optional)

I told everyone to choose the greeting based on who they would be giving it too. So everyone had several choices. The little bitty hearts come from inside the decorative heart die cut piece.
Yum! I hope you enjoyed this project. If you’d like to order any of these Stampin’ Up! products to make your own Valentine treats please see my link below.
Be sure to register for upcoming classes – just click on Registration under the Events tab.
Order online here – use hostess code BNNC9A9C for January 2019.
Jan 11, 2019 | 2019 Occasions Catalog, Cards, Designer Series Paper, Stampin' Blends |
A long time favorite is when Stampin’ Up! has a pack of patterned paper that is black & white. It’s easy to add just one color to it and have it work for so many things. There’s a new pack of paper that has all black and white prints on one side but the other side is colored. That’s even better because it gives you the option to work with the color palette that Stampin’ Up! created for the paper OR to use the black and white side with any color that you want. It’s the new Botanical Butterfly Designer Series Paper in the Sale-A-Bration Brochure. And what makes it even better is that you can get this paper for free with a qualifying order!
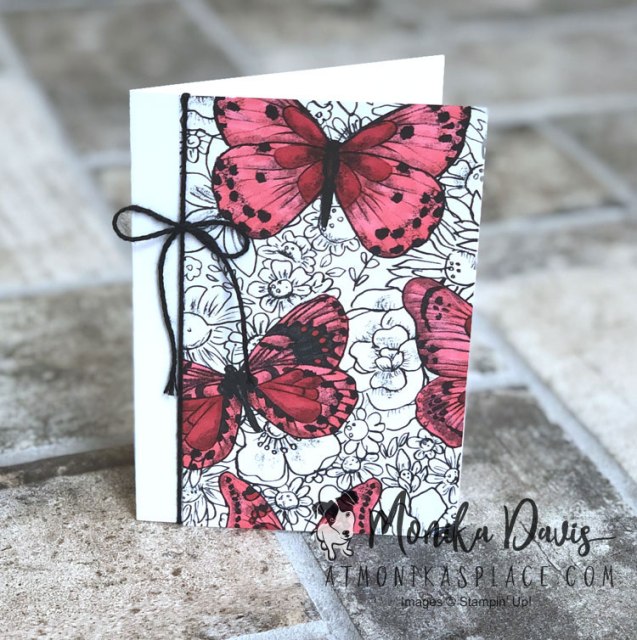
The Black & White patterns allow you to highlight what you want by adding color to just that portion. For this note card I used the Stampin’ Blends to color in just the butterflies so they pop of the page – almost like they are flying. This is a quick card using the Whisper White Note cards and envelopes. I cut a piece of the Designer paper 3″ wide and 5″ long and attached to the front of the card aligned with the right hand edge. Then tied some Basic Black Baker’s Twine around it. There isn’t even any stamping on this card. Just coloring with the Stampin’ Blends.
Supply List
- Botanical Butterfly Designer Series Paper (Sale-A-Bration)
- Whisper White Notecards & Envelopes
- Basic Black Bakers Twine
- Stampin’ Blends: Lovely Lipstick combo or other color of your choice
- Stampin’ Trimmer
- Multipurpose Liquid Glue
Here is a look at the full pack of paper. One side is colored and the other is the black & white. There are 12 sheets: 2 each of 6 double-sided designs. Place a $50 product order to receive this paper for free. The list of products above is $52.50. And each pack of note cards includes 20 cards & envelopes. Colors in the paper include: Balmy Blue, Daffodil Delight, Grapefruit Grove, Highland Heather, Lemon Lime Twist, Whisper White, and Basic Black.


Be sure to register for upcoming classes – just click on Registration under the Events tab.
Order online here – use hostess code BNNC9A9C for January 2019.
Dec 23, 2018 | 2018 Holiday Catalog, Christmas, Designer Series Paper, Tags |
Just a quick post to share some tags that I made this year. These use the Farmhouse Christmas Suite of products.

Strips of the Festive Farmhouse Designer Series paper on the tag base. Stamp and punch the circle greeting. Add the sprig punch. Add twine with an accent from the burlap ribbon and a holiday clip. You could pull something like this together with bits and piece of things that you have lying on your craft table.
Supply List
- All is Bright Paper Clips
- Farmhouse Christmas stamp set
- Festive Farmhouse Designer Series Paper
- Cherry Cobbler Ink
- Festive Farmhouse Cotton Twine
- 5/8″ Striped Burlap ribbon
- Gray Granite card stock
- Whisper white card stock
- Cherry Cobbler card stock
- Mossy Meadow card stock
- Sprig Punch
- Detailed Trio Punch
- Layering Circles Framelits
- Big Shot Die Cutting Machine
- 2-1/4″ Circle Punch
Merry Christmas to you and your family!
Be sure to register for upcoming classes – just click on Registration under the Events tab.
Order online here – use hostess code DS9YWVDP for December 2018.
Dec 17, 2018 | 2018 Holiday Catalog, Big Shot, Cards, Designer Series Paper, Stamp, Scrap, & Create Retreat |
Two days in one. I’m running out of days in December and have some other projects to share that aren’t from the Farmhouse Christmas suite. So today you get a two for one on the Farmhouse Christmas. These two cards were ideas from a demo friend of mine – Lorri Heiling. She has such creative ideas. In fact probably some of my other farmhouse projects were from her ideas too.

This first one uses the truck as the focal image. It’s stamped with Memento Black ink and colored in with the Stampin’ Blends. In the background is a piece of the Festive Farmhouse Designer Series paper and a piece of Crumb Cake card stock that was run through the Big Shot in the Corrugated Dynamic Embossing Folder. A tip when you run it through – be sure to send the spine of the folder through first. And all the Dynamic Embossing folders are extra thick so you use only ONE cutting plate and place it on the top of your folder. Don’t use a cutting plate on the bottom when making your sandwich.
Supply List
- Farmhouse Christmas Stamp set
- Festive Farmhouse Designer Series paper
- Corrugated Dynamic Embossing Folder
- Festive Farmhouse Cotton Twine
- Sprig Punch
- Mossy Meadow card stock
- Very Vanilla card stock
- Crumb Cake card stock
- Stitched Labels Framelits
- Memento Black ink
- Stampin’ Blends: Cherry Cobbler, Basic Black, Smoky Slate, Daffodil Delight, Crumb Cake, Shaded Spruce, Old Olive
- Big Shot Die Cutting Machine
The Stampin’ Blends really do blend the colors well together. I wanted Mossy Meadow which we don’t currently have in a Blends (but it’s coming) so I had to combine the Shaded Spruce and the Old Olive and blend those to get something close to what I wanted.
And here is the next one – this one is really cute!

The Designer Paper Squares in the back ground are cut with the little Stitched Square Framelit. This is a square card – 4-1/4″ square card – and yes I just use the regular medium sized envelope to send this card. You may wonder about where the little house comes from – we don’t have a little house die. But we do have the big house from the Farmhouse Framelits Dies. So here is the trick – go ahead and stamp the large house on Crumb Cake card stock and cut it out with the house framelit. Now pull out your Paper Snips and get ready to cut along the lines. First cut along the roof line on the left – and then along the wall on the left – leaving you with a tall skinny 2 story house. Then I cut along the top of the lower window. That left me with the little house – which I turned over to attach to this card – the stamping is on the back side now. I hope that makes sense!
Supply List
- Farmhouse Christmas Bundle: Farmhouse Christmas Stamp set + Farmhouse Framelits dies
- Festive Farmhouse Designer Series paper
- Festive Farmhouse Cotton Twine
- Sprig Punch
- Mossy Meadow card stock
- Cherry Cobbler card stock
- Crumb Cake card stock
- any ink
- Stitched Shapes Framelits
- Stitched Labels Framelits
- Big Shot Die Cutting Machine
There isn’t any visible stamping on here so you can use whatever ink is close at hand. It’s basically creating your guide for cutting the house.
Be sure to register for upcoming classes – just click on Registration under the Events tab.
Order online here – use hostess code DS9YWVDP for December 2018.
Dec 13, 2018 | 2018 Holiday Catalog, Big Shot, Cards, Christmas, Designer Series Paper, Stamp, Scrap, & Create Retreat |
Thank you for the comments on the Farmhouse Christmas projects I’ve been sharing. I still have more! Can you tell I had fun with this theme/suite of products. After the retreat I’ve used these products for a few other things too and I hope to get those shared before Christmas arrives. Today is another card that I was really happy with. I hope you like it too.

The front of the card is completely covered with a piece of the Festive Farmhouse Designer Series Paper. Then accented with some strips. The Merry is cut out of the Galvanized Metal paper. I do wish that was staying in the catalog but it is not – so if you didn’t get any yet do it quick. Use the 1/2″ circle punch to snip a little notch in each end of the card and tie the twine around the card front coming through the notch on each side. It’s just a little different way to add the cotton twine.
Supply List
- Merry Christmas to All Bundle – Merry Christmas to All stamp set + Merry Christmas Thinlits dies
- Thick Vanilla Card stock
- Festive Farmhouse Designer Series Paper
- Very Vanilla Card stock
- Cherry Cobbler ink
- Galvanized Metal paper
- Festive Farmhouse Cotton Twine
- 1/2″ Circle punch
- Big Shot Die Cutting Machine
For this card the measurements are
- Very Vanilla Thick card stock 8-1/2″ x 5-1/2″, scored at 4-1/4″
- Designer Series Paper 5-1/2″ X 4-1/4″, 4″ X 3/4″, 3-1/2″ x 1/2″
- Very Vanilla card stock 3-1/2″ x 1-1/2″
- Galvanized Metal Paper 4″ x 2″
The Merry Christmas to All stamp set and the Merry Christmas Thinlits will be carrying over but after January 2nd they won’t be a bundle anymore. Get them now at the 10% discounted bundle price.
Be sure to register for upcoming classes – just click on Registration under the Events tab.
Order online here – use hostess code DS9YWVDP for December 2018.


