Sep 5, 2013 | Cards, Thank You, Washi Tape |
I have a few more Washi Tape ideas for you – these are a little bit out there. This one you may have seen posted – it was idea that came from Stampin’ Up! Well that is where I saw it – I supposed they might have found it elsewhere.
Use Washi tape to make feathers!

Here’s some how to’s on making a feather:
- take a toothpick and put Washi tape on one side – over the tip and down the other side.
- trim into the shape of a feather
- snip the edges to create the feathered look
- attach to the card with some mini glue dots
The background on the card is the Tape It Stamp set. There is a little bit of bling – a Rhinestone and some Candy Dots. The Awesome Thanks comes from the Yippee-Skippee stamp set.
Thanks for stopping by today!

Sep 3, 2013 | Big Shot, Cards, Thank You, Washi Tape |
Remember that left over heart that we cut for the last card that I shared. Well I used it for the card I’m sharing today. Which is also another Artisan inspired card – this time from Cindy Schuster – she created a card similar to this for a retreat we attended just before convention.
 check with this post to see where the heart came from
- this time I used a note card for the card base
- a piece of Polka Dot parade designer series paper – use the 2-1/2″ Circle punch to punch a hole – add the paper to the note card with Stampin’ Dimensionals
- Add the heart to the center of the hole – also with Stampin’ Dimensionals
- Tie some Linen Thread through a small Vintage Faceted Button and use a glue dot to add to the heart
- Stamp a greeting on Whisper White and cut into a flag – add to the front of the note card.
That’s project #9 and you would think we would be done – but we are not – I really did go overboard creating with the Washi tape. I still have a few more to share so be sure to come back.
I hope you enjoyed your Labor Day weekend. I did – Saturday Kyle came home and we went out to dinner to celebrate Tyler’s 20th birthday. Sunday I spent the day with Cindy, Christine and Kim – stamping and creating ALL Day. Then Monday I was pretty darn lazy and didn’t do much except work on my Germany project in My Digital Studio. I’m nearly done with it – down to the last couple of pages.
Thanks for stopping by!
Aug 12, 2013 | Big Shot, Cards, Holiday Catalog 2013, Retired Stamps for Sale, Stamp, Scrap, & Create Retreat, Thank You |
 I’d like to introduce some new products from the Stampin’ Up! Holiday mini catalog –
- Truly Grateful stamp set
- Sweater Weather Designer Series paper
- Witches’ Brew Designer Washi tape
- Envelope Liners Framelits Dies
I used all four products on this note card that we made for Stamper’s Club this month. The Envelope Liners Framelits dies include three sizes to line the envelopes that we sell in our catalog – the little square envelopes, the note card envelopes and the medium sized envelopes. You use these with your Big Shot and standard cutting pads.
 On this card we put the Washi tape on the card and then stamped “Truly Grateful” directly on the tape. If you want to learn more fun ways to use Washi tape be sure to come to my class this Friday, August 16th – Wild about Washi! We will be having fun making a variety of cards using Washi tape in different ways. The class is offered twice on Friday – at 10:00 am and at 7:00 pm – go HERE to rsvp on my website for the class you want to attend.
Upcoming Events you don’t want to miss:
Friday, August 16th – Wild about Washi class
Saturday August 24th – Buy One Get One free Sale & Mini Class
Wednesday August 28th – Card Maker’s class
Friday August 30th – Wow Scrapbook class
September 27th – 29th – Stamp, Scrap & Create Retreat
Have a wonderful day! I have all three of my boys at home right now. Kyle returned from California last night. So I’m a happy mom today.
Jul 29, 2013 | Cards, Simply Pressed Clay, Stamper's Club, Thank You |
Have you tried the new Simply Pressed Clay molds from Stampin’ Up! yet? I love them!
The set comes with two molds – one is Buttons and one is Blossoms – each one has three different designs on it. You use them with the Simply Pressed Clay – which is white molding clay. Look at this cute card that I made using the Buttons.

I really love this card! I made it as a swap card for our STARZ retreat prior to convention. And also used it for my stamp clubs in July. I colored the white clay using my reinker bottles – I made Pear Pizzazz, Daffodil Delight and Melon Mambo clay and molded them into the button molds. Here are a few tips that I discovered while I worked with the clay and the molds.
- I pulled off a small amount of clay, stuck it in a small ziploc bag, added drops of reinker. Close the bag and knead the clay until the color is distributed. I wrote on the bag what color it was and kept it sealed until I was ready to use it. Alternately you could put gloves on your hands and knead the color in that way – you don’t want the ink all over your hands.
- The molds use far less clay than you think. I found it was better to fill each section of the mold with just enough clay to create a flat back – and don’t go over the edges – if you do then you’ll need to cut that away later. Especially with the buttons so that you can mold the holes you want just enough to fit inside.
- You can use the embossing buddy to add a little powder in the molds to help the clay release. But I prefer to use the freezer. Put the clay in the mold and then stick in the freezer for 10 -15 minutes pop out and set aside to dry completely over night. I actually found that when the mold was already cold it took less time in the freezer.
- I accidentally left one of my bags of colored clay slightly unsealed – which caused it to dry out just a bit – I decided to try to mold it anyway – and it actually molded very well and popped right out of the mold.
- Once you have your shape you do want to let it dry completely – I left mine to air dry over night.
- You could also create the shapes in white and then color with markers or the spritzer, a sponge or dab into the ink pad – this will add some variations of color.
That’s just a few ideas for you when using the clay.
If you want a little more detail on my card here you go –
- Card base is Chocolate Chip. I did add a layer of whisper white on the inside so it would be easier to read the message you add to the inside of the card.
- On the front is a layer of Whisper White. Stamp greeting in Chocolate Chip ink on front. I stamped the stem from Field Flowers in Pear Pizzazz ink on the card.
- Add stitching around the stem – I used the Paper Piercer, mat and template to add 6 holes – 3 on each side of the stem. Then string the Early Espresso Baker’s Twine through and tie in a bow.

- Punch flowers using the Pansy Punch from Gingham Garden Designer Series paper. Curl the petals with a bone folder and add to the stem with mini glue dots.
- Add the clay buttons to the centers of the flower. I used the Multi-purpose liquid glue and made sure the buttons were dry before adding them.
This is one of my favorite cards. Thanks for stopping by today.
You can buy the Simply Pressed Clay and Molds in my online store – CLICK HERE – along with all the other products I used on this card.
Jun 12, 2013 | Cards, Quatrefancy Suite, Thank You |
I think I’m going to learn how to spell Mosaic very quickly! I’m tired of the little red line telling me I spelled it wrong – I want to reverse the a and the i. Well I think I have it figured it out now.
Here is another Mosaic Madness card for you. I created this one for a swap with the GoDiva’s group. I received many wonderful cards in this swap and had a bunch on display at my open house. I really like the way this card turned out with the clear panel in the front. And I also decorated the inside too. I stamped and punched a ton of those little mosaic pieces!

- the card base is Strawberry Slush – one of the new In-Colors – the front is cut – the bottom edge is 1-1/2″ and the top section is 2-3/4″ – the strip I cut out is now sitting on my table waiting for something to be done with (I have a big stack)
- the top panel was stamped with the long strip image
- the bottom panel was stamped with VersaMark ink and “thank you” from Lovely & Lacey stamp set – then embossed with Pool Party embossing Powder.
- I used a piece of the printed clear window sheet from the Quatrefancy Specialty Designer series paper. My card is actually only 4″ wide (instead of 4-1/4) so that I could maximize my window sheet. Attach to the top panel first – then close the card and position the bottom panel so that it is even with the bottom of the card back and attach it to the bottom end of the window sheet (I hope that made sense)
- Stamp the mosaic pieces – Pool Party and Daffodil Delight – for the front and the inside of the card – and punch out – that’s 8 total pieces per card.
- Tie a piece of Whisper White Baker’s twine around the front of the card and tie in a bow.
- Attach the mosaic pieces to the front of the card with Stampin’ Dimensionals. Then attach to the inside of the card in the same spots.

- Finally I added a Whisper White piece to the inside bottom panel of the card.
I hope you like it!
May 19, 2013 | Cards, Retired List, Thank You |
We are counting down the days – 16 more days left to order from the 2012-2013 Stampin’ Up! catalog – June 3rd is the final day. Stampin’ Up! decided to extended it by a few days. Remember that stamp sets will be available until the last day but the accessories and Stampin’ Around wheels are only available while supplies last. You can see the most current list by checking out my website online store and look under the category Retiring Products.

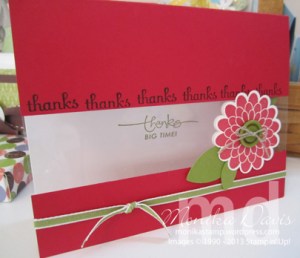
I love ow this card turned out. Here are a few more pictures for you so that you can see the center strip is a window sheet and the “thanks big time” is actually stamped on the inside of the card. I think it would be a great Teacher thank you.

Retiring items on this card:
- Button Buddies stamp set #122735 $29.95 (w) #122737 $21.95 (c)
- Brights Designer Buttons #119747 $8.95
- A Word for You stamp set #117032 $21.95 (w) #120528 $16.95 (c)
- Blossom Petals XL punch #121808 $16.95
I have a special offer going on right now for anyone placing an order through my online store. Read more about it HERE.
Have a great day!


