Jul 11, 2009 | Colored Brads, Stamper's Club, Stamps, SU Ribbon, Techniques, Wanted |
 I know 4th of July has passed but we can always use a fun Red, White and Blue card any time. And this could be easily changed to some other color and make a great birthday card. Actually this idea is from a birthday card that my sister-in-law, Stephanie, sent to Tyler for his birthday one year – he has an August birthday – I have been saving it because I liked the pinwheel on it.
I used Real Red and Night of Navy and added the star brad in the center. I have been trying to find a project for the star brads and this was the perfect one. While it isn’t in this picture – I actually took the brad and smooshed it into a craft ink pad (I had to use Ruby Red since I didn’t have Real Red) and got ink all into the grooves of the brad and then wiped it with a paper towel so that ink in the grooves stayed but the other ink wiped off. I’ll get a picture later today and add it to this post later.
The new modern label punch worked great with the Family Phrases set where the “let’s celebrate” is from. I always fall back to using my Itty Bitty Backgrounds splatter stamp when I think my project needs something and it finished this one off nicely – atleast I thought it did.
This was one of our club projects last night for my Stamper’s Club meeting. We have one more meeting for this round in August and then I’ll start a new group in September. If you are not in the club now and want to join please let me know and I’ll send you all the details.
Have a fun weekend!

Jul 10, 2009 | Circle Scissor Plus, Designer Series Paper, Great Friend, In Colors, Occasions Mini 2009, Rock 'n Roll, Stamps, SU Ribbon, Techniques |
 I made this cute box the other day. The pattern and idea came from an online class that I am taking called Simply Babies by Heather Summers who is a demonstrator in Canada. While her projects are all baby related and I don’t really need baby projects her work is so great and most things can be adapted to anything you want. I haven’t been able to create all the projects – there is a new one each day – but I have made a few.
This one is a cupcake box that I made for my friend Gina who had a birthday while I was away on vacation. Gina likes bright colors so I thought the new Razzleberry Lemonade Designer Series Paper would be just perfect for her. I used three of the new In-Colors – Melon Mambo (the pink color), Crushed Curry (the yellow color), and Rich Razzleberry (the purple color). The stamp set is the Great Friend stamp set – one of my favorites as you can tell because I am using it a lot. It debuted in the Occasions mini catalog. The butterfly is done with the Rock ‘n’ Roll technique because I wanted it to kind of look like the paper which has the Melon Mambo and Rich Razzleberry colors blending together.
To do the Rock ‘n Roll technique follow these easy steps:
- Choose two colors of ink that will work together – one lighter than the other. In this case mine are Melon Mambo and Rich Razzleberry – where Melon Mambo is the lighter color.
- Tap your solid image stamp into the light-colored ink – Melon Mambo.
- Press the edges of the stamp in a rolling motion on the darker ink pad – Rich Razzleberry, being careful not to ink the center of the stamp.
This gives the lighter Melon Mambo color in the center of the butterfly and the Rich Razzleberry around the edges. I cut out the butterfly and added cross-stitch thread to the center to create a body and antenna for the butterfly. The tag is made using one of the large sized metal edge tags. The 1-3/4″ circle punch is the perfect circle to fit on the tag – I used Crushed Curry and stamped “for you” in Rich Razzleberry ink. The butterfly is attached with Stampin’ Dimensionals to give it a 3-D effect.
 I created my lid a bit differently than Heather made her orignal design – I changed two things. First before assembling the lid I used the Scallop Edge punch on each edge to create the lid border. Make sure to trim the tabs on so that they can be attached inside without seeing them behind the scallops. Also before assemble I punched a slit using the Horizontal slot punch on two sides of the box – these are in the edge corner where the side fold down. I made them wide enough to slide my ribbon through. This allowed me to tie the ribbon through the lid of the box and it doesn’t have to be untied to remove the lid. I am so bad at tying bows once I “get it” I don’t want to undo it.
The inside of the box has an insert with a circle cut out of the center – used the Circle Scissor Plus – that holds the cupcake in place so it doesn’t slide around. The picture doesn’t actually have the cupcake inside – just the liner to show you. I was able to add the cupcake with a candle in it – the box was tall enough for that.
I really loved how it all turned out and think this would be a cute little birthday present to give someone that maybe you wouldn’t normally buy a gift for but want to acknowledge them with a special surprise!
I took Gina her cupcake yesterday afternoon and she was surprised to find it inside when she opened the box. We lit the candle and she made a wish – but to her surprise (and actually to mine) – the candle re-lit! My boys like to use the trick candles and when I grabbed one it never crossed my mind that it would be one of those. I just picked one with pink colored stripes – which of course are the leftovers since I have boys we don’t usually use the pink candles unless they make a cake for me.
Anyway – hope you day is full of fun and surprises!
Jul 9, 2009 | Big Shot, Great Friend, Occasions Mini 2009, Stamps |
I made this card a few months ago and sent it in to Stampin’ Up! for one of their contests. It did not win. I was hoping to see it on the Stamper’s Showcase – these are cards and projects sent in my demonstrators for contests (that didn’t win) or at events – but on July1 they changed how they are doing the Stamper’s Showcase so they haven’t posted any new projects for us in over a week. And looking back on my card (I only have the picture) I think I used Kiwi Kiss so they won’t show it because of the retired color but it is close to Old Olive so maybe I actually used Old Olive – and in that case everything is still current. Or I’ll have to remake it with different colors and send it in again…..
 I actually used this same idea of the beaded butterfly for the box decoration on one of my class to go kits – so you may have already seen it – but this was the card I originally made and then from that created the class using the same colors. I used the Great Friend stamp set which was originally in the Occasions Mini catalog and is also in the new 2009-2010 Idea Book & Catalog. The butterfly is from the Beautiful Butterflies die for the Big SHot. One of my favorite! The body of the butterfly uses the Bead Duo in orange and they are strung on a piece of linen thread tied at the top in an overhand knot to create the antenna.
This is one of my favorite cards.
Thanks for stopping by today. My new stuff came yesterday so I’m going to play a little and get ready for the Stamper’s club meeting on Friday night.
Happy Stamping!
Jul 7, 2009 | Circle Circus, Circle Scissor Plus, Scrapbook Pages |
Gosh – I’m feeling so behind and like I can’t catch up….
I have the July Wow Scrapbook Kit posted now – go on over to the blog to check out all the details – wowscrapbookkits.wordpress.com – here is a sneak peek of the pages for this month:
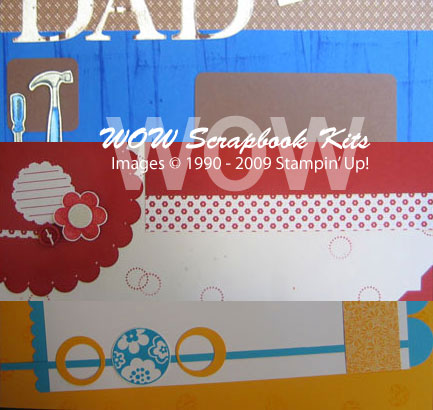
My favorite is the Circle Circus summer layout – some of the pictures from our beach trip should fit perfectly on there. The Dad layout uses the Totally Tool set and we have lots of pictures of home projects that could work on this layout – I’ll have to see what I can find. I have tons of pictures that I have never scrapped and I have become a totally random scrapper. Lately I have been creating the pages first and then remember an event or pictures that I might have that will go on it. Other times I have the pictures and create a page to go with them – but that is not normally what I do. I want to spend alot more time on my personal scrapbooking. I have several vacation albums I want to complete and then one big goal for this year is to complete an album for Kyle before he graduates high school next spring! I am also working on a year in review album that Wendy has created – we get together once a quarter and make about a double page layout for each of three months. I have to finish my March, April and May pages now.
The day is quickly getting away from me – AGAIN! How does that always happen? I want to go create in my craft room with my new stuff so I have more to share with you and I need to finalize my plans for all of my convention swaps and classes for this month. I’m expecting the rest of my new catalog stuff (what I ordered on the 1st) to come tomorrow!! I can’t wait!
Happy Stampin’ and Scrappin’!!
Jul 6, 2009 | Big Shot |
The second deal of the week is
July 6, 10:00 AM (MT) through July 13th, 9:50 AM (MT). For those of us in the Eastern Time Zone that is July 6, 12:00 PM (noon) through July 13th, 11:50 AM (ET).
Sizzix Big Shot Doctor’s Bag #113474 page 194
Regular Price $69.95 Special Price $49.99

Carry your Big Shot machine, cutting pads, and dies in stunning style.
This black-and-white checked doctor’s bag makes storing and transporting your Big Shot machine easy and convenient.
It has handles for carrying and a shoulder strap for when your hands are full of other crafting supplies.
What a great deal at 30% off!
To order – click here – to go to my website and then click the SHOP NOW button.









