Oct 21, 2019 | Achievers Blog Hop, Christmas, Holiday Catalog 2019, Stamp, Scrap, & Create Retreat, video |
Hello. I’m joining the Maui Trip Achievers Blog Hop this month. It’s my first time to hop with this group and the first month of the Maui Trip Achievers Blog Hop. I’m so excited to have earned this incentive trip and go on one of my bucket list trips. And equally excited to join this blog hop for the first time – let’s hope that I got everything right!

This was one of the projects that we made at my Fall Retreat earlier this month. It’s a quick project and can easily be adapted for other holiday’s or occasions. You can watch my FB Live from October 14th to see how I made this fun tic tac holders – https://www.facebook.com/AtMonikasPlace/videos/2198657496906978/
Snowman Tic Tac Treat Holder

This project uses a 2″ wide strip of card stock and a tag topper punch. Add a wrapped piece of Designer Series Paper and ribbon at the top. These would be quick and easy to make. See below for the supplies and measurements.
Supply List
- #102482 Real Red cardstock 2″ x 8-1/2″, score at 3-7/8″, 4-5/8″
- #149518 Delightful Tag Topper
- #150393 Let it Snow Specialty Designer Series Paper 2-1/2″ x 5-3/4″, score so the front section is 2″ and then either side is 3/4″, and the back will overlap
- #150426 Real Red Curly Ribbon – tie the ends in a knot after you cut it so they don’t unravel
- #150644 Mini Curvy Keepsake Dies
- #150460 Tiny Keepsakes Stamp Set
- #147084 Real Red Ink
- #110755 Multi-purpose Liquid Glue
- Trimmer (coming soon)
- Die cutting machine

The Blog Hop Continues
To continue through go and click on the next blog in the list below.
Don’t miss the 24-Hour Stamp Sale on Wednesday – October 23rd.

Thanks for visiting today.
Be sure to register for upcoming classes – just click on Registration under the Events tab.

Order online here – use hostess code PKR73VM7 for October 2019.
Sep 17, 2019 | Cards, Masculine, Scrapbook Pages, Stamper's Club |
So I started writing this post way back in July! It was shortly after returning from the Incentive trip to Greece. But as you can see I never finished it and never posted it. Life happens. When we got back I was trying to spend as much time as I could with my son knowing that he would be leaving the country. So I let some things slide – like my blog. He left last week on Monday. He has been gone for 1 week now and I need to get my butt in gear and get back on track. So here we go…..
I have a scrapbook page and cards to share with you using the Come Sail Away Suite. I shared these on a Facebook Live video a while ago and you can see that here.

The left page of this two page layout was what my Stamp Club made for one of their projects back in July. And the right hand page was the one I added as part of my Facebook Live video. The bottom left corner is actually a card idea that I created for a swap and then decided that I wanted to base a scrapbook page on it.
Fun Fact: in case you didn’t know I grew up sailing. That was my sport from about 10 years old until I went to college. My dad and brother are sailors and my mom used to sail too. I grew up living in a sailing club on the lake. At that time there weren’t very many girls that were sailing. I always say that I grew up in a boys world and had to join Stampin’ Up! to find some girls to hang out with.
Supply List
- #147003 Neutrals 12×12 card stock
- #100730 Whisper White card stock
- #149481 Come Sail Away Designer Series Paper
- #151006 Sailing Home Bundle = Sailing Home Stamp Set + Smooth Sailing Dies
- #149483 Baker’s Twine
- #149482 Sail Away Trinkets
- #147110 Night of Navy Ink
- #147117 Sahara Sand Ink
Since not everyone in my stamp club is a scrapbooker I also give them the option to create two cards instead of the one scrapbook page. I utilize the same supplies. Here are the two cards from this layout.

The card on the left was the one I made for my swap card and that is the one that inspired the scrapbook page. You should be able to see where the second card is taken from the scrapbook page too. And you could also use that bottom right corner on the second page to create a card layout. I hope you like these ideas.
Be sure to register for upcoming classes – just click on Registration under the Events tab.
Order online here – use host code CTTQEX3U for September 2019. If your order is over $150 in product don’t use the host code because you will earn your own Stampin’ Rewards. For orders less than $150 use the host code and I’ll send you a surprise in the mail.
May 1, 2019 | Cards, Product Medley |
Today is the day for Everything is Rosy. A brand new limited release medley of products. It is a whole bunch of amazing coordinating products for you to create beautiful projects with. Products in this medley are exclusive to this medley and cannot be purchased anywhere else. You’ll love the happy, rosy feeling you get as you create with these fun and flowery products. Available for a limited time. Get them while you can!

Product Medley includes:
- Everything Is Rosy Photopolymer Stamp Set—18 stamps
- Everything Is Rosy Dies—10 dies
- 6″ x 6″ Designer Series Paper Stack—48 sheets; 8 each of 6 double-sided designs
- 6″ x 6″ rose gold foil paper—8 sheets
- Printed die cuts—2 sheets
- Rose gold die cuts—4 sheets; 2 each of 2 designs
- Rose gold adhesive backed mirror embellishments—60 embellishments
- Melon Mambo 1/4″ Ruched Ribbon—10 yards
- Night of Navy/Rose Gold 3/8″ Metallic –Edge Ribbon—10 yards
- Rose Gold Shimmer Paint—1/2 oz.
Everything is Rosy Stamp Set


Today is the first day for everyone to order so I don’t even have any of this yet. Let me share a few samples from Stampin’ Up!


Be sure to register for upcoming classes – just click on Registration under the Events tab.
Order online here – use hostess code JK4ED9AN for May 2019.
Use the code for orders with less than $150 in products. Orders over that redeem your own Stampin’ Rewards.
Jan 14, 2019 | 2019 Occasions Catalog, 2019 Sale-a-Bration, Stamper's Club, video |
For quite a few years now I’ve been creating a seasonal desktop calendar for my Stamper’s Club and a private stamping group. Since both groups meet at the beginning of the month that is usually our first class when we start a new year. This calendar is different from the ones most people make – which is just a stand with rip off calendar for each month of the year. My Seasonal Calendar has four panels – one for each quarter/season of the year and allows you to view multiple months at a time for planning and scheduling. My ladies love to have these on their desk at work so I continue to make one each year for them.
1st quarter

Each panel is built on a square with the calendar strip on the right side and a decorative seasonal element on the left side. Then all the squares are attached to a base piece and held up on the desk with a little stand. On Sunday, January 13, 2019 I did a Facebook Live video on my business page – At Monika’s Place – showing exactly how I made this whole project. It’s much easier to show it than to describe it in words. I had planned to upload to my Youtube Channel as well but I haven’t quite figured out how to get it there from my FB page.
Supply List – 1st quarter Jan – Mar
- Gray Granite card stock – 5-3/4″ x 5-3/4″
- Tranquil Tide card stock – 5-1/2″ x 3-1/2″
- Tin Tile Dynamic Embossing Folder
- Whisper White card stock – 4-1/4″ x 2-3/4″
- Gray Granite ink
- Tranquil Tide ink
- Stamparatus
- Winter Woods stamp set
- Part of My Story stamp set (SAB)
- Whisper White Bakers Twine
On this 1st quarter panel I used the Stamparatus for positioning my stamps. The little image for the ground under my trees was done using the hinge-step technique. The small grid paper is also helpful for positioning the card stock on the stamparatus – I marked alignment positions on the paper so everyone could use the stamps as I had them arranged on the stamparatus.
2nd quarter

Supply List – 2nd quarter Apr – Jun
- Basic Black card stock – 5-3/4″ x 5-3/4″
- Old Olive card stock – 5-1/2″ x 3-1/2″
- Layered Leaves Dynamic Embossing Folder
- Whisper White card stock – 4-1/4″ x 2-3/4″
- Old Olive ink
- Memento Black ink
- Clear Blocks
- Butterfly Gala stamp set
- Artisan Textures stamp set
- Butterfly Duet punch
- Botanical Butterfly Designer Series Paper (SAB)
- Old Olive Linen Thread
For this second quarter panel I used the Butterfly Duet punch to punch out the butterflies from the designer paper. If you watch the video I’ll show you a handy trick for getting these lined up in your punch.
3rd quarter

Supply List – 3rd quarter Jul – Sep
- Soft Suede card stock – 5-3/4″ x 5-3/4″
- Pool Party card stock – 5-1/2″ x 3-1/2″
- Ruffled Dynamic Embossing Folder
- Whisper White card stock – 4-1/4″ x 2-3/4″
- Ink in these colors: Pear Pizzazz, Pool Party, Soft Suede, Sahara Sand, Crushed Curry
- Waterfront stamp set
- Clear Blocks
- Pool Party/Silver Bakers Twine
For this third quarter panel I used the Pool Party & Silver Baker’s Twine – which is three strands twisted together – one Pool Party, one Whisper White and one Silver. I slightly twisted one end to separate them and then pulled out just the Pool Party piece to use on the panel. You can see how to do this in the video. You could use the white or the white and the silver twisted piece on the 1st quarter panel.
4th quarter

Supply List – 4th quarter Oct – Dec
- Mossy Meadow card stock – 5-3/4″ x 5-3/4″
- Crumb Cake card stock – 5-1/2″ x 3-1/2″
- Pinewood Planks Dynamic Embossing Folder
- Whisper White card stock – 4-1/4″ x 2-3/4″
- Early Espresso ink
- Mossy Meadow ink
- Crumb Cake ink
- Stampin’ Sponge
- Stamparatus
- Rooted in Nature stamp set
- Linen Thread
On this 4th panel I used a Stampin’ Sponge to ink up the wood slice image to make it a little lighter than a full on inking of it. And I also used the sponge to add a bit of ink around in the background.
More on the Calendar strips
On each panel I added the calendar strip. These were created in the old My Digital Studio program. I still have it saved on my old laptop. In the program I exported the calendar images and then printed them on my printer here at home. I used Whisper White card stock for my printing. I’ve added the images here. If you save them to your computer then select them both to print as 5×7 photos on one sheet. Make sure that the box for Fit Picture to Frame is not selected. Once you print them I trim them to 5-3/4″ long and 2″ wide. You may need to adjust the printing on your printer to get them to the right size.


Putting it all together
Once all four panels are made I attach them to the base piece which was 12″ x 6″ Early Espresso card stock. And the little stand piece is 5-1/2″ x 2-1/8″ and scored at 1-3/4″ & 3-3/4″. When attaching each panel to the base use Stampin’ Dimensionals on the sides and across the top but don’t place one in the center of the bottom. That needs to stay open to slide the stand piece in for holding the calendar upright on your desk.
I hope you enjoy this project. Be sure to visit my FB page to watch the video and while you are there like/get notifications for my page so you’ll see future videos and post. I’d love to hear what you think. You can order the products I used to make this project by clicking the link below. Thanks so much for visiting!
Be sure to register for upcoming classes – just click on Registration under the Events tab.
Order online here – use hostess code BNNC9A9C for January 2019.
Dec 11, 2018 | 2018 Holiday Catalog, Christmas, Stamp, Scrap, & Create Retreat |
I found these cute little metal buckets and decided to use them as one of the pillow gifts. They fit in nicely with the Farmhouse theme at my Stamp, Scrap & Create Retreat. There are so many things you could fill these buckets with. I decided on the Festive Farmhouse Cotton Twine.
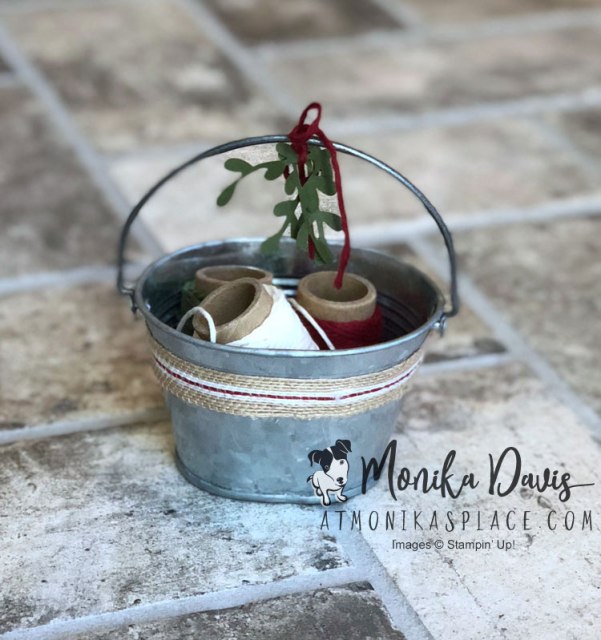
I added the Striped Burlap ribbon around the bucket – the tear & tape is the perfect adhesive to use for this. the Sprig Punch is new in the Holiday catalog and its been really popular! So much so that it is was on back order for quite some time – the shipment came in, all the back orders were filled and then it sold out again and its back on back order. It’s going to be quite a wait though – the next shipment will arrive in February. I have mine here if you need to come punch some out. I used two sprigs and tied them to the handle with some of the Cotton Twine.
Supply List
- Sprig Punch
- Festive Farmhouse Cotton Twine
- 5/8″ Striped Burlap Ribbon
- Tear & Tape
- Mossy Meadow card stock
Another option to dress up the tins is to add a monogram. Very carefully stamp on the front with Versamark ink – I used the Brushwork Alphabet set. Then cover the ink with White Embossing Powder and heat set it with the Heat Tool.

These would be cute gifts filled with candy for the holidays. But I actually have mine on my craft table and filled with the twine.
Be sure to register for upcoming classes – just click on Registration under the Events tab.
Order online here – use hostess code DS9YWVDP for December 2018.


