Nov 24, 2020 | 2020 Mini catalog, Cards, Christmas, Online Extravaganza |
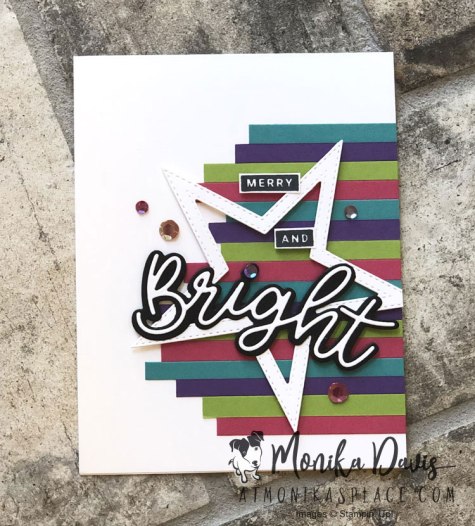
Today I have two Merry & Bright Cards to share with you AND the Merry & Bright Online Extravaganza Sale is TODAY! It’s a one day sale on Tuesday, November 24th only. Almost everything in the Stampin’ Up! Annual Catalog is on sale for 10% off. Stamps, dies, cardstock and paper, tools, ribbons and embellishments! Don’t Miss it!

There are some exclusions to the sale and you can see those below.

Speaking of Merry and Bright I have these two cards to show you today. I featured these on my FB Live yesterday – 11/23/2020 – on my FB page. See it here.

Supply List
- #155167 Peace & Joy Bundle (Peace & Joy stamp set + Joy Dies)
- #150653 Stitched Stars die
- #140272 Thick Whisper White card stock
- #146976 Regals 8-1/2 x 11 Cardstock Assortment (Real Red, Cherry Cobbler, Crushed Curry, Shaded Spruce)
- #153074 2020-2022 In Color 8-1/2 x 11 Cardstock Assortment (Bumblebee, Just Jade)
- #121045 Basic Black cardstock
- #100730 Whisper White cardstock
- #132708 Memento Black ink
- #150457 Holiday Basic Jewels
- #144108 Mini Dimensionals
- #152344 Adhesive Sheets
- #103579 Paper Snips
- #110755 Multipurpose Liquid Glue
- #127853 Silicone Craft sheet
- #149653 Stampin’ Cut & Emboss Machine
- #149655 Take Your Pick Tool
- #102300 Bone Folder
The first one was in the Regals colors which are your more traditional holiday colors. This second one is the same card using the Brights collection. I swapped out the card stock colors to #146975 Brights 8-1/2 x 11 Cardstock Assortment (Melon Mambo, Granny Apple Green, Bermuda Bay, Gorgeous Grape) and the bling to be #152477 Artistry Blooms Sequins. Everything else was the same. And if you want to use this same design for a birthday card just switch out the words!

I hope you like these fun colorful cards. They are the perfect design for using up thin scraps of cardstock – these are 1/4″ strips.
Be sure to register for upcoming classes – just click on Registration under the Events tab.

Order online here – use hostess code 9SPZ3FHA for November 2020.
Jan 15, 2020 | 12 Cards of Christmas, 2019 Holiday Catalog, Cards, Christmas, Watercoloring |
So Christmas came and went and I thought I was prepared for all the cards I wanted to mail out. I was wrong. This year I mailed out about 120 cards just before Christmas – short of the 170 on my list. I told myself that I had to come up with a new system. So I spent a while trying to figure out how to tackle making all my cards. Normally I start creating Christmas cards late in the fall just before the holidays start. I’ve never been a Christmas in July person. But this year I’m trying something new – making Christmas cards all year long!
Here is my plan:
One day each month I’ll design, cut, stamp, and assemble a set of Christmas cards. If I plan to make 12 cards (one design) each month, in December that would give me 144 cards. Then I’ll add the normal cards from my classes leading up to the holidays. So each month I’ll share my card and if you’d like to join me in this card challenge you can copy my card or create your own. Let me know how many you are making. Let’s start with January’s card.

This card I cased from another demonstrator – Ashley VanCamp. I had saved her version and decided to tweak it for my 12 Cards of Christmas project. I wanted to stick to current products. And yes everything I used on this card is current – so if you don’t have it you can order it and make this card too. I gathered up all my supplies, worked on all my pieces, and then sat and assembled everything – including stamping the inside of the card and a matching envelope.

The front layer is Shimmery White card stock. I started by using my Aqua-painter filled with water and getting the front wet. Then came back with the Aqua-painter loaded with Balmy Blue ink and water colored the background. To speed up the drying I used my heat tool. I stamped Shaded Spruce trees from the Perfectly Plaid Stamp set. Those were punched with the Pine Tree Punch and a vellum tree and a white tree. Using the Word Wishes dies, I cut “Merry” out of Gold Foil. Christmas comes from the A Wish For Everything stamp set – stamped on a scrap of white and I just cut straight around the word. The card is finished with Linen Thread and Gold Metallic Pearls. You can order all the products that I used for this card in my online store – the supply list is below.

Supply List
- #149418 Perfectly Plaid stamp set
- #149521 Pine Tree Punch
- #149320 A Wish For Everything stamp set (available as a bundle)
- #149629 Word Wishes Dies (available as a bundle)
- #146982 Balmy Blue card stock
- #100730 Whisper White card stock
- #101910 Shimmery White card stock
- #101856 Vellum card stock
- #132622 Gold Foil Sheets
- #107301 Medium Whisper White envelopes
- #147088 Shaded Spruce classic ink
- #147168 Balmy Blue classic ink refill
- #104199 Linen Thread
- #146282 Metallic Pearls
- #103954 Aqua Painter
- #129053 Heat Tool
- #104430 Stampin’ Dimensionals
- #144108 Mini Stampin’ Dimensionals

So that’s Card 1 of the 12 Cards of Christmas Challenge. Now to start thinking what I want to use for February.
Be sure to register for upcoming classes – just click on Registration under the Events tab.

Order online here – use hostess code ZRF6KVHJ for January 2020.
Nov 20, 2019 | 2019 Holiday Catalog, Boxes, Designer Series Paper |
In the Stampin’ Up! Holiday Catalog you may have noticed the beautiful traditional Christmas Cracker boxes on page 30 & 31. These are made with the Brightly Gleaming Specialty Designer Series Paper. I made some of these and then decided that I wanted a smaller version for an event that my team would be hosting this month. Our event was this past Friday and was a success. So I wanted to share my project with you. I’m going to share with you both sizes today and a third variation. On Monday, Nov. 18th I filmed a FB Live showing how to make all three and some little 3D ornaments. You can see that video HERE.

So let’s start with the large size that’s shown in the catalog. You’ll want to cut a piece of paper to 8-3/4″ x 9″ – so you will want to choose something that comes in 12×12 size for these large ones. My photo uses the Brightly Gleaming Specialty paper and also the Christmastime is Here Specialty paper. On the short side (that’s the 8-3/4″ side) you will score at 1-3/4″, 3-1/2″, 5-1/4″, and 7″. Then you will use the Gleaming Ornaments Punch Pack to punch at every fold – push the punch all the way in from the side of the paper lining up the center of the punch on the fold. Glue the end flaps together to make a 4 sided tube and then tie the ends shut with ribbon.
Supply List
- #150429 Brightly Gleaming Specialty Paper
- #150394 1/2″ Classic Weave Ribbon
- #149590 3/8″ Denim Ribbon
- #150647 Gleaming Ornaments Punch Pack
- #152154 Christmastime is Here Specialty Paper
- #152156 Gold 1/4″ Shimmer Ribbon
- #152392 Paper Trimmer
So now let me show you the smaller version that I made. I wanted to make it out of a 6×6 piece of paper so that I could use the pretty Feels Like Frost Paper Specialty paper. I ended up with a smaller three sided version. These are a nice size for table favors – you could even add names and use them as place cards. The silver ones would work for New Years or even a wedding.

I started with the 6×6 piece of Feels Like Frost Specialty paper. On one side you will score at 1-3/4″, 3-1/2″, and 5-1/4″. Now turn to the other side and score at 1-1/4″ and 4-3/4″. Then you will use the Gleaming Ornaments Punch Pack to punch at every fold along the two score lines. You’ll only slide the punch in a small amount. Watch the video and you can see what I mean – also look at the photo below. Glue the end flaps together so the small end is on the inside of the large end to make a 3 sided tube and then tie the ends shut with ribbon.


Supply List
- #150444 Feels Like Frost Specialty Paper
- #144213 3/8″ Silver Metallic-edge Ribbon
- #150647 Gleaming Ornaments Punch Pack
- #152392 Paper Trimmer
- #132178 Silver Foil
- #124262 White Baker’s Twine
- #150457 Holiday Rhinestone Basic Jewels
Then I wanted to make another version of this small one. For this one I wanted to make one end flat so it would stand up. You’ll do everything the same except on the second side score at 5-1/4″ instead of the 4-3/4″ and you won’t punch on that side. Instead you will snip them and then trim the angles on each side. The video will show you how.

Don’t miss the Online Extravaganza Sale Happening right now – Nov. 20 – 22, 2019. Check out my online store to see what’s on sale.

Be sure to register for upcoming classes – just click on Registration under the Events tab.

Order online here – use hostess code 6CPQVZGH for November 2019.
Oct 21, 2019 | Achievers Blog Hop, Christmas, Holiday Catalog 2019, Stamp, Scrap, & Create Retreat, video |
Hello. I’m joining the Maui Trip Achievers Blog Hop this month. It’s my first time to hop with this group and the first month of the Maui Trip Achievers Blog Hop. I’m so excited to have earned this incentive trip and go on one of my bucket list trips. And equally excited to join this blog hop for the first time – let’s hope that I got everything right!

This was one of the projects that we made at my Fall Retreat earlier this month. It’s a quick project and can easily be adapted for other holiday’s or occasions. You can watch my FB Live from October 14th to see how I made this fun tic tac holders – https://www.facebook.com/AtMonikasPlace/videos/2198657496906978/
Snowman Tic Tac Treat Holder

This project uses a 2″ wide strip of card stock and a tag topper punch. Add a wrapped piece of Designer Series Paper and ribbon at the top. These would be quick and easy to make. See below for the supplies and measurements.
Supply List
- #102482 Real Red cardstock 2″ x 8-1/2″, score at 3-7/8″, 4-5/8″
- #149518 Delightful Tag Topper
- #150393 Let it Snow Specialty Designer Series Paper 2-1/2″ x 5-3/4″, score so the front section is 2″ and then either side is 3/4″, and the back will overlap
- #150426 Real Red Curly Ribbon – tie the ends in a knot after you cut it so they don’t unravel
- #150644 Mini Curvy Keepsake Dies
- #150460 Tiny Keepsakes Stamp Set
- #147084 Real Red Ink
- #110755 Multi-purpose Liquid Glue
- Trimmer (coming soon)
- Die cutting machine

The Blog Hop Continues
To continue through go and click on the next blog in the list below.
Don’t miss the 24-Hour Stamp Sale on Wednesday – October 23rd.

Thanks for visiting today.
Be sure to register for upcoming classes – just click on Registration under the Events tab.

Order online here – use hostess code PKR73VM7 for October 2019.
Sep 13, 2019 |
Christmas Countdown Project Class
Join me in my Stamping Studio and get ready for Christmas with hand-crafted advent decor piece. Fill the boxes with small treats, and let the countdown begin!
Class Fee is $38 – PREPAID by Sept. 25th
Please bring adhesive or plan to purchase some here – for this project you will need either SNAIL Adhesive or Multipurpose Liquid Glue. I have an adhesive store if you need some.
This is a fun class for all levels of stampers – no stamping experience necessary!
Limited seats.


