Oct 23, 2013 | Big Shot, Cards, Halloween, Holiday Catalog 2013, Washi Tape |
I figure I better get all my Halloween ideas posted really quick – Halloween is just around the corner!
This card featuring the Toil & Trouble stamp set from the Stampin’ Up! Holiday Mini Catalog was one that I made last month for one of my card classes. The idea came from Melissa Davies.

Here is what I used on this card –
- Toil & Trouble stamp set
- Delightful Dozen stamp set
- Crumb Cake, Whisper White and Pumpkin Pie card stock
- Crumb Cake, Soft Suede, Pumpkin Pie classic ink and Jet Black StazOn ink
- Witches Brew Washi Tape
- Whisper White Bakers Twine
- Circle Framelits Collection and the Big Shot Die Cut machine
I’ll look through my projects to see what other Halloween stuff I haven’t shared.

Oct 12, 2013 | Banner Kit, Halloween, Holiday Catalog 2013, Stamp, Scrap, & Create Retreat |
 The Stamp, Scrap & Create Retreat theme this fall was “Tackle the Holidays”. So our first holiday was Halloween. The project was this BOO Banner made with the Simply Created Banner Kit.
I probably need to take a new photograph with it hanging up – this one is lying on my dining room table and you can hardly see the black glittery punch art spider hanging off the bottom. And we cheated just a little when we made this one – Cindy had one of the accessory kits for the banners – the Halloween one and it had the big Bat in it. We needed 12 but didn’t want to buy a kit for each person and increase the price or our retreat. So instead we traced the one that Cindy had and made a template for everyone to trace and cut – a bit more work but the effect was the same. We covered the bat with the 2-way glue pen and black glitter and it was done.
Here are some more details on how this banner came together –
- Using Sponge Daubers and Pumpkin Pie and Basic Black ink stencil the polka dots on one banner piece and the chevrons on another. The dot stencil you can line up with the two grommets at the top of the banner.

- Use the alphabet stencils and the mask to stencil a ‘b’ and and ‘o’ in black.
- For the center banner cover it with the mask stencil so that you have just the large circle open. Use a spritzer filled with Crushed Curry ink and rubbing alcohol (20 drops of ink refill). Spritz the circle. Let it dry for a minute and before removing the stencil use a sponge and Summer Starfruit ink to sponge around the edge of the circle to add some depth.
- Trace and cut out the bat. Cover with 2-way glue pen and black glitter. Attach to the banner.
- Create the pumpkin. Three xl-Oval punches in Pumpkin Pie – sponge the edges with Pumpkin Pie Ink. Layer with Stampin’ Dimensionals. A hand cut piece of black for the stem. Old Olive punched from the Boho Blossom punch for the leaves. A little piece of Linen Thread tied around the stem. Attach to banner with dimensionals.

- create the Spider. (I really need to get another picture so you can see it better.) The body is the Mosaic punch, the head 3/4″ circle punch, the legs are the Chevron Punch each one cut in half to make them thinner, plus a thin strip for the web part. Glue all the pieces together. Then cover with the 2-way glue pen and black glitter. Attach to the back of the banner so it is hanging down.
- String all the banners on a piece of Jute.
- Add ribbon to the jute on each end. Summer Starfruit and Basic Black ribbon.
Let just say there was black glitter everywhere and I am very glad we did this project in my craft room and not in the dining room or kitchen table.
Now go make your Halloween banner – it will be here soon!
And to see a stepped up version of this banner that Cindy made for one of her Artisan team projects – look here.
Thanks for stopping by today!
Oct 5, 2013 | Big Shot, Cards, Halloween, Holiday Catalog 2013 |
World Cardmaking Day is this Saturday, October 5, and to celebrate Stampin’ Up! is holding a contest you won’t want to miss. After all, what’s not to love about a holiday dedicated to card makers worldwide?!
There are two ways to enter:
- E-mail a photo of a card, or of you making a card, made with Stampin’ Up! product on World Cardmaking Day to [email protected].
- Post a photo of a card, or of you making a card, made with Stampin’ Up! product on World Cardmaking Day on Instagram. Mention us by typing @stampinup and use the hashtag #wcmd2013 in the description.
This contest is open to everyone-demonstrators, customers, friends, spouses, children . . . you get the idea. However, there are a few conditions:
- You must be over the age of 18 to win a prize.
- You can enter as many times as you wish, but each entry must feature a different card.
- Contest will last all day on October 5, from 12:01 AM to 12:00 PM. (that’s Mountain Time)
- We will randomly select 100 winners from our North American markets to receive a Paper Pumpkin Kit (valued at $19.95 US/ $20.95 CA)*, and we will select 50 winners from our South Pacific and European markets to receive the Naughty and Nice Rotary Stamp and Season of Style Designer Washi Tape.
A selection of pictures will be posted to Stampin’ Up!’s World Cardmaking Day Pinterest Board and the winners announced in a later current update.
*Quebec winners will receive the Naughty and Nice Rotary Stamp and Season of Style Designer Washi Tape (valued at $14.95).
Here is a card idea for you

A quick card using the Halloween Happiness single stamp from the Stampin’ Up! Holiday Catalog. Here’s how it was made:
- Cajun Craze for the card base
- Old Olive layer embossed with the Chevron Embossing Folder and tied around with a piece of Old Olive ribbon
- Cajun Craze layer cut with the Label Framelits
- Whisper White layer stamped with the Halloween Happiness stamp – use Stampin’ Write Markers to ink it up – Old Olive, Cajun Craze, Pumpkin Pie and Tangerine Tango. Huff and stamp. Then cut out with the Label Framelits.
That’s it! Have fun making cards today!
Oct 3, 2013 | Big Shot, Halloween, Stamp, Scrap, & Create Retreat, Tags, Washi Tape |
Last weekend’s retreat was so much fun! We all had a great time. Throughout the weekend I had little surprises for everyone. If you go to a Stampin’ Up! incentive event you get what they call “pillow gifts”. These are gifts that Stampin’ Up! leaves usually on your bed/pillow in the hotel room during the event. I wanted to do the same thing during the retreat but not everyone had a pillow here – some people went home every night. So the “pillow” gifts were left on everyone’s crafting spot. I tried to sneak down and leave the little surprises when no one was around.
This was the one from Friday night –

Friday night treat – skeleton Smore’s
Friday night we planned to have a fire in the fire pit so I thought the perfect surprise would be Smore’s related and I saw this idea on Pinterest some time ago and always wanted to make something like this.
I used the Stampin’ Up! Gusseted Cello bags that were in last years Holiday catalog and then on the clearance rack – not sure if they are still there or not. Inside the bag I have this – listed from bottom to the top
- bottom layer – graham crackers – 4 squares
- chocolate – 1/2 standard size bar
- Jumbo pumpkin shaped marshmallow – it is on its side
- yogurt covered pretzels – 5
- regular marshmallow – I used an edible marker to draw the face
I tied the bag shut with some Pumpkin Pie Taffeta ribbon (it was in my retired stash).
I also added a Skeleton twist tie – made with the Witches Brew Washi Tape – I just covered an existing white twist tie with the Washi Tape (I’ve also covered floral wire to make twist ties – see this post).
Breaking news!!! THANK YOU THURSDAY special from Stampin’ Up! – today Thursday Oct, 3, 2013 only – Washi Tape is on sale – order in my online store.
To finish the treat I made a little tag using the Halloween Bash stamp set. I stamped “eat if you dare” in Black ink and cut wit the label framelit. I used a Pumpkin Pie Stampin’ Write Marker to color the white edge outside the image.
 I tied the tag on and my skeleton treats were all done!
Each bag had enough to make two smore’s.
Enjoy!
Oct 2, 2013 | Big Shot, Cards, Halloween, Holiday Catalog 2013, Washi Tape |
One more fun card from my Cards that Move class – a Telescoping Card. This idea was not from convention or from Shelli but from Julie Davison.
 It’s a Halloween card and this is what it looks like closed. I used the Circle Framelits die set to create it. This is what it looks like open –
 Each of the circles rotates to open up. The circles are connected with the silver mini brads. So when I made this card and was prepping for my class I just pulled out regular Very Vanilla envelopes. I never tried to put the card in the envelope and when I was having my morning class – guess what? The largest circle in the die set which is the base of this card is too big! Oops. Well guess what I have that Stampin’ Up! just started selling that came to my rescue????
The Envelope Punch Board!! Yes it did – I pulled it out along with the rest of my Witches Brew Designer Series paper and in just a couple of minutes we had custom made envelopes to fit our telescoping card!! Yipee!

I’m so glad I had that Envelope Punch Board to rescue me! And look how cute the matching envelope is. I measured my card by placing it on my grid paper to see how big I needed my envelope to be. Cut the Designer Paper to the size that it said. Placed it on the punch board at the correct score line – then punch, score, rotate – line it up with the little marker along the score line, then punch, score and rotate. Repeat for the other two sides. Corner round all the points. And then fold it up into an envelope. It just take a few minutes – how great is that!
Here is a closer look at the bottom panel of the card –

Here is a quick list of what I used to create this card:
- Witches Brew Designer Series Paper
- Witches Brew Washi Tape
- Tags 4 You stamp set
- Bracket Label punch
- Circle Framelits die collection
- Gorgeous Grunge stamp set
- Seasonal Sayings stamp set
- Basic Black, Whisper White, Summer Starfruit, Pumpkin Pie card stock
- Basic Black, Summer Starfruit, Pumpkin Pie ink
- silver mini brads
- Summer Starfruit stitched ribbon
- Paper Piercer & Mat
- Envelope Punch Board
- Designer Label punch
Everything is available to order in my online store.
It was a fun card to create. Let me know if you make one.
Oct 1, 2013 | Best Of 25 Years, Cards, Demonstrator, Halloween |
I wanted to share several Stampin’ Up! related updates with you – new stamp sets and products and offers.
 A hostess special for October! Celebrating Stampin’ Up!s 25 year anniversary – get $25 extra hostess dollars with a qualifying workshop! Contact me to schedule your October party!
 A new Best of Stamp set – Best of Christmas #134384 – $14.95 – Clear Mount set. Order today!
 Coming son – a new recruiting special! It’s the lowest price ever. Join Stampin’ Up! for $25. Two weeks only – October 7 – 21st. Contact me for more information.
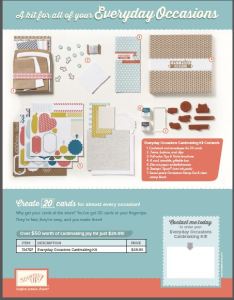 The Everyday Occasions Card Making Kit. The perfect card making kit for the new stamper – simple, fun all occasion cards. The kit contains everything necessary (minus adhesive and scissors) to create 20 beautiful cards for almost any occasion, and it comes in a beautiful box to store them in.

Monstermaniacs Clear-Mount Stamp Set #134972 Price: $14.95
Monstermaniacs, by Doris D., is the second winning stamp set from In With You, our new stamp set design challenge beta program. Order today!
Contact Form:
[contact-form subject=’Stampin%26#039; Up! October Specials – Contact’][contact-field label=’Name’ type=’name’ required=’1’/][contact-field label=’Email’ type=’email’ required=’1’/][contact-field label=’I want to book a party in Ocbober!’ type=’checkbox’/][contact-field label=’I want to learn more about Joining Stampin%26#039; Up!’ type=’checkbox’/][contact-field label=’Comment’ type=’textarea’ required=’1’/][/contact-form]


