Jan 23, 2013 | Cards, Demonstrator, Designer Series Paper, Mini - Love Notes, Sale-A-Bration 2013, Spring Catalog 2013 |
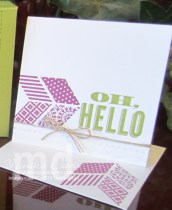
This quick little box is made from one piece of card stock and doesn’t need any adhesive – just a belly band to hold it shut. Fill it with some cute little matching Love Notes and you have a perfect little gift for someone sweet!

These are both based on ideas that I saw at the Stampin’ Up! Leadership conference. The box was an on stage demonstration and I think the little cards were too – but I’m not sure they were shown together – since my photos have them in different colors – I did combine the ideas for this project that I used in my team meeting this past weekend. We had lots of fun sharing both creative and business ideas and things that we learned at Leadership. Right now is a great time to join my team – during Sale-A-Bration you can choose $156.50 worth of products for your starter kit for only $99! And the kit is fully customizable so you can choose any items you want from the current catalogs! If you would like to learn more about this opportunity let me know – email me at [email protected] or check out more details on my website.
So back to this cute project – you start with a 7-1/2″ square and then use the Simply Scored Tool with the Diagonal Score Plate (you can get that FREE during Sale-A-Bration) – and score all four sides diagonally at 2-1/4″ and 3-1/2″.

Then you will do some cutting away of the little sections on each side.

Then you just fold it up to form the box. I cut a strip of Rich Razzleberry Designer Paper to go around it for a belly band – it just slides on and off. That is what holds the box shut.

Decorating the box was pretty quick –
- I stamped on the box with a couple of images from the Oh Hello stamp set
- Wrapped the strip of Designer Paper around it and glued the ends together.
- Then wrap the Linen Thread around it and tie in a bow.
- Slide the belly band off and add the Designer Builder Brad, then slide it back on.
- To make the Builder Brad – stamp an image from the Itty Bitties stamp set on card stock and punch out with the circle from the Itty Bitty Shapes Punch pack. Use a mini glue dot to attach to the Builder Brad. Then cover with the epoxy bubble that comes with the brad.
The box holds some Love Notes – which are little 3×3″ cards. I made mine out of Whisper White card stock and included matching white envelopes – they are the mini square ones in the Stampin’ Up! catalog. We made two designs at our meeting.

- The little Love Notes are made from Whisper White card stock
- Emboss the front edge with the Needlepoint Border Embossing Folder.
 Then stamp the words in Old Olive and the images in Rich Razzleberry
- Finish the Love Note by tying a piece of Linen Thread around.
- Stamp the envelopes to match.
A fun little project – I hope you like it. The stamp set is the Oh Hello stamp set in the Stampin’ Up! Spring Catalog. If you would like to order any of the products that I used to make this project please visit my online store on my website. Here is a full list of supplies for you.
Stampin’ Up! Supplies:
- Stamps: Oh, Hello, Itty Bitties
- Ink: Old Olive, Rich Razzleberry
- Card Stock: Old Olive, Whisper White
- Accessories: Simply Scored, Diagonal Scoring Plate, Linen Thread, Needlepoint Border Embossing Folder, Big Shot Die-Cut Machine, Designer Builder Brads, Mini Glue Dots, Itty Bitty Shapes Punch Pack, Polka Dot Parade Designer Paper, Mini square envelopes
Have a great day!
Monika

Jan 8, 2013 | Big Shot, Demonstrator, Fabric |

These were the gifts I gave my downline for Christmas. I think they all liked them. They are pouches for a pair of paper snips – and yes I included the paper snips too!
Stephanie helped with the sewing – she is much better than I but I think I did figure out one problem – and that is my sewing machine. I found the instruction book for mine and it is copyright 1978! Oh I think I might need a new sewing machine and then I might be better at it and enjoy it more. I was working on some swaps for the Leadership conference this weekend and got so frustrated with the machine I had to call my friend Cindy for help. She brought her machine over yesterday and I got done pretty quick. Next thing to purchase is going to be a new sewing machine.
Anyway back to these little things – I used Stampin’ Up! fabric – different patterns as you can see. For each pouch I cut two pieces of fabric and one thin piece of batting. I used the fabric adhesive to adhere the batting in between the two pieces of fabric. Then cut the whole thing with the petal cone die. Then we sewed them up.

To decorate them I cut flowers with the coordinating fabric and sewed that on with a button in the center. I also added shrinky dink monogram tags to the scissors but I didn’t get those in the picture.
I’m off to Florida today heading to the Stampin’ Up! Leadership conference. I hope to have a few updates but they may be on my Facebook page instead of here on my blog – so check over there too.
Oh – one more thing – if you are interested in joining my team I just might have one more of these for the next person that signs up! And coming later this month is Sale-A-Bration with a new Recruiting special – a great deal on the starter kit for you! Contact me if you want to know more!
Have a great day!
Nov 19, 2012 | Christmas, Demonstrator, Embossing, Fabric, Holiday catalog 2012, Punch Art |
At my last PAWS team meeting we had a treat wrapper swap and I wanted to share all the cute ideas with you. Hopefully I remembered correctly who made all of these (I don’t have them with me to check). I’m in VA at my sister-in-laws house – we did some crafting yesterday and have plans to do more – I’ll share those ideas later.

Anne’s swap – reindeer treat cups – color the large pearl with a red sharpie for the red nose

Fran’s swap – a little purse made from the framelits – she showed us how to make these for one of our M&T projects

Joyce’s swap – Two Tags die Mr. & Mrs. snowman

Laree’s swap – hot cocoa pocket

Leishman’s Swap – Pillow Pocket pouch

Lisa’s swap – Hot cocoa pouch

Monika’s Swap – rolo snowmen with fabric hats and scarves
My snowman idea came from Cindee Wilkinson – I thought the ones she posted were so cute I wanted to make something similar. The eyes are pearls and I colored mine by mashing them into my versamark ink pad so they got covered with ink then pouring black embossing powder over them – then I carefully heat set – and then I had black pearls. I did use our new Heat Tool which has a high and a low setting – I imagine if it was too hot you could melt or burn these pearls – so do it carefully. I’m going to try some of our other colored embossing powders too.

I wanted a punched nose and was trying to figure out which punch to use – finally I realized the Mitten Punch was perfect – use the thumb for the nose – here is what it looks like when I punched it –

Then I used a Pumpkin Pie marker to add some lines like a real carrot would have. Sponge the edges a bit too to add some dimension to it. It was the perfect little carrot nose.
Our meetings are so much fun – I enjoying getting together with everyone – my downline, my adopted downline and all my sidelines. Come join my team and join the fun! Join today and take advantage of the Online Extravaganza specials and the ONE DAY only Doorbusters – you could really build a deal of starter kit – plus you still get the free st of Ink Pads too! Join today by visiting my website and then you can take advantage of all the added demonstrator discounts for the rest of the week. If you have questions send me an email – I’ll be checking throughout the day!
And here is a picture of most of the group that was at the meeting – Joyce is missing and I’m missing (I was behind the camera).

Happy Shopping! My website is www.monika.stampinup.net – join their and shop their.
Nov 6, 2012 | Christmas, Demonstrator |
Stampin’ Up! is giving everyone a glimpse of what demonstrators get in the mail every other month. Some of our Stampin’ Success articles will be made available to everyone. Here is what they have to say –
Like what you see?
This is just a small sampling of the magazine our demonstrators receive every other month.
Our bimonthly Stampin’ Success magazine is filled with project ideas, business ideas, advice, and recognition for our demonstrators. If you want to see more ideas call your demonstrator and plan a party. You can gather your friends for a girls’ night out. And if you want to receive the full magazine in the mail every other month she can help you join. Just ask.
At Stampin’ Up! we’re all about creativity. Try us out.
So here you go – this is a peek at the November/December 2012 issue – check out the Stampin’ Success Magazine HERE.
And here is a little project from Stampin’ Up! that I included in my November Newsletter –

Enjoy your day!
Sep 26, 2012 | Cards, Demonstrator, Holiday catalog 2012 |
Finally I’m posting the swap cards from the last PAWS meeting. I’ve been so busy that I’m way behind on many things. Here is a quick look at what everyone shared.

Cindy Schusters’ swap card

Fran’s Swap card

Laree’s Swap Card

Leishman’s Swap card

Lisa Swantek’s Swap card

Monika’s swap card (one of 3 versions) – I already posted these earlier.
I think that was everyone that swapped.
Tomorrow is Hilton Head day! Yeah!
Sep 17, 2012 | Big Shot, Demonstrator, Halloween, Holiday catalog 2012, My Digital Studio |
Every other month I have a demonstrator meeting at my house – my PAWS team meeting. It is a ton of fun to get together with these wonderful ladies each time. At the meeting we usually start with sharing some business topics and other Stampin’ Up! news and then we have snacks, Make&Takes and we do a swap. I came to realize that after the meeting I don’t always get a chance to take pictures of everything. So this last month I decided to take pictures at the meeting and I think that will be better – and now that I’m writing this – I think next month I’ll even try to get pictures of the M&Ts with the person that created it. Hopefully this will make it easier to share the wonderful creations that everyone brings.
So I already shared my Make&Take from the meeting – that was the Core’dinations card and technique book. And today I’ll share with you Leishman’s Halloween Make&Take.

PAWS meeting – Leishman Williams Make & Take project
She really had two projects for us. One was the little cello bag filled with candy corn. The bottom of the bag is stamped with StazOn ink. The top is tied with the new black/gray satin ribbon and we added a little punched tag to the front. Leishman used My Digital Studio 2 to create the different images from the Spooky Bingo Bits stamp brush set. In MDS2 it is easy to recolor portions of the stamp images – she had a variety of images for us to choose from. I guess I should have taken a picture of that too.
Then we made a little box using the Scallop Circle die – we trimmed them and glued them to the sides of a box – and embossed with the Spider Web folder. Then use the Simply Scored and a strip of Designer Paper – these were printed on a home printer through MDS. It’s the Howlstooth & Scaringbone DSP – either use the real designer paper or use the digital paper and print it at home. Create a medallion – use some hot glue on the new silicone craft sheet – it really holds the medallians well. Stamped image is from the Mixed Melody hostess stamp set and Tiny Tags for the Boo.
Two fun Halloween ideas – I hope you like them. Thank you Leishman for sharing these with us.


