Feb 21, 2013 | Cards, Create with Connie & Mary, Sale-A-Bration 2013, Simply Scored, Spring Catalog 2013 |
The Patterned Occasions set is another Sale-A-Bration set with a bunch of versatile images. My favorite image is the little elephant but another fun one is the band-aid. And that is what I focused on for this week’s color challenge at Create with Connie & Mary. I needed a get well card and decided to use the band-aid image and combine with the colors for this week’s challenge. And now this week I think I need a get well card for myself I’m trying really hard to fight away a cold or something that is trying to come in and take me over – I don’t need that so just go away. I’m so ready for Spring to be here – enough cold and rain. We don’t get snow we just get cold rain with some occasional ice – snow would be better – at least then everything is pretty.
By the way have you joined the Create with Connie & Mary Spring 2013 Online class? They are show-casing items from the Stampin’ Up! Spring catalog plus Sale-A-Bration! Lots of great ideas and its not too late to join.
Here are the colors this week – Melon Mambo, Daffodil Delight and Basic Grey. Very popular right now is the yellow and gray combination and I think the splash of bright pink really makes these colors pop. Some of the combinations I’m not crazy about but this one I do like.


The card inspiration came from an idea I saw somewhere while poking around on the internet. Here are some details on this card –
- card base is Daffodil Delight – it’s a bit hard to see but the base is embossed using the new Simply Scored Borders Plate – there are two sets of double scallops.

- A Basic Gray layer with a piece of Designer Paper from Sunshine & Sprinkles pack in the Spring Catalog.
- I stamped the Band-Aid image from the Patterned Occasions set three times on Whisper White card stock – once in Daffodil Delight, once in Basic Gray and once in Melon Mambo – and cut out the band-aids and the words from the Gray one (just cut a tiny banner).
- The band-aids are added with Stampin’ Dimensionals.
- The words are glued flat and then I added a cute little clip from the Elements Cute Clips – the heart and it is tied with a piece of the Melon Mambo Striped Organdy ribbon – those are also in the Stampin’ Up! Spring catalog.
- I thought it turned out really cute and the colors made it bright and cheery.
Visit the Create with Connie & Mary site to see the creations from the rest of the design team and to submit your own creation for this new challenge. Plus don’t forget to check out the 2013 Spring class going on right now!
Stampin’ Up! Supplies:
- Stamps: Patterned Occasions (SAB)
- Ink: Daffodil Delight, Melon Mambo, Basic Gray
- Card Stock: Daffodil Delight, Basic Gray, Whisper White
- Accessories: Sunshine & Sprinkles Designer Series paper, Elements Cute Clips, Melon Mambo 3/8″ Striped Organdy Ribbon (all from the Spring Catalog) , Stampin’ Dimensionals.

Feb 19, 2013 | Cards, Embossing, Sale-A-Bration 2013, Vintage |
One more Sale-A-Bration project using the vintage style set called Feeling Sentimental. These images are really nice when they are embossed.

This is a quick easy card and this is how I created it –
- Card base is Crumb Cake and the front flap is embossed with Delicate Designs Embossing Folder. Sponge over the edge with Early Espresso ink.
- Tie some Linen Thread around the card front – tie in a bow.
- stamp Celebrate in Versamark ink on the bottom of the card front and cover with Early Espresso Embossing Powder and heat set with the Heat Tool
- stamp the Ferris wheel image on the First Edition Designer Paper with Versamark ink, cover with Early Espresso Embossing Powder and heat set with the Heat Tool
- Sponge around the image with Crumb Cake ink
- Distress the edges of the Early Espresso card stock with the Distresser tool.
- layer together and add to the front of the card
You could use any of the images in the set and switch out the word with something else from another set. Clean and simple. I hope you like it.
Feb 16, 2013 | Cards, Sale-A-Bration 2013 |
Lets do some Sale-A-Brating! In the Stampin’ Up! world that means its our biggest promotion of the year with lots of different choices for earning FREE Stampin’ Up! products. Earlier this month I had a class that focused on the Sale-A-Bration products for 2013. So I want to share some of those projects with you so you can see some ideas on the different choices that you have. Today’s project was one that we saw on stage at the Stampin’ Up! Leadership conference and I adapted it to be a project for my Stamper’s Club this month. This is the Happy Hello Simply Sent Card Kit – one of your Free Sale-A-Bration choices. Now you can make the cards just as they are in the kit but this little project takes the kit a bit further. You need to get some product anyway in order to get the kit free – so this is one idea for you –
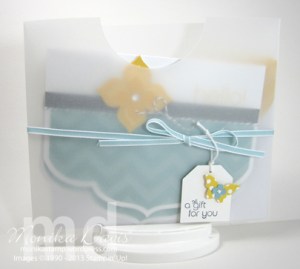
It’s a super cute pouch to put some cards in and give as a gift to someone – a hostess perhaps. If you went to the Stampin’ Up! leadership conference this may look familiar. I’m not sure how Sara made her pouch but this is how I made mine.
- I used a full sheet of 8-1/2 x 11 Vellum Card Stock, score it in half at 5-1/2″ using the Simply Scored Board.
- Turn it and score at 1″ on either side.
- Cut on the 5-1/2″ score line from the outside edge to the 1″ score line on either side to create flaps. I cut away the flaps on one side.
- punch a half-circle on the side with the flaps

- Fold the pouch in half and the flaps around the back – I didn’t even use any adhesive.
- Add a piece of 1/8″ Baja Breeze Taffeta Ribbon and tie it in a bow
- Make a tag using the Extra-Large Tag punch
- The tag is stamped with the phrase that comes from the Bring on the Cake stamp set
- the butterfly is a piece of Daffodil Delight designer paper from the Polka Dot Parade paper pack using the new Bitty Butterfly punch, then a bitty flower and a rhinestone
Now make the cards that come in the Happy Hello kit – the Baker’s Twine, Rhinestones, Daffodil Flowers and Envelopes are all included in the kit. The only thing I added was on the blank card I stamped “wishing you a wonderful day” also from the Bring on the Cake stamp set.


I put two cards and envelopes in the pouch – since the kit comes with 8 you could make 4 sets! To get the Happy Hello kit free you need to put in a $50 order of Stampin’ Up! products – so here is an idea.
- Simply Scored Tool $29.95
- Vellum Card Stock $6.50
- 1/8″ Taffeta Ribbon $5.95
- Bitty Butterfly punch $15.95
Use a stamp set that you have on hand, if you don’t have the tag punch cut it by hand, use some designer paper that you have on hand for the butterfly. Hopefully that gives you some inspiration. I saw another cute idea for this kit and I plan to try it out and share that with you later.
You can place your order for these products today on by website – www.monika.stampinup.net – just click on SHOP NOW.
Enjoy the weekend!
Feb 15, 2013 | Big Shot, Cards, Sale-A-Bration 2013, Spring Catalog 2013, sympathy, Vintage |
The new Stampin’ Up! Flower Trim is beautiful! If you haven’t seen it in real life you are missing out. And while the trim itself comes in Very Vanilla – you can change the color! On this card I changed my to Summer Starfruit – and I’ll share with you how I did that. Here are the two versions of this card –
 These cards are very pretty in real life and I just love the little flowers. I cut off a couple of flowers for each card. Do you want to know how I changed the color from Very Vanilla to Summer Starfruit? It’s easy – here is what I did –
- I cut off the number of flowers that I wanted from the trim and placed them on a paper towel
- I used one of the new Stampin’ Spritzer bottles – fill it with some rubbing alcohol about 1/2 full or a bit more.
- Use the Summer Starfruit ink refill and add to the Spritzer bottles – the more drops the darker it will be – so you’ll have to decided what is right for you. I probably added 10 drops. Then shake it up.
- Spritz the flowers with the mixture in your spritzer bottle and let the flower dry – it shouldn’t take very long.

Here are the tips on making this card –
- The card base is Summer starfruit.
- The layer of Whisper White card stock is embossed on the bottom edge with the Needlepoint Border Embossing Folder (Spring catalog).
- Add a 1/2 piece of one of the Tea Lace Paper Doilies (Spring catalog) to the white card stock.
- Stamp sentiment on the white card stock.
- Add the leaves/stems to the doily layer. Use the piercing tool and pierce a hole on either sides of the stems to pull the Linen Thread through and tie in a bow.
- Attach the Whisper White panel to the card base.
- Add the flowers to the stems – I used glue dots.
Here is another version of the card –

If you look at the two version of the cards there are just a couple of minor differences –
- The stamp set that I used – So Sorry on one and Vintage Versus from the Sale-A-Bration brochure on the other
- The stems/leaves that I used – the Bird Builder punch on one and the Little Leaves Sizzlits die on the other.
I hope you like this card. I do and will probably make a few more as I need some more sympathy cards and I think this one turned out very peaceful looking. Thanks for stopping by today. All the products that I used are available in my online store on my website – just click the SHOP NOW button – www.monika.stampinup.net
Feb 14, 2013 | Big Shot, Cards, Create with Connie & Mary, Ronald McDonald House Charities, Spring Catalog 2013, Valentine's Day |
Happy Valentine’s Day! We made Valentine’s at the Ronald McDonald House on Tuesday night. And since today – Valentine’s Day was going to be a Create with Connie & Mary challenge day I decided to use the sketch for the card we were making at the Ronald McDonald House. Stampin’ Up! has a partnership with the Ronald McDonald House Charities and demonstrators from all over volunteer time to get crafty with house guests everywhere. I go with a small group of demonstrators to one of the houses here in the Atlanta area – we try to visit every month. And since it was the week of Valentine’s day of course we had to make Valentine cards.
This weeks Challenge at Create with Connie & Mary is a sketch challenge. Plus you can get daily inspiration right now if you join Create with Connie & Mary Spring 2013 Online class. They are show-casing items from the Stampin’ Up! Spring catalog plus Sale-A-Bration! Lots of great ideas and its not too late to join.
Here is a look at the sketch for this week –

Since I wanted a Valentine card – the first thing was to take the flower and make it a heart. Then I just played with the rest until I got something I wanted. I ended up turning the sketch for my card. It needed to be a simple card for everyone at the Ronald McDonald house to make. And I pre-prepped several pieces ahead of time so they just had to glue them on.

Here are some details on this card –
- card base is Primrose Petals and I used the hearts folder from the Adorning Accents Embossing Folders to add hearts across the bottom (I did this ahead for them)
- Above the embossed hearts is a scalloped piece of Pool Party card stock – this was cut with the Tasteful Trim Bigz XL die (I cut these ahead of time too)
- They stamped a greeting above the scallops – they had a choice of four different ones – “Happy Valentine’s Day” from Wacky Wishes, “Be My Valentine” from Delightful Dozen, “You’re in My thoughts, You’re in my Heart” from Word Play, and “happy valentine’s day” from Teeny Tiny Wishes – all the stamping was done in Real Red ink (it’s best to have only one color ink to choose from when we stamp there)
- I punched hearts from the More Amore Designer Series paper using the Full Heart punch (I punched all these ahead of time). They added them to the card with Stampin’ Dimensionals.
- I also had a couple of hearts from the Hearts A Flutter stamp set that they could use. They were able to write and stamp on the inside of their card and decorate the envelopes too.
- We had cards for grandma’s, auntie’s, mama’s, and sister’s.
- Signed and sealed and ready to be delivered!
Here are some photos of our Stampers’s this week.


I hope you gave some love to someone close to you and even to someone you didn’t even know! I know everyone had the Ronald McDonald House that stamped with us really had a fun time.
Visit the Create with Connie & Mary site to see the creations from the rest of the design team and to submit your own creation for this new challenge. Plus don’t forget to check out the 2013 Spring class going on right now!
Stampin’ Up! Supplies:
- Stamps: Wacky Wishes (and others listed above but not shown on this sample)
- Card Stock: Primrose Petals, Pool Party
- Accessories: Full Heart Punch, Big Shot Die Cut Machine, Adorning Accents Embossing Folders, Tasteful Trim Bigz XL die, More Amore Specialty Designer Series paper, Stampin’ Dimensionals.
Feb 7, 2013 | Cards, Create with Connie & Mary, In Colors, Spring Catalog 2013 |
It’s time for a new Color Challenge at Create with Connie & Mary . – that means it’s Thursday. Plus you can get daily inspiration right now if you join Create with Connie & Mary Spring 2013 Online class. They are show-casing items from the Stampin’ Up! Spring catalog plus Sale-A-Bration! Lots of great ideas and its not too late to join.
So here is this weeks color challenge –

All three are from the 2011-2013 In-Color collection – so I thought about having Baker’s Twine in all three colors. Then I remembered a card I saw on Pinterest that used Baker’s Twine and tiny tags – it wasn’t a Stampin’ Up! card but I knew I could recreate the idea with my Stampin’ Up! products. So here is my version.

Here are some details on this card –
- card base is Island Indigo with a layer of Calypso Coral and then a layer of Whisper White
- I stamped three little tags from Tiny Tags – one in each color – Lucky Limeade, Calypso Coral and Island Indigo and punched them out with the Jewelry tag punch and punched a hole in the top with the 1/16 handheld punch
- On the Lucky Limeade tag I stamped a tiny butterfly from the Itty Bitties stamp set in the Spring catalog
- On the Calypso Coral tag I added a bitty flower punched from the Itty Bitty Shapes punch pack with a small Rhinestone in the center.
- I added the matching Baker’s Twine to each tag – tying just a piece with a knot to be attached to the back of the card and then using a second piece to tie a bow at the top of the tag.
- I stamped “wishing you a wonderful day” on the white card front in Island Indigo ink – I did use my Stamp-a-ma-jig because I wanted to be sure it was straight
- I placed the tags on the white card front with Stampin’ Dimensionals and then attached the Baker’s Twine to the back before attaching it to the front of the card.
But there’s a little bit more – I decided I wanted to dress up the inside – I had a piece of scrap paper on my craft table that had a piece punched out of it and it made me think I could add a Whisper White layer to the inside of the card with the Jewelry tag punched out of it. So here is what it looks like –

I stamped the bitty butterfly and added a small Baker’s Twine bow. Just a fun little addition to the inside!

Visit the Create with Connie & Mary site to see the creations from the rest of the design team and to submit your own creation for this new challenge. Plus don’t forget to check out the 2013 Spring class going on right now!
Stampin’ Up! Supplies:
- Stamps: Tiny Tags, Itty Bitties, Bring on the Cake
- Ink: Island Indigo, Lucky Limeade, Calypso Coral
- Card Stock: Island Indigo, Calypso Coral, Lucky Limeade, Whisper White
- Accessories: Jewelry Tag Punch, Itty Bitty Shapes Punch pack, Basic Rhinestones, Baker’s Twine – Lucky Limeade, Island Indigo, Calypso Coral, Stampin’ Dimensionals.


