Nov 7, 2013 | Big Shot, Birthday, Cards, Masculine |
I have a great Masculine Birthday card for you today! It seems that everyone struggles making cards for guys. I have a lot of guys in my family – a husband and 3 sons, a brother, my father, 2 brother in-laws and 2 nephews. That’s 10 compared to 6 girls. anyway…..

I think part of making it masculine has to do with the colors you choose. For this card I used Soft Suede and Summer Starfruit along with the Naturals White card stock.
The background technique is a fun one – I used a brayer to add Soft Suede ink to the top side of the Modern Mosaic Embossing Folder – insert a piece of the Naturals White card stock and then run it through the Big Shot. It embosses the card stock and adds the ink into the recessed areas.
Here are all the elements of the card:
- Soft Suede card base
- the Modern Mosaic embossed layer
- a piece of Summer Starfruit ribbon
- Soft Suede card stock cut with the Deco Labels Framelit
- Naturals White card stock – stamp with Morning Post Numbers stamp set and cut with the Deco Labels Framelit
- Summer Starfruit card stock – stamp with Label Love and punch out with the Artisan Label punch
One more thing you could add which isn’t in this photo but was on one of the cards that I made was the addition of 2 Soft Suede candy dots on either side of the label frame.
Thanks for visiting today!

Nov 4, 2013 | Birthday, My Digital Studio |
Have you taken advantage of any of the My Digital Studio deals during Digital Scrapbooking Days?
There is a My Digital Studio Seasonal Sale with select downloads at 30% off.
Daily deals with a select download at 50% off. There was even a free download on Saturday.
I have added some new downloads to my collection including today’s Daily Deal – Modern Medleys Overlay Kit – it’s only $3.98 today.
With all the talk of My Digital Studio and digital downloads I thought I would share a My Digital Studio project with you today.
 Check out this fancy card! It’s a new option for printing called the Artisan Postcard (there is also a scallop card option). If you are designing a card in MDS and plan to print it with this option through Stampin’ Up! be sure to turn on the Artisan card bleed area.
To create this card I started with a postcard template from the Every Celebration Hostess Ensemble — yes there is a digital download hostess option. This is what the postcard template looks like
 It’s actually an invitation. I copied the top and flipped and mirrored it to add it to the bottom of the card. Then I changed the words to add phrases related to birthdays so that it would be a birthday card. I sent it off to Stampin’ Up! to print it as an Artisan card.
Here is a look at the Every Celebration Hostess Ensemble –
 Next time you are a Stampin’ Up! hostess you can choose this for part of your hostess dollars.
Visit my online store to see all the digital downloads we have available including the ones on sale. Tomorrow is Tuesday so there should be some new releases too. Also visit MyDigitalStudio.net to see tomorrows daily deal.
Thanks for visiting today!
Oct 11, 2013 | Big Shot, Birthday, Cards, Demonstrator, Thinlits |
Stamping News from Monika Davis
Aug 15, 2013 | Big Shot, Birthday, Thinlits |
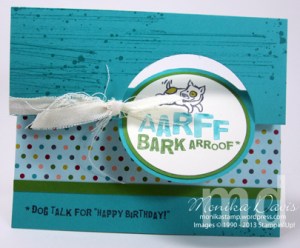 Look at this fun card I made using the new Stampin’ Up! Circle Card Thinlits dies!
I decided to turn mine on it’s side for a different look – what do you think?
This was the swap card that I made for my PAWS team meeting last Saturday. I loved how it turned out. Here are some details for you.
- card base is Bermuda Bay – cut to use with the Circle Card Thinlits die – and run right through using the Magnetic Plate and Big Shot. Then just fold on the score lines and your card is ready to decorate!
- Add a strip of Birthday Basics Designer Series paper – I did use the Thinlits die to cut it so the circle cut would match up to the card base.
- Add a strip of Gumball Green card stock.
- Stamp greeting on bottom of card
- Stamp Gorgeous Grunge images on top portion of card and lower right hand corner in Bermuda Bay ink
- Stamp the dog image from Animal Talk on Very Vanilla card stock – I used markers to color the stamp so I would have it in three different colors – Gumball Green, Bermuda Bay and Basic Gray. I cut these out with the Circle Framelits die.
- I punched coordinating circles using the 2-1/2″ circle punch – one in Gumball Green and one in Summer Starfruit.
- Layer the circles and attach one to the circle of the card and one to the flip side.
 The final addition was the Cotton Ribbon – I cut a strip in half and then cut away the finished edge on the other side. I wanted it to be frayed. Tied it around the card in a knot.
Enjoy!
You can shop online here at my website Online Store.
Upcoming Events you don’t want to miss:
Saturday August 24th – Buy One Get One free Sale & Mini Class
Wednesday August 28th – Card Maker’s class
Friday August 30th – Wow Scrapbook class
September 27th – 29th – Stamp, Scrap & Create Retreat
Jul 16, 2013 | Birthday, Tags |
You can create some pretty packages in a snap. It’s as easy as 1,2,3 ….

- Pick a Box like the new Tag a Bag Gift Boxes from the Stampin’ Up! Catalog. These are Kraft food safe boxes with a acetate sleeve.
- Add a tag using the new Tag a Bag Accessory Kit. Each kit includes supplies to make 10 tags. Pieces include large base tags, medium builder tags, Baker’s Twine, Stampin’ Dimensionals, mini clothespins. and some adhesive strips.
- Fill your box with goodness!
On my box above I did add just a couple of things –
- Bermuda Bay card stock – a 1/2 sheet cut into strips and crinkled for the filler inside.
- Bermuda Bay card stock – punched with the Elegant Butterfly punch and Bitty Butterfly punch
- Rhinestone
- Stamped greeting from Teeny Tiny Wishes – using Bermuda Bay ink.
These are really nice sturdy boxes and are a great size for many little things. We made these at my Stamp Club meetings last week using all the colors in the Tag a Bag Accessory kit – Bermuda Bay, Gumball Green, Crushed Curry, Tangerine Tango, and Smoky Slate.
I’m out of town again this week (this is really too much travel for me). But this time it is a girls trip and we are having Stamping fun all week long in Utah. Sunday Cindy and I flew to Utah and met up with Elizabeth and headed to Wendy’s house. Monday was a fun day – we went out on adventures and shopping and finished the day in the Canyon – I have pictures to download and share with you in another post. Nancy, Carolyn and Libby joined us from Texas. Today we are having a stamping retreat – we spent the morning stamping projects and after we finished lunch we are now learning more about My Digital Studio.
Fun times stamping with friends from all over. Later in the week we will head into Salt Lake City for the Stampin’ Up! Convention. I can’t wait!
Jul 5, 2013 | Birthday, Cards, Masculine, This & That |
 This is my version of a card I found on Pinterest. I made a few changes but it is generally the same. I think it make’s a great masculine birthday card.
- Daffodil Delight card base
- Basic Gray layer – embossed with the Chevron Embossing Folder
- Some flags made from the Epic Day Designer Series paper
- Make a Wish from the stamp set called Make a Wish – it is stamped in Basic Gray on Whisper White card stock
- Stamped the splatter from the Paper Pumpkin Welcome kit in the background in Daffodil Delight
- Attach to the Basic Gray layer
- Tie a piece of Basic Gray stitched ribbon around
A fun card that would be easy to create with any of the designer papers in a variety of colors!
Thanks for visiting today!


