Jan 23, 2013 | Cards, Demonstrator, Designer Series Paper, Mini - Love Notes, Sale-A-Bration 2013, Spring Catalog 2013 |
This quick little box is made from one piece of card stock and doesn’t need any adhesive – just a belly band to hold it shut. Fill it with some cute little matching Love Notes and you have a perfect little gift for someone sweet!

These are both based on ideas that I saw at the Stampin’ Up! Leadership conference. The box was an on stage demonstration and I think the little cards were too – but I’m not sure they were shown together – since my photos have them in different colors – I did combine the ideas for this project that I used in my team meeting this past weekend. We had lots of fun sharing both creative and business ideas and things that we learned at Leadership. Right now is a great time to join my team – during Sale-A-Bration you can choose $156.50 worth of products for your starter kit for only $99! And the kit is fully customizable so you can choose any items you want from the current catalogs! If you would like to learn more about this opportunity let me know – email me at [email protected] or check out more details on my website.
So back to this cute project – you start with a 7-1/2″ square and then use the Simply Scored Tool with the Diagonal Score Plate (you can get that FREE during Sale-A-Bration) – and score all four sides diagonally at 2-1/4″ and 3-1/2″.

Then you will do some cutting away of the little sections on each side.

Then you just fold it up to form the box. I cut a strip of Rich Razzleberry Designer Paper to go around it for a belly band – it just slides on and off. That is what holds the box shut.

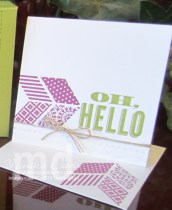
Decorating the box was pretty quick –
- I stamped on the box with a couple of images from the Oh Hello stamp set
- Wrapped the strip of Designer Paper around it and glued the ends together.
- Then wrap the Linen Thread around it and tie in a bow.
- Slide the belly band off and add the Designer Builder Brad, then slide it back on.
- To make the Builder Brad – stamp an image from the Itty Bitties stamp set on card stock and punch out with the circle from the Itty Bitty Shapes Punch pack. Use a mini glue dot to attach to the Builder Brad. Then cover with the epoxy bubble that comes with the brad.
The box holds some Love Notes – which are little 3×3″ cards. I made mine out of Whisper White card stock and included matching white envelopes – they are the mini square ones in the Stampin’ Up! catalog. We made two designs at our meeting.

- The little Love Notes are made from Whisper White card stock
- Emboss the front edge with the Needlepoint Border Embossing Folder.
 Then stamp the words in Old Olive and the images in Rich Razzleberry
- Finish the Love Note by tying a piece of Linen Thread around.
- Stamp the envelopes to match.
A fun little project – I hope you like it. The stamp set is the Oh Hello stamp set in the Stampin’ Up! Spring Catalog. If you would like to order any of the products that I used to make this project please visit my online store on my website. Here is a full list of supplies for you.
Stampin’ Up! Supplies:
- Stamps: Oh, Hello, Itty Bitties
- Ink: Old Olive, Rich Razzleberry
- Card Stock: Old Olive, Whisper White
- Accessories: Simply Scored, Diagonal Scoring Plate, Linen Thread, Needlepoint Border Embossing Folder, Big Shot Die-Cut Machine, Designer Builder Brads, Mini Glue Dots, Itty Bitty Shapes Punch Pack, Polka Dot Parade Designer Paper, Mini square envelopes
Have a great day!
Monika

Jan 22, 2013 | Cards, Sale-A-Bration 2013, Stampin' Up! Events |
It’s time for our biggest promotion of the year at Stampin’ Up! – it’s Sale-A-Bration time!

Bloomin’ Marvelous Stamp Set – set of 8
The Sale-A-Bration promotion starts today! Sale-a-Bration is an annual party with loads of free products! This year’s party is better than ever – we’re celebrating our 25-year anniversary! So, put on your party hat and BYOC (bring your own confetti)!
How will you party?
Enjoy Sale-A-Bration in Three Ways. Choose all that Apply.
HOST – have my friends over for a party – qualifying party $150 – you’ll get – a free pack of silver glimmer paper + $25 hostes dollars OR qualifying party $400 – you’ll get – a free pack of silver glimmer paper + Free product bundle + $65 hostess dollars + 50% off any full-priced item

Madison Avenue stamp set (set of 5), Sycamore Street Designer Series Paper
SHOP – yipee! a party just for me! – spend $50 – you’ll get – one free SAB product – spend another $50 get another

Feeling Sentimental stamp set (set of 4)
JOIN – I can party all the time – join during Sale-A-Bration – you’ll get – product discount + friends + the chance to make a difference – PLUS 25% more in your starter kit – $156.50 worth of products for $99!
Visit my website starting today to learn more!
I’m also offering SAB Mini Clubs – find two friends and contact me today for all the details!

My Digital Studio options – Lemonade Stand Disc or One Big Sale-A-Bration Disc
The pictures in this post are some from the display boards at the Stampin’ Up! Leadership conference. They show just some of what you can get free during Sale-A-Bration.
I can’t wait to Sale-A-Brate with you! Order today to get your FREE products – next on my list are Bloomin’ Marvelous and Feeling Sentimental! How about you?
Jan 21, 2013 | Big Shot, Fabric, Spring Catalog 2013, Stampin' Up! Events |
These super cute fabric petal cones are full of fun decorated kisses! I created these for a treat wrapper swap at the Stampin’ Up! Leadership conference.

The little kisses are so much fun to decorate and really quick and easy!
- stamp images from the Itty Bitties stamp set (Spring Catalog)
- punch out with the Itty Bitty Shapes Punch Pack (I used the circle)
- punch out 3/4″ circles from coordinating designer paper
- add to the bottom of the chocolate kiss with a mini glue dot!
- cuteness!
I choose the Itty Bitties images to color coordinate with the fabric that I used for each Petal Cone holder. I made them in various colors using the fabric from the Essentials Designer Fabric pack – Cherry Cobbler, Early Espresso, Old Olive, Daffodil Delight, and Marina Mist.

Here are a few tips on how I made the fabric petal cones –
- I cut pieces of each of the fabrics to fit the petal cone die – I think they were about 6″x6″ or maybe 5-1/2″
- I cut pieces of felt to be the same size
- I cut pieces of the Fabric Adhesive roll to be just a bit smaller
- Using an iron follow the directions for the Fabric Adhesive and create a “sandwich” – one layer of fabric, the fabric adhesive, a piece of felt, another fabric adhesive, the second layer of fabric – for each one I used the same color in the two different patterns.
- Now take the fabric sandwich and cut the Petal Cone shape using the Big Shot machine – it should be the cutting plate, the die, the fabric sandwich, another cutting plate.
- Cut away the little tab on the side
- If you want to sew – and yes these are sewn – first sew around the two scallops.
- Next fold down one of the scallops – that is going to be your front – and stitch it down so that it stays folded over
- Now fold the two petals together to create the cone shape and stitch up the side to close it.
- If you don’t want to sew then just use a strip of fabric adhesive to adhere the sides closed.
 To decorate the front I cut a flower from the scraps that were left after cutting the petal cone. I used the small flower from the Fun Flowers Die. I stitched it onto the pouch using Whisper White Baker’s Twine and added a coordinating button to the center.
If you haven’t noticed these are the same little pouches that I made for the paper snips that I gave my downline for Christmas. So once the kisses have been eaten this can be used to store your paper snips.
Thanks to Cindy for coming over with her sewing machine so I could get these all together before I went to Leadership. I know for sure I need a new sewing machine. Now to figure out which one to buy – if anyone has any thoughts let me know.
Jan 18, 2013 | Big Shot, Birthday, Cards, Masculine, Spring Catalog 2013 |
Henry Says, Pinwheels, and Parker’s Patterns make for a fun birthday card. I created this fun card for the GoDiva Spring Catalog Swap.

I used lots of fun products from the Stampin’ Up! Spring Catalog –
- Henry Says stamp set (my favorite!)
- Parker’s Patterns Designer Series Paper
- Cloudy Day Textured Impressions Embossing Folder
- Pinwheel Sizzlets Die
- Hearts A Flutter Framelit Dies
I love the little pinwheel coming out of Henry’s trunk – I even tilted him back a bit so it looks like he is really blowing out some air to get that pinwheel going. What a fun little guy!
If you would like to buy any of these products you can shop at my online store on my website – www.monika.stampinup.net
Jan 16, 2013 | Paper Pumpkin, Uncategorized |
Paper Pumpkin by Stampin’ Up! is here! I’m so excited about this! I always loved getting kits in the mail and even loved it when my boys got kits in the mail when they were little – like Lego and Magic Tree House – it was always so exciting to see what was in the box and what activities were in there for us to work on. This is going to be something fun for new stampers, busy stampers, experienced stampers and everyone in between.

We’re your paper fairy godmother (without the white hair). We’re your creativity problem-solvers. We design, color, measure, cut it all for you. We’ve been sweeping away the mundane for 25 years. And, we want to share it all with you. Need paper, ink, accessories? Or just a few fun products?
Sweep away the mundane-your creativity carriage awaits!
I’m Paper Pumpkin . . .
I come to your door each month (a fully decked-out creativity carriage). I’ll help you to escape your life with some paper fun.
I come in a sweet box, but you’ll really love what you find on the inside:
All the stamps, ink, paper, and accessories to create pinable projects. Create stuff like cards, journals, décor, and more!
Paper Pumpkin by Stampin’ Up! is a new monthly kit program that anyone (even you) can enjoy!
Get Started
It’s so easy to get started. Simply sign up for the program starting Monday, January 14 by visiting www.mypaperpumpkin.com and click Get it. Every month a new, surprise project kit arrives at your doorstep. Just think of the anticipation of creating a fun project to pin, showoff, and share with your friends and family-every month!
Of course, you’ll want to know more. So here’s the nitty gritty:
- Each month we send you a unique, surprise kit with a project-cards, journals, décor, and more! (We’ve even color-coordinated, measured, and cut everything for you!)
- Each kit includes stamps, ink, paper, and accessories-everything but adhesive.
- Each kit gives you a 30-minute creativity escape.
- We will ship your Paper Pumpkin on or around the 15th of the month.
- You need to sign up for a kit by the 10th of the month to get that month’s kit. If you sign up on the 11th of the month, your first kit will come the next month. (Let’s say you sign up on May 10th, we’ll send your kit around May 15th. If you sign up on May 11th, we’ll send your first kit around June 15th.)
- A Paper Pumpkin membership is $19.95 per month (and shipping is included!)
- There’s no commitment, you can cancel your monthly Paper Pumpkin at anytime. You can also skip a month if you want.
- Starting in early March, we’ll offer a Try-It kit if you’d like to try Paper Pumpkin for one month.
Here’s How You Order
Sign up for your monthly Paper Pumpkin starting Monday, January 14 by visiting www.mypaperpumpkin.com and click Get it (join here). Enter the quantity – 1 (or more than one if you want more). Then enter all of your shipping information. Then you enter your payment information. After that it asks if you are a Stampin’ Up! Demonstrator – if you are you can answer yes but otherwise answer no. Next it will ask if you have a Stampin’ Up! Demonstrator – well that’ me – so select that and then fill in my name – MONIKA DAVIS – and WOODSTOCK, GA. Then find me. If it shows me in another state – that is someone else. After you finish you will get an email and you set up a password for your account. If you need to you can come back into your account and make any updates, skip a month or cancel. After you sign up send me an email ([email protected]) because I don’t get a notice right now.
Starting in early March, you can try Paper Pumpkin for one month by visiting my online store.
A Free Gift in Your Very First Kit
The Welcome Kit is the very first Paper Pumpkin you will receive in your first month of membership. The Welcome Kit includes a free gift-a clear acrylic block!

I can’t wait for all the FuN!


