Nov 16, 2013 | Big Shot, Cards, Christmas, class |
Here is an idea for a Christmas Card using one of our all occasion stamp sets. It might not be one that you think of for creating Christmas. It’s the Pennant Parade stamp set.
 I got the idea from a swap card I received. I wanted a woodsy feel to the card and to use traditional red and green. Here are some notes on how I made this one.
- Card Base is Real Red card stock
- A piece of Early Espresso card stock embossed with the Woodgrain Embossing folder and the Big Shot and layered on a piece of Whisper White.
- To make the tree I stamped the pennant image 3 times on Whisper White card stock and punched them out with the Petite Pennants Builder Punch. I took each edge of the punched piece and pulled it through my Old Olive ink pad so that the edges would be green. And I used a Real Red marker to fill in the dots to look like garland. Each piece was layered on a a piece of Old Olive card stock punch with the scallop pennants from the punch.
- I stamped the pot on Whisper White card stock with Early Espresso ink and cut it out. I glued that to the embossed wood layer.
- Use Stampin’ Dimensionals to add the three pieces of the tree above the pot so they overlap one another to create a tree.
- Stamp “merry” on a piece of Whisper White and punch out with the small oval punch. The edge of the oval was pulled through the red ink pad. Punch a small hole in the end of the oval and the corner of on tree section. Use a Vintage Trinkets safety pin to attach the oval to the tree.
- to finish tie a little box of Linen Thread on the safety pin.
This card will be one of the options at my Card Maker’s Class this coming week. If you live in my area I hope you will join me.
I hope you enjoyed today’s card idea and come back again!

Oct 31, 2013 | class, Holiday Gift Making |
Holiday Gift Making Class
Friday, November 15 and Saturday, November 16, 2013
My house will be open from 10:00 am – 5:00 pm on Friday & Saturday. You can drop in at any time to complete your projects, but make sure you allow yourself time depending on how many gifts you plan to make. I will have snacks and water for you here. You are welcome to bring lunch if you will be here during that time.
I will have different projects for you to choose from each will have a supply fee and you can sign up to make as many of each one as you would like. You do not need to make them all only the ones that you want since you will pay per project. These can be gifts for friends, family, teachers or things to keep for yourself.
I hope this will be a fun event for everyone!
PROJECT CHOICES
Thanksgiving Tablescape and Scrapbook

Everything you need to set the mood for 10 dinner guests: napkin holders, table tents, centerpiece wraps and accents. One candle included with this project. You can also use the materials to make an optional scrapbook.
Thanksgiving Tablescape Project cost: $30
Holiday Gift Boxes

Three boxes for you to fill for the holidays. Each box is food safe. One Extra-Large Gift Box, one Decorative Window Gift Box, one Tag-a-Bag Gift Box.
Holiday Gift Boxes Project cost: $15
JOYful Holiday Banner

Joy banner
Banners are everywhere these days. Make one for the holidays featuring the Stampin’ Up! Build a Banner Simply Created Kit. Colors – Gumball Green, Cherry Cobbler, White and Gold.
Joy Banner Project cost: $10
Goodie Gear Treat Bags
 Enough supplies to make 10 goodie bags. Include tags, banners, bags, twine. White Yogurt covered pretzels will be included to fill your bags. Make multiple sets for the kids to take to school.
Goodie Bags Project cost: $8
Tag It Bundle Boxes
 This fantastic Christmas packaging kit is perfect for giving treats this holiday season. Make cute cookies that will show through the window in the box, and then tie up your homemade gift with a ribbon and hand-stamped tag. Includes the Tag It set (stamp set, ink, tags), 6 Decorative Window boxes, Ribbon.
Tag It Window Box Bundle Project cost: $24
 This kit is perfect for packaging small gifts this Christmas. And it comes with everything you need to make your gifts look just how you like it. Includes the Tag It (stamp set, ink, tags), 3 XL boxes, Ribbon.
Tag It XL Box Bundle Project cost: $22
Silverware Place Setting You will be prepared for your Holiday party’s with these festive tableware place settings. Set of 4.
Place Setting Project cost: $10
Holiday This & That Planner
 Before your holiday prep makes you want to put everyone on that naughty list, try using the Season of Style This & That journal to keep you organized in style. Use it this year and next year, give it as a gift or turn it into a mini scrapbook by adding your holiday photos.
Holiday Planner Project cost: $15
Endless Wishes Notecard set
 Create a set of 20 notecards using the Endless Wishes stamp set and Basic Rhinestones.
Endless Wishes Note Cards Project cost: $15
Please register by Tues. November 5th. I will send you a Paypal invoice or you can mail me a check for your project costs. I will be placing the supply order on Wed. Nov. 6th.
EMAIL ME HERE if you would like to attend.
Oct 28, 2013 | Cards, Christmas, class, Holiday Catalog 2013 |
Come join me on Wednesday, October 30th for Card Maker’s Class. If you are ready to start making Christmas cards you could choose this card made with the Wonderful Wreath stamp set.

Card Maker’s Class
Stamping with Monika DATE: Wednesday, Oct 30, 2013 TIME: 10:00 am – 12:30 pm
or
7:00 pm – 9:30 pm
LOCATION: 7013 East Hills Way, Woodstock, GA 30189 |
|
|
Stamping with Monika 7013 East Hills Way Woodstock, Georgia 30189 770-500-8076 |
|
25% off
25 stamp sets

Hurry it’s the LAST DAY to save 25% on 25 different stamp sets.
SHOP ONLINE now – CLICK HERE or email me with your order.
I’ll place an order tonight Monday, Oct. 28th at 11:00pm.
Sep 26, 2013 | Cards, class, Vintage |
Another card from my Cards that Move class was a simpler version of a beautiful card Shelli shared with us at the Stampin’ Up! Convention.
 The card is closed up with the Very Vanilla Seam Binding. I decorated the front with the Papillion Potpourri stamp set and the Flowering Flourishes stamp set. There is also some splatter with an Aquapainter filled with rubbing alcohol and Soft Suede ink. And also some Vanilla Smooch Spray.
When you open the card you get a big surprise –
 The huge Swallowtail butterfly pops right out at you – likes it is flying off the card. I stamped it on a separate piece of card stock – I used the Natural White card stock and stamped with Black StazOn ink. Then used the Aquapainter to watercolor with the ink pads. Then cut the butterfly out – fold one wing in and attach to the inside of the card just on the left side.
I’ve been busy busy getting ready for my Stamp, Scrap & Create retreat that starts tomorrow! I can’t wait. I’ll probably be posting pictures on my Facebook page – so be sure to check in over there during the weekend. If you haven’t already LIKE my page so you don’t miss anything I post over there.
Sep 24, 2013 | Big Shot, Cards, class, Thinlits |
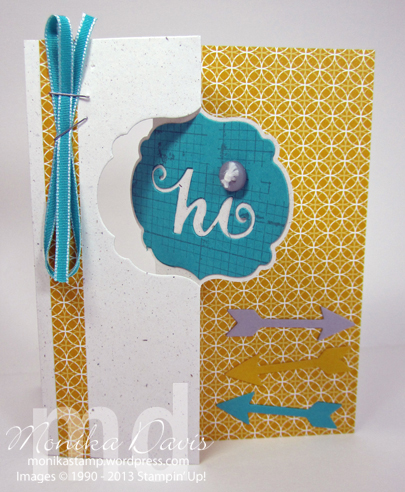
I hope you liked yesterday’s card. Today I have another moving card – featuring the new Label Card Thinlits for the Big Shot. This card is pretty much the sample card that you see in the Stampin’ Up! ad for the new thinlits. I can’t remember for sure if it was shown in Shelli’s presentation at convention.

All the die cut pieces are part of the set – it cuts the card base, the label layer, the hi and the arrow. Plus there are more pieces that I didn’t use on this card.
 Two different banners with the score lines to make folding easy. A short arrow, an ampersand, and “I♥u”. So lots of pieces to get creative with.
This is a view of the card when it is “flipped” –

One tip for you – attach the designer paper to the right side of the card before cutting through the Big Shot. That gives you a clean matching cut on the designer paper and you won’t have to try to line up after the fact.
Thanks for checking in today.
I’m heading out with Ryan later to go to the College Fair in our county. He has been working on college applications and I think all the ones he is looking at (except 1) will be at the fair for us to talk to. And maybe he will find some others that he is interested in too. I can’t believe he has grown up – where in the world did the time go – in less than a year he will be off to college.
Sep 23, 2013 | Big Shot, Cards, class, Pop 'n Cuts, Washi Tape |
My hands-on stamping class last week was “Cards that Move” – it was a lot of fun. We actually made 4 cards and 1 mini scrapbook. It took much longer than I anticipated and the morning class had to finish quickly because I was late getting Ryan to a doctor appointment – yikes! But we got there only a few minutes late. To speed up my evening class I did a lot of the Big Shot cutting ahead of time. I need to do a better planning job! Everyone really enjoyed the projects.
Most of my projects were “Shelli” projects – she did a presentation at Convention this summer featuring cards that move – so most of the projects were taken from that presentation – with minor changes.

This first card that moves features the Label Pop-‘n-cuts die and the coordinating Deco labels Framelits. Here is the inside:

Here are some notes on how I made it –
- I cut a Daffodil Delight card base – it’s actually a slightly smaller card – the finished size (when it is folded) is 5″ x 4-1/4″. That is so the decorative edge and slits for the Pop ‘n Cuts card base could be trimmed off on the inside layer and the corners rounded instead.
- The front of the card base was embossed with the Chevron Embossing Folder.
- On the front I added Washi Tape from the Gingham Garden collection, a flag that says “hello there” and a little flower.
- Cut Sahara Sand piece for the inside piece – the piece was 4″ wide and 9-1/4″ long and centered on the pop ‘n cuts die to cut the inside piece. Gently fold the cut piece so that the pieces bend into a “table” and then fold flat when the card is closed.
- TIP!! This tip will help you get this pop up card to fold nicely. First be sure the inside piece is “trained” to fold flat. Then put adhesive on ONE side of the inside piece and attach in to the inside of the same side on the card base. Again fold the inside piece flat. Then add adhesive to the second side and fold the card base over it as though you are closing the card. Close the card flat.
- Now open it up and add the decorations to the inside pop up piece. Cut a Deco Label framelit piece out of Whisper White card stock and stamp with the Chevron stamp – I used Tempting Turquoise – and trimmed one edge flat so I could place it up against the inside of the card covering the base.
- For the butterfly I used the Beautiful Butterflies die – the smallest image cut in white and the next smallest Melon Mambo. The white piece has some Washi tape on it. Adhere the butterflies together and tie Baker’s Twine around with a bow at the top.
- Layer on a mini brad – a Daffodil Delight flower, stamped Word Window punch, the butterflies, a flag of designer paper. Add to the center of the card with Stampin’ Dimensionals. Be sure that the butterfly doesn’t interfere with the folding of the card.
It’s a really happy card to send to some one special!
Thanks for stopping by today.
 I got the idea from a swap card I received. I wanted a woodsy feel to the card and to use traditional red and green. Here are some notes on how I made this one.