Jan 27, 2010 | Designer Series Paper, family, Great Friend, In Colors, Stamper's Club |
The stamp club orders came on Monday and look at the new Stampin’ Up! Boxes –
 Not only do they have the Sale-A-Bration logo on them, but look at this new Caution statement.
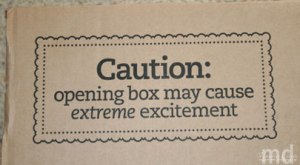 I’m ready for some extreme excitement!
I’m always happy to open up Stampin’ Up! boxes because there is always something fun inside. I think I heard it is only this particular size box that has this label on it because it is the most common size for orders during Sale-A-Bration.
So anyway the club orders were in that box and if you are a part of my Stamp Club then I have all of your stuff ready for you. Our last club meeting for this session is in February and I’ll start new groups in March. If you are not already in my Stamp Club and want to be a part of the fun please contact me – I’ll be sending out more information later this week.
Here is one of the projects we made at our last Stamper’s Club meeting – it is a skinny tin that has been altered to be a picture frame. My friend Wendy shared this with us at our STARZ group meeting and I decided to use it as our club project.
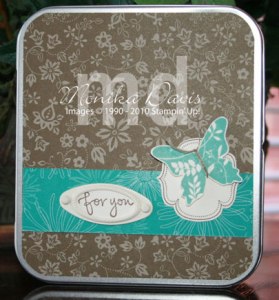 This is the front of the tin. And when you open it up you can stand it on your desk and it shows two photos on the inside.
 I added a couple of photos of Tyler and Haley when they went to the Homecoming Dance last fall.
This is a great little gift idea – perfect for a Mother’s Day or Father’s day gift – just adjust the colors and accents to what you need.
Have a great day! I’ll post later with some bird photos – they were busy today.

Jan 26, 2010 | Big Shot, class, Designer Series Paper, Occasion Mini 2010, Scrapbook Pages |
Here are the next two pages from my Desktop Calendar – May and June.
 My May calendar doesn’t have a picture on it yet – when I decide it will be a small one – mostly because I love this paper! If you haven’t noticed (although I’m sure you have) each month has the same layout. The 6×6 page with the 3″ strip of Sweet Pea Designer Series paper. The 3-1/2″ strip of card stock punched with one of the border punches. Then on the bottom are the three die cuts or punches for that month – with a fourth one over on the title strip.
May Stampin’ Up! Supplies:
- Pumpkin Pie card stock
- Rose Red card stock and ink
- So Saffron card stock and ink
- Old Olive card stock
- Sweet Pea Designer Series Paper stack
- Eyelet Border punch
- Big Shot die-cut machine
- Beautiful Wings Embosslit Die
- Billboard Alphabet Sizzlits Strip die
- Calendar Alphabet & Numbers stamp set
- Chocolate Chip ink
- Stampin’ Sponge
- Linen Thread

June calendar page
The June calendar supply list:
- Old Olive card stock
- Taken with Teal card stock
- So Saffron card stock
- Sweet Pea Designer Series Paper stack
- Scallop Border punch
- Big Shot die-cut machine
- Birds & Blooms Embosslit Dies
- Billboard Alphabet Sizzlits Strip die
- Calendar Alphabet & Numbers stamp set
- Chocolate Chip ink
- Silver brads
- 1/16″ handheld punch
I made a break through this weekend and got all the wallpaper off the walls in the half-bath. Yeah for me! Monday I took Ryan to the orthodontist and guess what – it is time for braces – yep – we scheduled it for Feb. during the school break – won’t that be a fun vacation for Ryan.
Thanks for stopping by today. I hope you come back again.
Happy Stampin’!
Jan 25, 2010 | My Digital Studio, Scrapbook Pages |
 I made another My Digital Studio page. This one uses the Custom Background feature. You can select a photo to be your page background. This is a great option if you are making calendars and since you can also adjust the opacity you can add a background behind the grid on a calendar. This is not a calendar but just a scrapbook page.
I also used the Photo Shape option – you can adjust the crop and adjust into a circle if you need to. On my photo shapes I added a black mat – size 2, and a drop shadow ( I used the default setting).
I added several text boxes – one for the title, one for the journaling and one for the photo. The photo on the right is my family – my parents and my brother with his wife and then my cousin who was visiting from Germany. We are the Lenkeit’s.
The left photo is my brother and my dad – my brother was the Commodore of the sailing club for 2009 and my dad was the Commodore several years ago. The center photo is a the commissioning ceremony where Michael was presented with his Commodore Portrait.
I had to marry someone with an easy name since nobody could pronounce or spell Lenkeit. So I ended up as a Davis – you can’t get any easier than that!
This page was quick to create once I decided on my pictures – it took only a few minutes.
Thanks for stopping by today – I hope you have a great week and will come back to see me again.
Jan 24, 2010 | Big Shot, Designer Series Paper, Occasion Mini 2010, Valentine's Day |
The Heart Shaped Treat holders from Stampin’ Up! are really cute. I made a card for my Valentine class on Friday that uses these cute little holders.
I used a card design from a friend of mine – Michelle Scileppi – she designed this for the circle treat holder and made it at Christmas with the Snow Buddies set. I wanted to use the heart shaped treat cup and make a valentine card.
 This card has a short front – I cut 2″ off the front. Then created a slider tag that lets the candy come out on the inside – so you don’t have to tear up the card to get it out.
Something else that I did was create a frame for the heart treat cup. I created the frame by first punching a Full Heart out of a piece of Chocolate Chip card stock. Then I used the Movers & Shapers die and the Punch Windows Heart. Place the negative part of the Chocolate Chip card stock – the part with the heart shape punched out. Place this on the Punch Windows Heart die so that it is centered as best you can. When you cut it creates the frame that fits around the heart cup. I should have taken a picture of that part.
I also used the Punch Windows Modern label to frame the “happy valentine’s day” that is stamped on Pretty in Pink card stock and punched with the Modern Label punch. 
The inside also has a piece of Sending Love Specialty Designer Series paper punched with the Scallop Trim Border bunch and then another piece of Chocolate Chip card stock.
Before you attach the paper and heart cup to the front of the card you need to punch the hole for the trap door. I found an easy way to get the hole in the right spot. Punch the Full Heart in the Sending Love Designer Series paper – I did this by pushing the punch all the way up from the bottom and the flush against the right side. Then just lay this on the front panel of the card but don’t glue it down. Now take the 3/4″ punch and slide it in from the side and punch inside the punched out heart on the designer paper – this will position the hole inside the treat cup so the candy can come out. I hope that made sense.
 You need small candy like M&Ms or the little cinnamon hearts so they fit in the treat cup and pass through the hole.
The heart treat cup is only glued on the front to the back of the Designer paper. Don’t remove the adhesive backing from the heart treat cup. When you glue the Designer paper to the front only glue on three sides – leave the right side open so that the tag can slide in and close up the hole.
You can order the Heart Shaped treat holders and the Heart punch directly from me – visit my online store by clicking the SHOP NOW button on my website.
This was a fun card and my class on Friday was a lot of fun. The other projects we made were these:
XOXO card – click here for the post.
Hugs & Kisses holder – click here for the post.
Love You Much card – click here for the post.
Thanks for stopping by today – I hope you like this card.
Jan 23, 2010 | Birthday, Create with Connie & Julie, Occasion Mini 2010, Rock 'n Roll, Rub-Ons, SU Ribbon |
It’s Challenge Day at the Create with Connie & Julie – Occasions Edition class. Congratulations to last weeks winners – Sue and Lori. Our challenge this week is a sketch challenge. Here is a look at the sketch:
 This week in class we are featuring the following products from the new Stampin’ Up! Occasions Mini Catalog: Vintage Vogue stamp set, Very Vintage Jumbo Wheel, and from the Sale-A-Bration brochure the Vintage Labels SAB set. Class members are encouraged to participate in the challenges so you can win prizes each week! So get busy with this sketch challenge and then go to the class site and link your entry to the challenge post. Good Luck – I hope you win!
And here is my card for the sketch:

This card is a little bit different than a standard card – it is actually a mini card on a post card backing. So the piece that opens is the Chocolate Chip piece. Here is a photo from another angle:

And here is one of the inside: 
Sometimes you only need a few words to say what you need to say so a small space is enough.
Stampin’ Up! Supplies used:
- More Mustard card stock and ink pad
- So Saffron card stock and ink pad and refill
- Chocolate Chip card stock
- Whisper White card stock
- Vintage Vogue stamp set
- Very Vintage Jumbo Wheel
- Well Scripted stamp set
- Jumbo Handle, Jumbo ink cartridge
- Chocolate Chip Satin ribbon
- Linen Thread
- Chit Chat Rub-ons
- Earth Elements brads – More Mustard
- 5/16″ Jumbo Brads – Chocolate Chip
- Playground Designer buttons – More Mustard flower
- 1/16″ and 1/8″ handheld punches
- Mini Glue Dots
- Stampin’ Dimensionals
The large flowers are stamped using the Rock & Roll technique – ink first in So Saffron and then roll the edges in More Mustard ink. The small flowers are just stamped in More Mustard. All the flowers are cut out. For one large flower punch a hole in the center. Wrap the ribbon around the More Mustard card stock and pull both ends through the center of the flower – tie in a knot and trim the ends of the ribbon. Add the brads and buttons to the other flowers and add to the panel with Stampin’ Dimensionals.
I used a rub-on on the front of the card from the Chit Chat set in the regular catalog but there is a new set in the Occasions Mini called Chat Room. These rub-ons are such a great deal – you get about 200 greetings in each pack. Both of these sets have a variety of styles and sayings.
And here is a look at the rest of the Create team:
Connie
Julie
Mary
Kerin
If you haven’t checked out the Create with Connie and Julie site yet now is the time to do it! We feature new Occasions Mini product every week.  There is a new project posted every day and there will be a minimum of two fabulous tutorials each and every week. We like to have lots of fun so we have challenges and prizes for our subscribers. Our sites stay up long after the session is done so you will always have access to the site and the tutorials. For more information and to see our Preview Week projects please visit the Create with Connie and Julie site.
Thanks for stopping by today! Happy Stampin’!

 Not only do they have the Sale-A-Bration logo on them, but look at this new Caution statement.
 I’m ready for some extreme excitement!
 This is the front of the tin. And when you open it up you can stand it on your desk and it shows two photos on the inside.
 I added a couple of photos of Tyler and Haley when they went to the Homecoming Dance last fall.








