Aug 27, 2020 | Cards, Masculine, Paper Pumpkin |
Are you ready for some alternate ideas with the August Paper Pumpkin Kit? It’s time for our monthly A Paper Pumpkin Thing Blog Hop. A blog hop filled with alternate ideas using contents from the monthly kit. This month our kit is – World’s Greatest. A kit with some fun cards to celebrate some everyday hero’s in our lives like teachers, coaches, kids and our friends.

This kit makes 3 different cards with fun matching envelopes – that’s always one of my favorites! One card style is a shaker card.

I decided to mix up the pieces and cut up the card bases for the two cards that were not the shaker card. By cutting each of those card bases into 4 pieces I can create 8 cards instead of just 2. Here are two new cards that I made.

Blue card
For this card I wanted a little bit more of a feminine feel to it. Cutting up the blue card base into four pieces allows me to make 4 new cards. Each piece is 2-3/4 x 4″. I added Thick White Whisper White card stock for a new card base. You’ll also want some more medium sized envelopes. The yellow water-colored rectangle was also cut in half and used on this card. I trimmed down one of the white rectangles to fit the words. For the little touch of ribbon use paper snips to cut a 3-1/2″ piece into small strips and then tie in a knot.

Supply List
The additional supplies that I added to complete this project were:
- Card stock – Thick Whisper White
- Whisper White envelopes
- Paper Snips
Green card
For this second card I used the green card base and also cut it into 4 pieces. Trim one of the white rectangles to be 3/4″ wide and then I stamped the medal ribbon image twice so the end of it met in the middle – that part will be covered up. Use one of the vellum leaf pieces and cut it into two so one part can go on each side. To add a bit of contrast I did pull out a piece of Bumblebee card stock to layer behind that argyle piece.

Supply List
The additional supplies that I added to complete this project were:
- Card stock – Thick Whisper White, Bumble Bee
- Whisper White envelopes
- Paper Snips
I hope you liked this alternate idea for the monthly Paper Pumpkin kit. Leave me a comment and let me know your thoughts.
The Blog Hop Continues
To continue through go and click on the next blog in the list below. If you are viewing this in an email click on the title to go to my blog and see the rest of the list to finish the hop. There are lots of creative ideas to see!
Don’t forget you have until the 10th of the month to subscribe to Paper Pumpkin and get that month’s kit.
Get ready for fall – choose Halloween or Thanksgiving or just general fall when putting together the September kit. Sign up by the 10th – go here.

Thanks for visiting today.
Be sure to register for upcoming classes – just click on Registration under the Events tab.

Order online here – use hostess code GYQSR9ME for August 2020.
Aug 23, 2020 | 12 Cards of Christmas, Cards, Class by Mail |
It’s time to get started on Christmas Cards (if you haven’t already). The time consuming part is the design, cutting and prepping. This class has that part done for you. You will complete the fun part – the stamping, assembling, and writing notes and sending to family and friends. My plan is to offer several of these classes between now and December. And the best part – we will do this with safe social distancing. This is an at home class and available for porch pickup or in the mail.

Christmas Card Stamp A Stack – In the Pines
This first Stamp a Stack class will feature the In The Pines stamp set on page 43 for the Aug-Dec Mini Catalog. If you remember my 12 cards of Christmas challenge – this is going to be card 4 & 5. I’ve already completed one set of 12 and will complete another set as part of this class.
Class supplies will include all the cut card stock, paper, envelopes, ribbon, and die cut, and embossed pieces. You will supply your own stamps, ink and adhesive. A written tutorial with photos will be emailed to you and a link to a video showing you how to make the card. Each class kit will include supplies to make 12 of the same card. I will also schedule a zoom for us to gather virtually to make our cards together. Date to be determined after everything is mailed.
Options:
- Christmas Card Stamp a Stack: $25 (porch pick up price)
- #1 Add On for mailing to you: $8 (mailed to your house)
- #2 Add On In The Pines stamp set: $21
- #3 Add On In the Pines Bundle – stamp set & dies: $51.25
Register & Pay by Aug 25th.
Register Here ==> https://atmonikasplace.com/event-registration/
On the registration link you need to select the base class for $25 and then select any add ons – mailing directly to you, add the stamp set or the bundle. These are offered at catalog price without additional shipping/tax. Remember to select all the options that apply to you and pay online or mail a check prior to Aug 26th. This is a prepaid class.
I will be ordering all the supplies and add-ons on the 26th. Once the order arrives the cutting, prepping and packaging will take place. I estimate having everything ready to go out by Sept. 4th.
Additional supplies you need to complete cards exactly as I did.
- #153448 In the Pines stamp set OR #155182 In the Pines bundle (stamp set & die)
- #147111 Mossy Meadow ink pad
- #147115 Soft Suede ink pad
- Paper Snips
- Bone Folder
- Adhesive
Be sure to register for upcoming classes – just click on Registration under the Events tab.
Order online here – use hostess code GYQSR9ME for August 2020.
Jun 25, 2020 | Cards, Paper Pumpkin |
Did you receive the happy yellow box from Paper Pumpkin this month? I sure hope you did because it was a bright happy box full of fun supplies to help you spread sunshine! And today is our monthly A Paper Pumpkin Thing Blog Hop. A blog hop filled with alternate ideas using contents from the monthly kit. This month our kit is – Box of Sunshine – a kit inspired by Stampin’ Up! CEO Sara Douglass.

If you didn’t already hear about the Box of Sunshine idea let me tell you about it. The box for this month’s kit is actually part of the project. There are extra stickers and a label in your kit that you can use to decorate the box once you’ve made all your cards. Then fill the box with yellow treats add one of your cards and send it to someone special. It will be a little bit of sunshine to brighten their day. I’ll be sending mine to my son Ryan and his girlfriend.

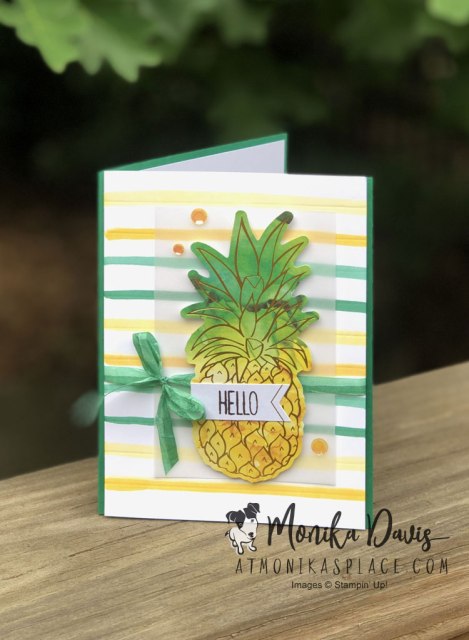
For my alternate idea this month I created a card using one of the extra pineapple die cut pieces. I used the same color palette of yellow and green and a fun background technique with Stampin’ Blends. And then my second idea uses a mini Paper Pumpkin box which perfectly fits a set of note cards. I decorated those with extra bits from the kit and created another little gift to brighten someones day.
Striped Pineapple Card
For this card I made a fun background piece to go behind the pineapple die cut. Use the Paper Trimmer to score the card stock at every 1/2″ – these are basically to create guidelines for drawing with the Stampin’ Blends. Use the Stampin’ Blends to add stripes. I also colored my White Crinkled Seam Binding to with the Stampin’ Blends to match. The card is finished with a piece of Vellum Card Stock, sequins from the kit and a piece of one of the labels.
Supply List
The additional supplies that I added to complete this project were:
- Card stock – Shaded Spruce, Whisper White, Vellum
- Stampin’ Blends – Shaded Spruce, Daffodil Delight, Mango Melody
- Whisper White Crinkled Seam Binding
- Paper Trimmer
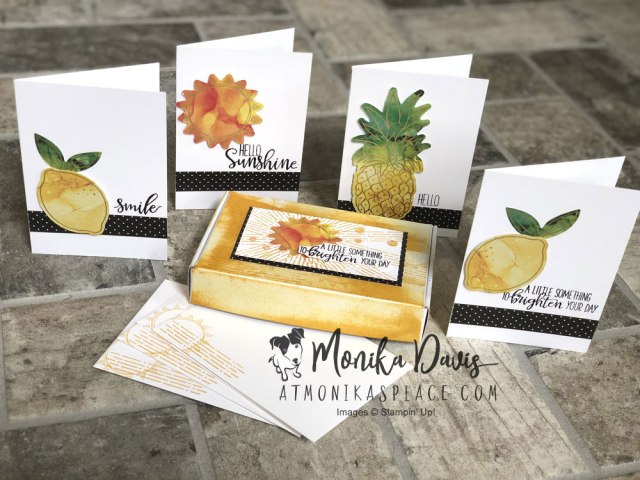
Mini Paper Pumpkin Box with Note Cards
We have a fun new product in the Annual catalog – mini Paper Pumpkin Boxes! And they are the perfect size to fit a set of Note Cards & Envelopes. So I used extra pieces from this months kit to decorate four note cards and envelopes to put inside my box. I decorated the outside of the mini paper pumpkin box first by swiping a Crushed Curry ink pad across all the sides and the top. Then added some stamping. I finished with some elements from the kit and some stamping.
Supply List
The additional supplies that I added to complete this project were:
- Card stock – Whisper White
- Whisper White Note cards & Envelopes
- Mini Paper Pumpkin box
- Crushed Curry ink
- Paper Snips
Here are some more pictures of this project.


I hope you liked this alternate idea for the monthly Paper Pumpkin kit. Leave me a comment and let me know your thoughts.
The Blog Hop Continues
To continue through go and click on the next blog in the list below. If you are reading this in your email you will need to click on the title to get to my blog and see the rest of the links.
Don’t forget you have until the 10th of the month to subscribe to Paper Pumpkin and get that month’s kit.
Next month’s July kit will be a kit to celebrate the magic of summer nights. In this exclusive fun-filled kit, you’ll unbox enough supplies to create nine postcard-style cards, coordinating envelopes, and die-cut tealight bags. What’s even more spectacular about July’s kit is the add-on you can purchase along with it! The Summer Nights Add-On includes 24 card bases and envelopes in coordinating Summer Nights designs. Sign up by the 10th to get the July kit – go here. AND you can order the Add-on beginning July 1st! Just $10 for 24 card bases and envelopes – I think that is an amazing deal!

Thanks for visiting today.
Be sure to register for upcoming classes – just click on Registration under the Events tab.
Order online here – use hostess code ZKVPNXCM for June 2020.
Jun 1, 2020 | Cards, Memories & More, Retired List |
It’s the Last Chance to order from the 2019-2020 Annual Catalog and the 2020 Jan-Jun Mini Catalog. Items on the Last Chance lists will be gone at the end of Tuesday, June 2, 2020. If you still have something one your gotta have list get it now.
May Quick & Cute Cards Online
On Sunday afternoon I had an online class showing some last chance items and I thought I’d post real quick the cards I made. If you want to see the videos and project supplies, etc. you’ll want to join the FB group that the class was held in – At Monika’s Place: May Quick & Cute Cards Online.
Card 1 – Stitched All Around
This first card idea came from my friend Cindy – I loved how the background is made with Stampin’ Blends. You may see the Stampin’ Blends on the Last Chance list but they will be in the new catalog. Going forward they will be offered in combo packs only – so you get the light and dark Blends for a color together. The Stitched All Around stamp set and the Stitched Labels dies are both retiring. And so is the Whisper White Baker’s Twine – why did they do that? It is a staple in my craft room.
Card 2 – Birthday Backgrounds

This card idea is from my friend Melody. It uses some great birthday sets that are retiring – Birthday Backgrounds and Perennial Birthday. The color palette is from the Glitter Enamel Dots which are also on the retirement list. And the White Baker’s Twine – I’m so sad.
Card 3 – Mosaic Vases

These fun cards use the Mosaic Mood Specialty Designer Series paper. It has a fun mosaic tile design with shiny embossed accents. The paper is retiring and so are the Hand Lettered Prose dies that I used to cut out the THANKS. The Flower Faceted Gems are retiring too – they match perfectly to the Mosaic paper. The stamp set I used is Varied Vases which unfortunately is sold out already. But the Vibrant Vases could also be used. The Vase Builder punch will be in the new catalog.
Card 4 – Magnolia Memories & More card

And this quick card uses the Magnolia Lane Memories & More Card Pack and the Cards & Envelopes that coordinate. No stamping on this one. Really quick to put something together with the Memories & More products.
Look in the online store to see which items are still available off the Last Chance List – items are selling out every day.

Be sure to register for upcoming classes – just click on Registration under the Events tab.
Order online here – use host code GWTX63TS through June 2nd.
The new host code starting June 3rd will be ZKVPNXCM
May 28, 2020 | Cards, Paper Pumpkin |
Hello my crafty friends. It’s time for our monthly A Paper Pumpkin Thing Blog Hop. A blog hop filled with alternate ideas using contents from the monthly kit. We are a group of demonstrators sharing our ideas using this months kit – just in case you need some added inspiration. This month our kit is – A Kit In Color.
This month’s kit is bright and cheerful and perfect for sending out cards right now. Plus you get an early peek at four of the five limited edition Stampin’ Up! In Colors for 2020-2022! Even the ink spot in the box is one of our new In Colors and Paper Pumpkin subscribers were the first to get their hands on it.

For my first idea I took the components for one set of cards from the kit and mixed up the pieces to create three different cards. My second idea uses the stamp set and some card stock featuring the new In Colors. If you want to see me make all these cards be sure to watch my Facebook Live video from May 25th – watch it here.
3 More Cards from the kit contents
I changed the orientation of each card base and then combined the pieces in a different way to create three more cards. So if you don’t want to make all the cards exactly the same this would give you some variety without adding any additional supplies to this month’s kit.

Here you can see all 6 cards – the 3 original cards and then my 3 alternate card ideas. The May kit includes enough supplies to make four of each card design so if you prefer you could make two sets of these 6 cards instead.

Supply List
The additional supplies that I added to complete this project were:
- I only used supplies from the kit
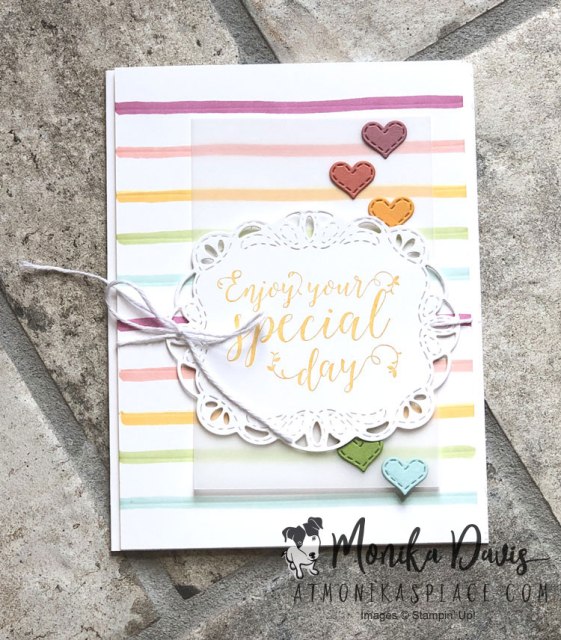
Rainbow Circle Card
For my second project I made a card using the color scheme and stamps from the kit. I was also able to use one of the epoxy stickers and some twine to finish the card. But if you didn’t have those left from this kit grab something similar from your craft supplies. The circles of card stock are cut with the Layering Circle Dies.
Use the Butterfly Duet punch to punch from the center of the large vellum piece (you’ll be covering it on your cards) or from a scrap of vellum in your craft room. The words You’re amazing were stamped on a scrap of Whisper White card stock and then fussy cut around them. One tip is that I added the left side to my layer of circles with liquid glue and the right side with a double stack of dimensionals. That kept everything on the same level. The 5 layers of card stock in the circle are about the same as one dimensional width. I hope that makes sense.

Supply List
The additional supplies that I added to complete this project were:
- #100730 Whisper White card stock
- #140272 Thick Whisper White card stock
- #153080 Magenta Madness card stock (coming June 3rd)
- #153079 Just Jade card stock (coming June 3rd)
- #150881 Purple Posy card stock
- #153081 Misty Moonlight card stock (coming June 3rd)
- #148523 Butterfly Duet punch
- #151770 Layering Circle dies
- #110755 Multi Purpose Liquid Glue
- #144107 Take Your Pick Tool
- #103579 Paper Snips
I hope you liked these alternate ideas for the monthly Paper Pumpkin kit. Leave me a comment and let me know your thoughts.
The Blog Hop Continues
To continue through go and click on the next blog in the list below.
Don’t forget you have until the 10th of the month to subscribe to Paper Pumpkin and get that month’s kit.
Don’t miss the special Share Sunshine June Kit – inspired by Stampin’ Up! CEO Sara Douglass. Sign up by the 10th – go here.

Thanks for visiting today.
And don’t forget the LAST CHANCE LIST! Our catalogs are ending on June 2nd and many products will be retiring/ Don’t miss your favorites.
Be sure to register for upcoming classes – just click on Registration under the Events tab.
Order online here – use hostess code GWTX63TS for May 2020.


