Feb 22, 2013 | Cards, Sale-A-Bration 2013, Thank You |
Did you know you can make your stamps go a little bit further by using the Omitting Technique? Maybe you haven’t even heard of this. Well on this quick card that we saw at the Stampin’ Up! Leadership conference that is exactly what you’ll see.

The Omitting Technique is basically where you omit a portion of the stamp image by not putting any ink on it. The easiest way to do that is to use your Stampin’ Write Marker’s. On this card the stamp image from the Vintage Verses stamp set has the detailed frame with words in the center. Using the marker apply ink only to the frame and not the words, give it a little “huff” to make sure its all still moist and then stamp it on your paper.

It’s really that easy.
All the details of this quick card are right here:
- The card base is one of the Note Cards from the Note Cards & Envelopes in the main catalog – these are white and come with 20 cards and envelopes in each pack. They are 5″ x 3-1/2″ note cards with envelopes to fit.
- Ink up the stamp with the Cherry Cobbler Stampin’ Write Marker applying ink only to the frame (“Omitting Technique”) and stamp on the front of the note card.
- Ink up the Thanks stamp with Jet Black StazOn ink and stamp over the frame.
- Punch two butterflies from Vellum Card stock using the Elegant Butterfly stamp. Stick them together with a glue dot and add to the front of the note card with another glue dot. Add a Rhinestone to the center (it cover’s the glue dot).
- Tie a piece of Whisper White Baker’s Twine around the spine of the card.
- Done!
You can get the Vintage Versus stamp set for FREE during Sale-A-Bration when you purchase $50 in Stampin’ Up! products. So let’s see at what we have here –
Elegant Butterfly punch – $15.95
Rhinestone Basic Jewels – $4.95
Whisper White Baker’s Twine – $2.95
Note Cards & Envelopes – $5.95
Stampin’ Write Marker – $3.50
Vellum Card stock – $6.50
Staz On ink – $7.95
Mini Glue Dots – $4.95
That’s $52.70 – which is enough to get the Vintage Versus set for free – you can make 20 note cards. You’ll have plenty of everything else left – so buy an extra pack of note cards and you have 20 more. And you’ll still have enough of everything left to make lots more. If you would like to order any of these products just visit my website any time – www.monika.stampinup.net – click on SHOP NOW and have fun!

Feb 21, 2013 | Cards, Create with Connie & Mary, Sale-A-Bration 2013, Simply Scored, Spring Catalog 2013 |
The Patterned Occasions set is another Sale-A-Bration set with a bunch of versatile images. My favorite image is the little elephant but another fun one is the band-aid. And that is what I focused on for this week’s color challenge at Create with Connie & Mary. I needed a get well card and decided to use the band-aid image and combine with the colors for this week’s challenge. And now this week I think I need a get well card for myself I’m trying really hard to fight away a cold or something that is trying to come in and take me over – I don’t need that so just go away. I’m so ready for Spring to be here – enough cold and rain. We don’t get snow we just get cold rain with some occasional ice – snow would be better – at least then everything is pretty.
By the way have you joined the Create with Connie & Mary Spring 2013 Online class? They are show-casing items from the Stampin’ Up! Spring catalog plus Sale-A-Bration! Lots of great ideas and its not too late to join.
Here are the colors this week – Melon Mambo, Daffodil Delight and Basic Grey. Very popular right now is the yellow and gray combination and I think the splash of bright pink really makes these colors pop. Some of the combinations I’m not crazy about but this one I do like.


The card inspiration came from an idea I saw somewhere while poking around on the internet. Here are some details on this card –
- card base is Daffodil Delight – it’s a bit hard to see but the base is embossed using the new Simply Scored Borders Plate – there are two sets of double scallops.

- A Basic Gray layer with a piece of Designer Paper from Sunshine & Sprinkles pack in the Spring Catalog.
- I stamped the Band-Aid image from the Patterned Occasions set three times on Whisper White card stock – once in Daffodil Delight, once in Basic Gray and once in Melon Mambo – and cut out the band-aids and the words from the Gray one (just cut a tiny banner).
- The band-aids are added with Stampin’ Dimensionals.
- The words are glued flat and then I added a cute little clip from the Elements Cute Clips – the heart and it is tied with a piece of the Melon Mambo Striped Organdy ribbon – those are also in the Stampin’ Up! Spring catalog.
- I thought it turned out really cute and the colors made it bright and cheery.
Visit the Create with Connie & Mary site to see the creations from the rest of the design team and to submit your own creation for this new challenge. Plus don’t forget to check out the 2013 Spring class going on right now!
Stampin’ Up! Supplies:
- Stamps: Patterned Occasions (SAB)
- Ink: Daffodil Delight, Melon Mambo, Basic Gray
- Card Stock: Daffodil Delight, Basic Gray, Whisper White
- Accessories: Sunshine & Sprinkles Designer Series paper, Elements Cute Clips, Melon Mambo 3/8″ Striped Organdy Ribbon (all from the Spring Catalog) , Stampin’ Dimensionals.
Feb 19, 2013 | Cards, Embossing, Sale-A-Bration 2013, Vintage |
One more Sale-A-Bration project using the vintage style set called Feeling Sentimental. These images are really nice when they are embossed.

This is a quick easy card and this is how I created it –
- Card base is Crumb Cake and the front flap is embossed with Delicate Designs Embossing Folder. Sponge over the edge with Early Espresso ink.
- Tie some Linen Thread around the card front – tie in a bow.
- stamp Celebrate in Versamark ink on the bottom of the card front and cover with Early Espresso Embossing Powder and heat set with the Heat Tool
- stamp the Ferris wheel image on the First Edition Designer Paper with Versamark ink, cover with Early Espresso Embossing Powder and heat set with the Heat Tool
- Sponge around the image with Crumb Cake ink
- Distress the edges of the Early Espresso card stock with the Distresser tool.
- layer together and add to the front of the card
You could use any of the images in the set and switch out the word with something else from another set. Clean and simple. I hope you like it.
Feb 18, 2013 | Big Shot, Birthday, Sale-A-Bration 2013 |
This super cute candy container is made from something you probably already have on hand. You need an empty button/brad container. You know the plastic containers that the Stampin’ Up! buttons, brads and trinkets come in. That’s the one – and don’t even worry about getting all the labels off because we will be covering all of that up too. This idea has been floating around amongst Stampin’ Up! demonstrators since the fall (at least that is when I first saw it). And I have decided to use several items from the Sale-A-Bration brochure to create a fun Birthday treat container!

This project actually uses a whole hand full of Sale-A-Bration items – but this idea is easy enough to swap out with other items you already have on hand – choose a different designer paper or ribbon, or change the tag. This one is easy to change for any occasion that you want. So let’s take a closer look –
- first find an empty container and open it up – I save all mine after they are empty so I have lots – this is the container I’m talking about – if you want pull the label’s off – really all I did was pull of the tabs that came over the sides – the top and bottom will get covered.
 Now you need a piece of window sheet – about 8-1/2″ wide and then the height that you want – I think mine is either 2-1/2 or 3″ tall. Put Sticky Strip along the bottom long edge and along one short edge. remove the red cover on the long edge. Now you are going to roll up the window sheet and fit it so the sticky strip sticks inside the lid of the empty container. This becomes the bottom of your treat holder.
- sorry I don’t have another picture I gave the ones I made to my niece and nephew and I don’t have them here anymore. Once you have the window sheet attached all the way around remove the red cover from the side and attach the side edge. Make sure you keep it all straight. Now test it to see if the bottom of the empty container will slide over the top edge of the window sheet – this is now your lid – don’t attach it just slide it on and off that way you can get to what’s inside!
- I used the 2-1/2″ Circle punch to punch 4 circles – these will fit on the inside and outside of the button container to cover the labels – for the ones going on the inside – use the Distress Tool (new in the Spring Catalog) and distress the edge all the way around the circle so that you can fit it inside the container. I used Sticky strip to attach the circles. All were plain except the one on the top – I just embossed with the Vine Street Embossing Folder.
 I cut strips of the Sycamore Street Designer Series paper to cover the outside edges of the containers – 1/4″ for the small one (now the bottom of your treat holder) and 1″ for the larger side (now the top of your treat holder). I did use Sticky strip to secure these to the container.
- Add a piece of sticky strip across the bottom and secure the center of a piece of ribbon – bring it up to the top and tie a bow – to open the container – just slide off the ribbon – you don’t even have to untie it! The ribbon I used was the Sycamore Street Ribbon & Button Pack – I used Island Indigo.
- Now make a tag to hang on. More Sale-A-Bration items used for mine. Pretty Petites stamp set and the Petite Curly Label punch. I also used the Sycamore Street Designer Paper and the Vine Street Embossing folder. The base of the tag is the Decorative label punch. And it’s tied to the ribbon with some Baker’s Twine.

- Slide off the ribbon, slide off the top and fill with candy – replace the lid and the ribbon and give it to someone special. I did add a little Rhinestone to one of the tags too – I gave that one to my niece – I figured the little hint of bling made it girly. I’m not sure she noticed though.
Hopefully some of that made sense. I know that other demonstrators have made these and if you visit Heather Summer’s she has a video where she made one back before Christmas.
These are all the Sale-A-Bration items that I used –
- Sycamore Street Designer Series paper
- Sycamore Street Ribbon & Button pack
- Vine Street Textured Impressions Embossing folder
- Pretty Petites Stamp set
- Petite Curly Label punch
Just a cute little container for a fun occasion!
Feb 16, 2013 | Cards, Sale-A-Bration 2013 |
Lets do some Sale-A-Brating! In the Stampin’ Up! world that means its our biggest promotion of the year with lots of different choices for earning FREE Stampin’ Up! products. Earlier this month I had a class that focused on the Sale-A-Bration products for 2013. So I want to share some of those projects with you so you can see some ideas on the different choices that you have. Today’s project was one that we saw on stage at the Stampin’ Up! Leadership conference and I adapted it to be a project for my Stamper’s Club this month. This is the Happy Hello Simply Sent Card Kit – one of your Free Sale-A-Bration choices. Now you can make the cards just as they are in the kit but this little project takes the kit a bit further. You need to get some product anyway in order to get the kit free – so this is one idea for you –
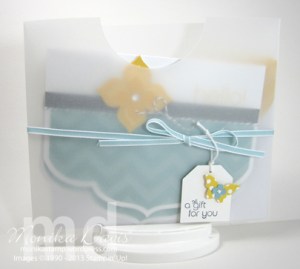
It’s a super cute pouch to put some cards in and give as a gift to someone – a hostess perhaps. If you went to the Stampin’ Up! leadership conference this may look familiar. I’m not sure how Sara made her pouch but this is how I made mine.
- I used a full sheet of 8-1/2 x 11 Vellum Card Stock, score it in half at 5-1/2″ using the Simply Scored Board.
- Turn it and score at 1″ on either side.
- Cut on the 5-1/2″ score line from the outside edge to the 1″ score line on either side to create flaps. I cut away the flaps on one side.
- punch a half-circle on the side with the flaps

- Fold the pouch in half and the flaps around the back – I didn’t even use any adhesive.
- Add a piece of 1/8″ Baja Breeze Taffeta Ribbon and tie it in a bow
- Make a tag using the Extra-Large Tag punch
- The tag is stamped with the phrase that comes from the Bring on the Cake stamp set
- the butterfly is a piece of Daffodil Delight designer paper from the Polka Dot Parade paper pack using the new Bitty Butterfly punch, then a bitty flower and a rhinestone
Now make the cards that come in the Happy Hello kit – the Baker’s Twine, Rhinestones, Daffodil Flowers and Envelopes are all included in the kit. The only thing I added was on the blank card I stamped “wishing you a wonderful day” also from the Bring on the Cake stamp set.


I put two cards and envelopes in the pouch – since the kit comes with 8 you could make 4 sets! To get the Happy Hello kit free you need to put in a $50 order of Stampin’ Up! products – so here is an idea.
- Simply Scored Tool $29.95
- Vellum Card Stock $6.50
- 1/8″ Taffeta Ribbon $5.95
- Bitty Butterfly punch $15.95
Use a stamp set that you have on hand, if you don’t have the tag punch cut it by hand, use some designer paper that you have on hand for the butterfly. Hopefully that gives you some inspiration. I saw another cute idea for this kit and I plan to try it out and share that with you later.
You can place your order for these products today on by website – www.monika.stampinup.net – just click on SHOP NOW.
Enjoy the weekend!
Feb 15, 2013 | Big Shot, Cards, Sale-A-Bration 2013, Spring Catalog 2013, sympathy, Vintage |
The new Stampin’ Up! Flower Trim is beautiful! If you haven’t seen it in real life you are missing out. And while the trim itself comes in Very Vanilla – you can change the color! On this card I changed my to Summer Starfruit – and I’ll share with you how I did that. Here are the two versions of this card –
 These cards are very pretty in real life and I just love the little flowers. I cut off a couple of flowers for each card. Do you want to know how I changed the color from Very Vanilla to Summer Starfruit? It’s easy – here is what I did –
- I cut off the number of flowers that I wanted from the trim and placed them on a paper towel
- I used one of the new Stampin’ Spritzer bottles – fill it with some rubbing alcohol about 1/2 full or a bit more.
- Use the Summer Starfruit ink refill and add to the Spritzer bottles – the more drops the darker it will be – so you’ll have to decided what is right for you. I probably added 10 drops. Then shake it up.
- Spritz the flowers with the mixture in your spritzer bottle and let the flower dry – it shouldn’t take very long.

Here are the tips on making this card –
- The card base is Summer starfruit.
- The layer of Whisper White card stock is embossed on the bottom edge with the Needlepoint Border Embossing Folder (Spring catalog).
- Add a 1/2 piece of one of the Tea Lace Paper Doilies (Spring catalog) to the white card stock.
- Stamp sentiment on the white card stock.
- Add the leaves/stems to the doily layer. Use the piercing tool and pierce a hole on either sides of the stems to pull the Linen Thread through and tie in a bow.
- Attach the Whisper White panel to the card base.
- Add the flowers to the stems – I used glue dots.
Here is another version of the card –

If you look at the two version of the cards there are just a couple of minor differences –
- The stamp set that I used – So Sorry on one and Vintage Versus from the Sale-A-Bration brochure on the other
- The stems/leaves that I used – the Bird Builder punch on one and the Little Leaves Sizzlits die on the other.
I hope you like this card. I do and will probably make a few more as I need some more sympathy cards and I think this one turned out very peaceful looking. Thanks for stopping by today. All the products that I used are available in my online store on my website – just click the SHOP NOW button – www.monika.stampinup.net


