Happy Birthday Card
Stamping News from Monika Davis
|
Stamping News from Monika Davis
|
World Cardmaking Day is this Saturday, October 5, and to celebrate Stampin’ Up! is holding a contest you won’t want to miss. After all, what’s not to love about a holiday dedicated to card makers worldwide?!
There are two ways to enter:
This contest is open to everyone-demonstrators, customers, friends, spouses, children . . . you get the idea. However, there are a few conditions:
A selection of pictures will be posted to Stampin’ Up!’s World Cardmaking Day Pinterest Board and the winners announced in a later current update.
*Quebec winners will receive the Naughty and Nice Rotary Stamp and Season of Style Designer Washi Tape (valued at $14.95).
Here is a card idea for you

A quick card using the Halloween Happiness single stamp from the Stampin’ Up! Holiday Catalog. Here’s how it was made:
That’s it! Have fun making cards today!

One more fun card from my Cards that Move class – a Telescoping Card. This idea was not from convention or from Shelli but from Julie Davison.
 It’s a Halloween card and this is what it looks like closed. I used the Circle Framelits die set to create it. This is what it looks like open –
 Each of the circles rotates to open up. The circles are connected with the silver mini brads. So when I made this card and was prepping for my class I just pulled out regular Very Vanilla envelopes. I never tried to put the card in the envelope and when I was having my morning class – guess what? The largest circle in the die set which is the base of this card is too big! Oops. Well guess what I have that Stampin’ Up! just started selling that came to my rescue????
The Envelope Punch Board!! Yes it did – I pulled it out along with the rest of my Witches Brew Designer Series paper and in just a couple of minutes we had custom made envelopes to fit our telescoping card!! Yipee!

I’m so glad I had that Envelope Punch Board to rescue me! And look how cute the matching envelope is. I measured my card by placing it on my grid paper to see how big I needed my envelope to be. Cut the Designer Paper to the size that it said. Placed it on the punch board at the correct score line – then punch, score, rotate – line it up with the little marker along the score line, then punch, score and rotate. Repeat for the other two sides. Corner round all the points. And then fold it up into an envelope. It just take a few minutes – how great is that!
Here is a closer look at the bottom panel of the card –

Here is a quick list of what I used to create this card:
Everything is available to order in my online store.
It was a fun card to create. Let me know if you make one.
I wanted to share several Stampin’ Up! related updates with you – new stamp sets and products and offers.
 A hostess special for October! Celebrating Stampin’ Up!s 25 year anniversary – get $25 extra hostess dollars with a qualifying workshop! Contact me to schedule your October party!
 A new Best of Stamp set – Best of Christmas #134384 – $14.95 – Clear Mount set. Order today!
 Coming son – a new recruiting special! It’s the lowest price ever. Join Stampin’ Up! for $25. Two weeks only – October 7 – 21st. Contact me for more information.
 The Everyday Occasions Card Making Kit. The perfect card making kit for the new stamper – simple, fun all occasion cards. The kit contains everything necessary (minus adhesive and scissors) to create 20 beautiful cards for almost any occasion, and it comes in a beautiful box to store them in.

Monstermaniacs Clear-Mount Stamp Set #134972 Price: $14.95
Monstermaniacs, by Doris D., is the second winning stamp set from In With You, our new stamp set design challenge beta program. Order today!
[contact-form subject=’Stampin%26#039; Up! October Specials – Contact’][contact-field label=’Name’ type=’name’ required=’1’/][contact-field label=’Email’ type=’email’ required=’1’/][contact-field label=’I want to book a party in Ocbober!’ type=’checkbox’/][contact-field label=’I want to learn more about Joining Stampin%26#039; Up!’ type=’checkbox’/][contact-field label=’Comment’ type=’textarea’ required=’1’/][/contact-form]
Another card from my Cards that Move class was a simpler version of a beautiful card Shelli shared with us at the Stampin’ Up! Convention.
 The card is closed up with the Very Vanilla Seam Binding. I decorated the front with the Papillion Potpourri stamp set and the Flowering Flourishes stamp set. There is also some splatter with an Aquapainter filled with rubbing alcohol and Soft Suede ink. And also some Vanilla Smooch Spray.
When you open the card you get a big surprise –
 The huge Swallowtail butterfly pops right out at you – likes it is flying off the card. I stamped it on a separate piece of card stock – I used the Natural White card stock and stamped with Black StazOn ink. Then used the Aquapainter to watercolor with the ink pads. Then cut the butterfly out – fold one wing in and attach to the inside of the card just on the left side.
I’ve been busy busy getting ready for my Stamp, Scrap & Create retreat that starts tomorrow! I can’t wait. I’ll probably be posting pictures on my Facebook page – so be sure to check in over there during the weekend. If you haven’t already LIKE my page so you don’t miss anything I post over there.
I hope you liked yesterday’s card. Today I have another moving card – featuring the new Label Card Thinlits for the Big Shot. This card is pretty much the sample card that you see in the Stampin’ Up! ad for the new thinlits. I can’t remember for sure if it was shown in Shelli’s presentation at convention.
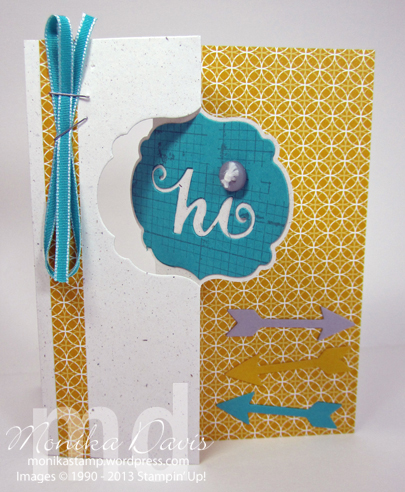
All the die cut pieces are part of the set – it cuts the card base, the label layer, the hi and the arrow. Plus there are more pieces that I didn’t use on this card.
 Two different banners with the score lines to make folding easy. A short arrow, an ampersand, and “I♥u”. So lots of pieces to get creative with.
This is a view of the card when it is “flipped” –

One tip for you – attach the designer paper to the right side of the card before cutting through the Big Shot. That gives you a clean matching cut on the designer paper and you won’t have to try to line up after the fact.
Thanks for checking in today.
I’m heading out with Ryan later to go to the College Fair in our county. He has been working on college applications and I think all the ones he is looking at (except 1) will be at the fair for us to talk to. And maybe he will find some others that he is interested in too. I can’t believe he has grown up – where in the world did the time go – in less than a year he will be off to college.

Milton, Georgia
Hi! I am a Stampin’ Up! independent demonstrator in Milton, Georgia. I love being creative and want to share it with you! On my blog I will share creative ideas using Stampin’ Up! products and you’ll also hear about my family and my dogs.
I look forward to helping you get your creative juices flowing!
Lets get crafty,
Monika Davis


For New Subscribers -
Join by the 10th of the month to start your subscription this month.
Prepaid subscriptions now available!


![]()

![]()


