Jan 6, 2015 | Occasions Catalog 2015, Sale-A-Bration 2015, Weekly Deals |
The Occasions Catalog is live and Sale-A-Bration has started. Best. Day. Ever!


Occasions catalogs went out in the mail in December and hopefully you received your copy. If not please let me know. The Occasions catalog begins today January 6th! And Sale-A-Bration is also going to start at the same time! I have those catalog here ready to hand out at my classes and events this month. If you need one mailed out please let me know.
The Occasions catalogs has tons of new products to help you show how much you care by giving a gift made with your own hands. Items for Valentines, Birthday, Easter, Mother’s Day, Baby, Father’s Day, Wedding, Graduation, Memory Keeping, and Everyday.
Sale-A-Bration is the best time to earn free product! 3 easy ways to get Free Products.
1 – SHOP – It’s simple – one free product for every $50 you spend (before tax & shipping).
2 – JOIN – There’s no better time to join Stampin’ Up! – Become a demonstrator for just $99, and during Sale-A-Bration you can get additional free products in your demo kit!
3 – HOST – Get $25 more to spend on any Stampin’ Up! products with a qualifying party!
Best. Day. Ever.
Also new weekly deals today
 And this recently released photopolymer stamp set – Snuggles and Smooches
 Lot’s of fun stuff to choose from – shop online any time in my store on my website – www.monika.stampinup.net.
Thanks for stopping by!

Jan 5, 2015 | Project Life |
Happy New Year!!
I ended up taking a long break from my blog and spent time with family. I was so lucky that I got to spend time with them. All my boys were home (and actually still here – Kyle leaves Wednesday and Ryan on Sunday). We visited with my parents, my brother and my niece and nephew on Christmas day. Greg’s mom spent Christmas eve and Christmas day with us. Then Greg’s sister and family came in the day after and Greg’s brother and family came the day after that – all 13 of use were together for family time on the 27th. I even had some time shopping with the girls – my mother-in-law, sister-in-law and niece. It seems I did most of the shopping though – which is normally not the case!
Anyway my hope is to blog regularly through the week now that the year has started. I used to always use a to-do list when I worked full time and over the years I got so far away from that – now I’m trying to get back to it. And update my blog will be one item on the list every day of the week.
For Christmas I made a gift for Greg using Project Life cards. I used cards from the Happiness Is card kit. I chose mostly journaling cards – the ones I could write on, with a few decorative ones in between. I wanted 12 cards that I could write a monthly date on! Each month we will set aside a time to have a date and each of the cards has a suggested date for the month.
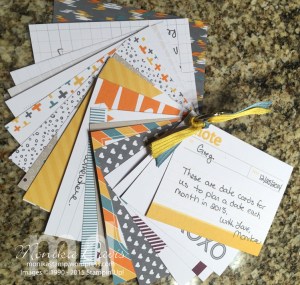 On each card I stamped the month using the Project Life Day to Day Photopolymer stamp set. I used the ink colors that matched the cards – for this set they are mostly the new in-colors – Lost Lagoon, Hello Honey, Blackberry Bliss, and Tangelo Twist. I wrote on the cards using my Project Life Journaling pen. To finish the project I punched a hole in the corner of the cards and strung them on a book ring. Then tied some coordinating ribbon around the handle.
 I wasn’t sure at first what I wanted the cover to look like – but found this NOTE card in the set and thought it would be perfect since it had boxes for TO and DATE. Behind the cover I added two months and then a decorative card and repeated till I finished the year. Not all the dates are things that cost money or even where we go anywhere.
 Here is one where we will stay home and watch movies together – I didn’t specify what movie series it will be we can decide on that closer to the date – maybe even something new will be available.
 I love to watch the sunset but it’s not something we can see from our house. We will have to find us a nice place where we can go. Greg actually got me wine for Christmas from some place that he visited in Chicago this past year. So this was kind of perfect. Really there is one bottle of wine per month – I got 12, so we could match them up to our dates!
This would make a fun gift for Valentine’s Day too – or even adjust it to be for one of your kids – mommy and me date cards – or anyone that you’d like to spend more time with. Just think of things that you can do together. In case you wondered what our 12 things are here is the list –
January – Let’s enjoy our evening by the fire pit roasting s’mores.
February – Let’s plan a triology movie marathon.
March – Let’s explore the walking trails & parks in downtown Woodstock.
April – We will hit up the bowling alley … lowest score wins!
May – I’ll grab the wine you grab the cheese and let’s watch the sunset somewhere.
June – We will pack a picnic dinner and watch an outdoor movie. (on the laptop in the backyard is ok too)
July – In honor of our anniversary month let’s get dressed up and eat in downtown Atlanta where we got engaged!
August – How about a round of mini-golf?
September – Food crawl: appetizers, then the main course, followed by dessert – all at a different place.
October – Let’s road trip up north to visit some apple orchards and see the fall leaves in the mountains.
November – Game night – we’ll enjoy our favorite board & card games and snacks.
December – Let’s enjoy a night of watching old home movies before the holiday rush.
Does that sound like a good list of dates for 2015? I’m looking forward to it and so is Greg. Not sure when our first one will be we will have to work it out with the weatherman.
Here is a supply list for this project.
Product List
Links by TheseAreMyStamps.com
Thanks for stopping by and I hope you have a wonderful 2015!
Dec 24, 2014 | Christmas |
 Wishing you and your family a very Merry Christmas and a Happy New Year.

Dec 20, 2014 | Christmas, Holiday Catalog 2014, Tags |
I have the perfect tags for your holiday packages and they are easy to make with products you probably already have in your supplies. Nothing I used is an actual “Christmas or Holiday” item. It’s a snowman tag made from the Star Framelit.
 I needed some tags for gifts that I bought the other week. I went shopping at the Woodstock Pharmacy – they have some really nice gifts in there and as it turned out I found something perfect for all the girls in the family. I’m not going to say what I got but I bought all that they had in the store – they had to order more! As I checked out she asked if I would like free gift wrap – why yes I sure do! And then since I had 6 of them and it was going to take her a few minutes to wrap them she asked if I wanted a free massage – why yes that sounds really good too. A little while later I went home with an armful of wrapped gifts that now needed tags. These snowman tags are what I created to go on my gifts. Look how nice they look under the tree!
 Here are the supplies that I used:
Product List
Links by TheseAreMyStamps.com
I hope you like these tags they aren’t very hard to make. We made them in my Holiday Tags, Bags & Boxes class on Saturday. Everyone loved them.

Sorry that I haven’t posted lately – I thought I was going to have so much more time to get things done these last couple of weeks but somehow I didn’t. My husband had hip replacement surgery earlier this month – and he is doing great. Then Aspen got really sick and spent 3 nights at the vet. I finally go to bring him home and then Magnolia got sick – it wasn’t the same as what Aspen had but I still talked to the vet and got her on the same prescription food and medicine that Aspen was taking. Now both of them are better too. I have to make sure all 3 of them get their meds twice a day. And the dogs have to be fed several small meals throughout the day. Aspen had a recheck on Friday and they took blood again – they will call on Monday with the results. Anyway – right now everyone is on the mend (well Tyler seems to have a cold). Ryan is coming home from school Sunday – he has one semester of college under his belt. And Kyle will come home from San Francisco on Monday night. I’ll be happy to have the whole family here together Christmas and New Years.
Enjoy your time with your families. Merry Christmas!
I will be trying to post some more projects – but may have to combine some in a post. I did run into a few technical issues – my camera hasn’t been working since Thanksgiving – not sure what is wrong. I used my phone to take these pictures. And now my power cord on my laptop seems to have died – I borrowed Tyler’s for right now – but he will want it back. And my battery won’t hold a charge so I need the power cord all the time. It may just be time for a new laptop – Santa did you hear that?
Well let me go on for now.
Dec 11, 2014 | Holiday Catalog 2014 |
The Petite Cafe Bags in the Stampin’ Up! Holiday catalog are a perfect size for giving someone a stack of holiday cookies or other treats. Here is an idea on how to decorate the bag by cutting a window in the front and covering the bag with some Designer Series paper.
 I used a piece of Trim the Tree Designer Paper from the paper stack and cut it to fit the front of my bag. The strip that was left is what I used to cut the stars – they just show the pattern on the other side. You will also need a piece of window sheet to cover the hole that you cut in the front.
- I used the Star framelits to cut my shape in the front.
- Go ahead and attached the bottom of the designer paper to the front of the bag.
- Slip the star framelit inside the bag with the cutting blade facing up towards the front of the bag.
- Place the bag between two cutting plates and run through the Big Shot – use either the magnetic platform or the multi-purpose platform set to the correct tab.
- Cut a square piece of Window Sheet to be bigger than the star but not wider than the designer paper – lift the designer paper up and attach the window sheet between the paper and the front of the bag to cover the hole.
- Then glue the designer paper to the rest of the front of the bag.
- Add a little greeting to the front – punched out with the Modern Label punch. And a tiny punched star.
- Tie some Whisper White Baker’s Twine around the top – I tied it below where the bag flap closes – then I can undo the flap and slide off the twine to fill or empty the bag without untying it.
- At the ends of the twine I sandwiched it with some stars cut with the small star framelit. They just hang.
Fill the bag with cookies, puffy peppermints, or something else fun to give to a teacher, neighbor, hostess or friend.
Thanks for stopping by today.


 And this recently released photopolymer stamp set – Snuggles and Smooches
 Lot’s of fun stuff to choose from – shop online any time in my store on my website – www.monika.stampinup.net.


