Mar 27, 2015 | 2015 Occasions catalog |
Earlier today I co-hosted a bridal luncheon for my soon to be sister-in-law. It was at a cafe here in Key West. I created these little favors for everyone.
 Inside each Curvy Keepsake Box were Key Lime White Chocolate Chip cookies. Yummy!
Lunch was great. The photos though are all on my regular camera and not my phone. I’m still blogging from my phone so I can’t share those right now.
Thanks for stopping by!

Mar 26, 2015 | Uncategorized |
So I’m trying to do a blog post from my iPhone. We shall see how well it works.
This cute little box idea was one they showed at our leadership conference. I decided to make one with some Sale-a-Bration supplies.

I used Sahara Sand card stock to make the triangle box. I wrapped it with some of the Best Year Ever Designer Series paper. Then I used the ribbon all three colors and tied them around the box. I added a tag stamped with Happy Spring which are from Crazy About You stamp set. And the little heart from the Best Day Ever stamp set. I also cut the flowers from the designer paper and added them to my tag.
It’s a fun little box made from one sheet of card stock. Cut your piece to be 8″ x 11″. Then score at 2″ and 9″ on the long side and 1″, 3″, 5″, 7″ on the short side. I also make just a little mark at 4″ on each side so that I can score a diagonal line for where the center scores cross each other and make the end fold in. you will cut away the small rectangle that you end up with in each corner. And then cut in on the 2″ and 9″ score lines until you reach the 3″ and 5″ lines – but don’t go all the way across. This will make your ends so you can fold them. I trimmed a wedge off of the outside flaps to make it fold nicely.
We shall see if this post works. Thanks for stopping by today.

Mar 25, 2015 | Big Shot, Scrapbook Crop, Tags |
I wanted to share these goody bags that I made for all the croppers and a scrapbook crop I went to earlier this month. I was a vendor and made 60 bags – one for each cropper that attended.
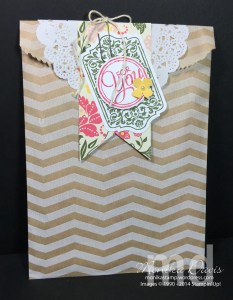 I used the Chevron paper bags in the Stampin’ Up! catalog and added a Paper Doiley, banner of All Abloom Designer Paper, and then stamped and cut pieces from the Chalk Talk stamp set and framelits. Finished with a punched flower, rhinestone and a paper clip tied with baker’s twine. Making 60 of them took some time but I really liked how they turned out – I hope all the croppers did too.
 Now do you want to know what I included inside for everyone?
First I gave them all some of the All Abloom Designer Paper stack. Here is what all that paper looked like before going in the bags –
 I also made up some little Project Life card samples using the Mini Kits from Sale-A-Bration –
 They also got a flyer for the new Sale-A-Bration items for March, a postcard about Paper Pumpkin subscriptions, a Door Prize form, a business card from me, and a small spool of Baker’s Twine.
It sure does seem like I had something else in there but I can’t think of it right now.
Thanks for visiting my blog today!

Mar 10, 2015 | class, Occasions Catalog 2015 |
What are your thoughts on the kits in the Stampin’ Up! Occasions Catalog?
Well my favorite one is the Hello Life Decor Kit! That’s the first one I bought and I am going to have a class on March 22nd for anyone that wants to get together to make theirs. Here are some photos of mine –
 I even had some black & white photos of my three boys that I could use! I love how it turned out and I plan to hang it in my new stamping classroom when it is finished – the colors in that room will be Gray, Yellow, White. – Yellow on the walls, white furniture and probably will do gray tiles on the floor. Final decisions haven’t been made yet but that is what I’m thinking right now.
 Kyle (my oldest – photo on the left) recently took a business trip to Brazil & Argentina. He is back at his home now in San Francisco. I was able to talk to him last night. Maybe I’m the only one but as a mom I was nervous for his traveling out of the country – it was his first time to leave the US. Ryan (my youngest – photo in the center) is away at college in Indiana. I got to talk to him yesterday too. He will be traveling soon to visit Kyle for his spring break and then stop here at home in Georgia before heading back to finish the semester. Tyler (the middle – photo on the right) is here at home so I get to talk/see him just about every day. He is finishing college and working right now at his first internship job. I was a happy mom last night after talking to all three of them on the same day!
 Here is a look at the Pom-pom and heart banner that is on the frame. I figured out the trick with the pom-poms – they take some time but I actually am very happy with the final result. I used a fine tooth comb – to carefully comb out all the strands of yarn.
 The panel that says LOVE THIS LIFE can be changed to say what you want. The kit comes with a set of adhesive letters so its’ your choice on what you want to put on there. The kit also has extra’s of most of the pieces in the kit – you can add more to your frame or use the left overs for a scrapbook layout or cards.
Join me on Sunday, March 22nd for a class to create this Home Decor Kit. This is a pre-paid class – RSVP and payment due by March 12th so I can order all the supplies for you. Grab a friend and sign up today! Class Fee is $32.
If you are a Stampin’ Up! demonstrator or you have already purchased the kit you can join us too – the reduced class fee is $7 (pay at the class) – you will have to bring your kit with you to the class.
RSVP for the class here – after I receive your RSVP I will send you a Paypal invoice.
Plan to bring Fast Fuse or Multipurpose Glue adhesive, your paper snips, and a bone folder. You can also bring some photos or add those later at home.
If you have questions let me know.


