Mar 19, 2013 | Big Shot, Cards, Sale-A-Bration 2013, Thank You, Wildlife |
Here is one more quick card using the Madison Avenue stamp set and a few other Sale-A-Bration items.
 The Sycamore Street Designer Series paper was used along with the coordinating Madison Avenue stamp set and Vine Street Embossing folder.
This is a 4-1/4″ square card.
I used this card as an example during some new demonstrator training sessions. This would be easy to change to use the products you have on hand.
The base used here is Shimmery White card stock – but you can just as easily use Whisper White.
You could use a different embossing folder or not emboss it all.
Switch out the ribbon – the Sycamore Street ribbon would have worked here too.
The Fabulous Phrases stamp set that I used here has a ton of different words to choose from – but if you don’t have that one choose something you do have.
The stamped flowers were embossed with clear embossing powder and the heat tool – but you could stamp with just VersaMark ink or use the same color as the card stock.
Switch out the designer series paper – and then use matching card stock.
There are so many different ways to alter this little card you could have a whole stack and each one be different.
Oh and another picture to share with you – my bluebird is right on schedule – egg #3 arrived today –

Let’s see if she adds another one tomorrow!

Mar 14, 2013 | Big Shot, Create with Connie & Mary, Easter |
Easter is sneaking up really fast! I made invitations last week and mailed them all out to our family to invite them over for lunch on Easter Sunday. It is always a fun day to get the extended family all together in one place. So with Easter on my mind I decided to make something with that theme using this weeks challenge.
This week at Create with Connie & Mary we were issued a sketch challenge!

I wanted to create a little box for my class this Friday so I thought I would use the sketch as the basis for the box design. And here is the end result –

As you can see it pretty much follows the sketch. I decided to use the scallops on the outside and layered squares on the inside – that’s kind of the opposite of what’s on the sketch – so maybe you can say I turned it inside out. And instead of a button I have an egg and a collection of little bunnies on the side.
Here are the details on this box –
- The front and back of the box are the Scallop Square Bigz Die – and on the front I pierced a hole in each scallop.
- Between the two scallop squares I made myself a box – same idea as last weeks project (and I guess I’m still stuck on last weeks color challenge too – I used basically those same colors again). This box is just bigger.
- A layer of Summer Starfruit card stock and a piece of the designer paper from Birds of a Feather.
- The bunnies are from Ears to You – one of the single stamps – I stamped them in Crumb Cake, Summer Starfruit and Raspberry Ripple and cut them out. I added a tiny pearl eye to each one and then one got a dahlia tail!
- Behind the bunnies I punched an oval from Primrose Petals card stock and used the piercing template to pierce around it.
- I tied Whisper White Baker’s Twine around the front layer.
- There is a little Happy Easter tag.
- And a Summer Starfruit ribbon handle.
- Fill with your favorite treat and give to someone special!
Visit the Create with Connie & Mary site to see the creations from the rest of the design team and to submit your own creation for this new challenge. I hope you will play along. Every week the top 3 are announced from each challenge – maybe this week it will be you!
Stampin’ Up! Supplies:
- Stamps: Ears to You, Teeny Tiny Wishes
- Ink: Crumb Cake, Summer Starfruit, Raspberry Ripple
- Card Stock: Primrose Petals, Raspberry Ripple, Summer Starfruit, Whisper white
- Accessories: Basic Pearls, Big Shot Die Cut machine, Scallop Square die, Summer Starfruit ribbon, Dahlia’s, Whisper White Baker’s Twine, Itty Bitty Banner Framelits, Wide Oval Punch, Piercing Template, Piercer and Mat, Birds of a Feather Designer Series Paper.
Happy Easter!
Mar 12, 2013 | Big Shot, Spring Catalog 2013 |
Today was craft day at Aunt Monika’s house! My niece Emily and her roommate Kayla are here for their spring break and today we had craft day. They made these fun canvases to hang in their rooms using the All Dressed Up framelit dies.

Emily and her canvas using the Tea for Two Designer Paper


Kayla and her canvas using the Print Poetry Designer Paper Stack

Then the each made a card and gave advise on something I was working on. It was a fun day. Now I’m headed to the Ronald McDonald House to stamp with the guests that are staying there. We will be making an Easter card that my friend Lieshman designed. Gotta go!
Mar 7, 2013 | Big Shot, Create with Connie & Mary, Spring Catalog 2013 |
Have you played with the new All Dressed Up Framelits from Stampin’ Up!? I wasn’t sure that I wanted these (I have all boys so I don’t do much girly stuff) but once I started to play with them – well it was really hard to resist having fun!
This week at Create with Connie & Mary we were issued a color challenge! And I decided I could use those colors to make a cute little dress project that I think you will love. It’s based on an idea that I saw in a magazine – you may have seen it to. But I of course wanted to use my Stampin’ Up! products and the Dressed Up Framelits to make mine. Here are the colors we are working with this week –

Are you ready to see this little cutie? Here it is –

I’m not sure you can quite tell from this front view but it is actually a little box – I’ll show you a side view in a second. The inside is filled with just a few little kisses that have designer paper on the bottoms.
Here are the details on this box –
- first I cut a piece of Raspberry Ripple card stock and scored it – folded it and placed it so that the dress die did NOT cut through the shoulders – I wanted this part to stay connected like a card.
- I took a second piece of Razzberry Ripple and cut another dress, then cut off just the skirt and embossed it with the Fancy Fan embossing folder – positioned so it did not emboss the scallops at the bottom of the dress – I layered this on top of my folded dress as the top layer
- next I used the Primrose Petals card stock and cut two dresses – cutting away the skirt and glueing those to the inside as a bottom layer on the front and back of the dress.

- for the box I cut a piece of Primrose Petals card stock – it is 2″ x 5-1/2″ – it is scored at 1″ on the short side and 1″, 2-1/2″, 3-1/2″ and 5″ – and made into a tiny box. I glued this to the inside of the folded dress.
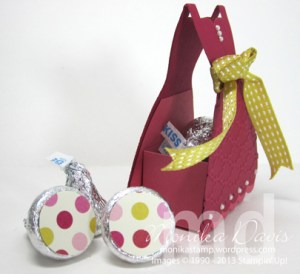
- I tied a piece of Summer Starfruit ribbon around the front of the dress – leaving long tails that I cut at the ends
- I added the tiny pearls along the base of the dress and up at the top for some bling.
- The kisses are covered with paper from the Print Poetry paper stack punched with the 3/4″ circle punch and attached with a glue dot.
- You could make these little dress boxes as party favors for any little girly occasion – change the colors to suit the occasion. Fun!
Visit the Create with Connie & Mary site to see the creations from the rest of the design team and to submit your own creation for this new challenge. I hope you will play along. Every week the top 3 are announced from each challenge – maybe this week it will be you!
Stampin’ Up! Supplies:
- Card Stock: Primrose Petals, Raspberry Ripple
- Accessories: Basic Pearls, Big Shot Die Cut machine, Fancy Fan Embossing Folder, Dress Up Framelits, Summer Starfruit ribbon, Cutter
Have some fun playing dress up!
Feb 27, 2013 | Big Shot, Designer Series Paper, Spring Catalog 2013 |
Stampin’ Up! now has dresses! Paper dresses that is! The new All Dressed Up collection is all ready for you to play.

I used the Dress Up Framelits from the Stampin’ Up! Spring catalog to create these cute little dresses. This Saturday I’m going to have a vendor table at the BUMC Scrapbook Crop and if you plan to attend be sure to stop by so you can make your very own cute little dress! I’ll have these available as Make&Takes at my table.
I used various Designer Series papers to create them – just cut the paper with the framelits. For the dress form I just cut it out of Crumb Cake card stock. Then I just decorated them in slightly different ways – the ones shown in this picture used the following to dress them up
- Basic Rhinestone Jewels
- Basic Pearls
- Baker’s Twine
- Seam Binding
- 1/8″ Taffeta Ribbon
- 1/4″ Stitched Grosgrain Ribbon
- Itty Bitty Punch Shapes
- Mini Silver Brads
- Satiny Ribbon from the Sycamore Street pack
These are just a few ways to dress these up – there are many other things you could do. Fun!
Which one is your favorite? Mine is the Pool Party dress.
Feb 26, 2013 | Big Shot, Cards, Sale-A-Bration 2013 |
Another Sale-A-Bration card to share with you – this one uses the Bloomin’ Marvelous stamp set and the Vine Street Textured Embossing Folder along with a hint of the Sycamore Street Designer paper and ribbon.

This is a quick little 4-1/4″ square shaped card. And here is how I made it –
- Pool Party for the card base. Emboss with the Vine Street Embossing folder – just 3 of the vines.
- Stamp a couple of butterflies in Tangerine Tango and punch out with the little butterfly punch
- Stamp “oh happy day” and punch out with the ticket punch – and punch a piece of the designer paper too
- cut a couple of strips of ribbon
- arrange everything on the front of the card
- final touch is a bitty button tied with some Whisper White Baker’s Twine.
- happiness!
 The Sycamore Street Designer Series paper was used along with the coordinating Madison Avenue stamp set and Vine Street Embossing folder.


