There are only 10 more days of the Stampin’ Up! Sale-A-Bration promotion. Don’t miss out on limited Time stamp sets, Designer Papers and even Glitter Tape! For the next 10 days I’ll be featuring a different Sale-A-Bration item on my blog. These items are available for FREE for each $50 product order that you place between now and March 31, 2016.
Today I have the Party Pants stamp set. It’s a Limited Time set that came out in mid February as a supplement to the original Sale-A-Bration offering. It coordinates with the Balloon Bouquet Punch from the Occasions Catalog. Here is the cute card I made with it this weekend.
I used a sponge dauber to color the dots that were embossed with the Large Polka Dot Embossing Folder.
The balloons were stamped with Hello Honey – some are full strength and some are stamped off. I added the little confetti stamp on each balloon. You can’t really see it on the photo but I did put a little clear Wink of Stella on each of those dots. The balloons are tied with Linen Thread and floating through the clouds!
You need to spend $50 in product to get the Party Pants stamp set for free – for this card here is one idea – order the two punches, the embossing folder, sponge daubers, and Linen Thread – that’s $53 and you can choose the Party Pants stamp set as your freebie.
Don’t forget the Starter Kit offer – if you have a long wish list get the $99 starter kit and choose $155 in product. Need more info or have questions I’m having an Opportunity Night tomorrow and can also answer questions online and help you get your kit ordered. Go to my Facebook Event for more info – https://www.facebook.com/events/1648907058705171/
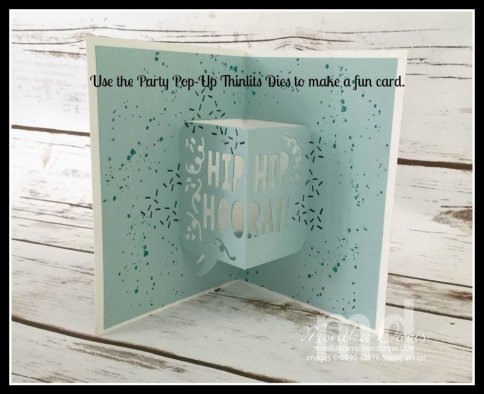
Did you see the Party Pop-Up Thinlits Dies in the Occasions Catalog? They are on page 7. You can use the dies to make a pop up card or trim the pop-up shape to use as a fun element on a card front, scrapbook page or other project. For this card I did both – the Hip Hip Hooray! pops up on the inside and the Happy Birthday element was added to the front.
I got this card idea from one I found on Pinterest – it’s the best source for ideas and inspiration. Another fun element is the black dots – those are actually the White Perfect Accents colored with a Black Sharpie Marker. It adds a fun touch to this birthday card.
Here is a peek at the inside.
There is one change I would make to this card – I’d add a Bermuda Bay card stock layer on the inside of the card so it would show behind the pop-up. With the white behind it it just doesn’t pop enough. But I already had mine all glued down before I thought of that. The next one I make will have that.
You can purchase the Party Pop-Up Thinlits Dies and the Party with Cake stamp set as a Bundle and save 15%. I’ve been using them a lot right now to make birthday cards. I’m starting a birthday club in March – if you would like to be part of it and receive a real hand-made card from me in the mail – then email me with your birthday and mailing address and I will add you to my list.
here is a video from my Stamper’s Club meeting where I show them how to use the thinlits and make this card. I didn’t do any editing on the video – I think it turned out ok. I’m working towards posting more videos and to start editing them too. It’s a start.
Thanks for stopping by today. I’ll try to be back soon.
I saw this cute Diamond box on the Stampin’ Up! blog. It was created by one of the Artisan Design team members from Europe. Stampin’ Up! shared her project along with a template and measurements. But it was all in centimeters. I decided to use this as one of my stamp club projects this month and convert the measurements into inches. I wanted to share with you how I did that, and also a little video we filmed during stamp club so you can see how to make the box.
You will use the Gift Bag Punch Board to create the Diamond box base. I converted the measurements to inches. A tip for doing a conversion like that – use the Stampin’ Up! Grid paper – it has inches on one side and centimeters on the other. I placed my card stock on the centimeter side and measured what they said and marked it – then turned over my grid paper and place the card stock down to see where my mark was on the inches side. I used the closest mark and those became my new measurements.
So my piece was 8-1/2″ x 3-1/4″ and I scored a line all the way across at 3/4″. Then I used the punch board. Place on the punch board (scored line down at the bottom). Line up the left edge with the start line. Punch, score horizontal, both sides of the triangle and the little side line in the center. Mark the Side line to the right with a pencil. Move the card stock so the pencil mark is on the start line and repeat.
Watch my video to see how the do that on the Punch board. (I didn’t do any editing on the video – hopefully that’s ok).
Some of the supplies I used include:
Love Blossoms Designer Paper Stack, Watercolor Wings Stamp set, Sweet Heart punch, Bow Builder Punch, Gift Bag Punch Board, Tear & Tape, Blushing Bride Sequin Trim, Very Vintage Buttons, Basic Pearls, Itty Bitty Accents Punch Pack – flower
Card Stock – Crumb Cake, Whisper White, Rose Red, Blushing Bride
Ink – Rose Red
This card idea is actually very versatile and I’ve seen several of these online and in some swaps that I’ve received. It is a great idea for using up scraps of your Designer Paper. Pick your paper, coordinating card stock, a greeting and a fun little element to add as an accent. You could use this for all different occasions.
I created this one with the Love Blossoms Designer Paper Stack and Bloomin’ Love stamp set.
Use the 1″ Square Punch to punch out squares from the various patterns in the Designer Paper stack. Arrange in a grid on a piece of coordinating card stock. Add a greeting punched with the Decorative Label (or other) punch.
Here is another one that is a Thank You card:
This one uses the Pretty Petals paper stack from the annual catalog and the Endless Thanks stamp set. The flowers in the stamp set coordinate with the patterns in the paper.
I think next I’m going to create a birthday card in this same design. What kind of card do you want to make with your paper scraps?
Do you need a simple treat idea for Valentine’s Day? Here is a fun arrow that is easy to make with just a few supplies.
I filled the 1×8 cello bags with M&Ms – use a straw to help get the first couple in there so they line up nicely. I used a 2×2″ square of Glimmer Paper to make the end of the arrow – hmm I wonder what that is called. Punch one end with the banner punch and then take that piece and put it at the other end to cut that into a tip. Then cut some slits in the sides. Add it to the filled bag with glue dots.
The point is a heart – I used the You’re So Sweet bundle – that’s the Mini Treat bag Thinlits.
Are you ready to get away from it all? Leave behind the family, the laundry, the cooking, the cleaning and come join us for a fun Stamp, Scrap & Create Retreat. Come party with us at Monika’s House March 18-20, 2016.
Arrive on Friday afternoon – come set up your craft space, bring an appetizer to share with everyone on Friday evening for our dinner. We will have games and prizes on Friday night. Make & Takes will be scheduled for Friday night and Saturday. All meals included on Saturday. Finish up on Sunday and pack up and head back home in the early afternoon. We have Make & Take projects planned as part of the retreat – and everyone will receive a Goody Bag with supplies and extras. And little surprises throughout the weekend!
Bring whatever creative projects you would like to work on. You will have table space set up for the whole weekend – so bring your scrap-booking, card making, Project Life, laptop for My Digital Studio, Paper Pumpkin kits, jewelry making, knitting – the choice is yours.
I have some space in my house if you want to spend the night here instead of going home or there is a hotel one exit south just a few minutes away. I will have three Queen beds upstairs, some sofa space, or we can put an air mattress on the floor. Or stay as late as you want in the evening – go sleep at home and come back in the morning!
I will send out a schedule and list of what you need to bring at the beginning of March. This time we are offering EARLY BIRD PRICING – paid in full by Fab. 15th – $75.
Regular pricing – due by March 1st – $90.
All fees non-refundable after March 1st. I will be ordering supplies and prizes March 2nd.
Spots are LIMITED – I am only opening this event up to 12 people! So reserve your spot today!
Hi! I am a Stampin’ Up! independent demonstrator in Milton, Georgia. I love being creative and want to share it with you! On my blog I will share creative ideas using Stampin’ Up! products and you’ll also hear about my family and my dogs.
I look forward to helping you get your creative juices flowing!
Click on the Shopping cart to visit my Online Store and order your Stampin' Up! Supplies any time. Earn Stampin' Rewards when you order reaches $20 - be sure to opt in to the rewards program on your account. Any questions click on the email me button above.
Current Catalogs
Join My Stampin’ Up! Team for $99
Join Paper Pumpkin – Your Creative Escape!
For New Subscribers -
Join by the 10th of the month to start your subscription this month.
Prepaid subscriptions now available!
The content in this blog is the sole responsibility of Monika Davis as an Independent Stampin’ Up! Demonstrator. The use of and content of classes, services or products offered is not endorsed by Stampin’ Up!