Jan 7, 2010 | Big Shot, Create with Connie & Julie, Designer Series Paper, Occasion Mini 2010, Sale-A-Bration 2010, Valentine's Day |
Hi everyone! Yesterday was so exciting…. a record number of visits to my blog and lots of comments trying to win the free pass to Create with Connie & Julie – check back tomorrow to see who won.
 This is my original Hugs & Kisses holder – Click Here – for the original post.
Based on the comments I received I wanted to show you some more pictures of the Hugs & Kisses Holder project. I used the Stampin’ Up! Scallop Square Bigz Clear Die (#115950). I used my Paper Cutter with a scoring blade to score – here are some more pictures so you can see the scoring more clearly.

score on all the dashed lines and punch 1/8" holes at the four circles in the corners

Here is what it looks like on the paper cutter - line up the track in between the scallops on each side.

This is how you line up the diagonal - put the corners in the track and then start your scoring blade where the other lines cross (inside corner) and go out to the outside corner.
Some people also asked about doing this without the Scallop Square Die – and YES you can – any square will work – just divide each side into thirds and score it like a tic-tac-toe board. I decided to make a larger one today – it takes longer because if you want the edges scalloped you’ll need to do that (the Big Shot did all that work for you when you use the scallop square die) with a border/corner punch.

large Hugs & Kisses holder
My large Hugs & Kisses holder started as a 8-1/2″ x 8-1/2″ square of Real Red card stock. I used the new Scallop Trim Border and Scallop Trim Corner punch. With this size square it worked out perfectly with 18 scallops on each side – so divide by three – I scored after every 6 scallops.
I used the Full Heart punch to punch hearts from the Sending Love Specialty Designer Series paper. I also used the Heart to Heart punch. I added buttons and brads. I also used the Big Shot with the Movers & Shapers Curly Label die and the Heart from the Punch Windows dies to create the larger heart.
Here are a couple more pictures.

large Hugs & Kisses holder

view from the top and the tag on the large Hugs & Kisses Holder
I hope that answers all the questions and show you another option on how to make a large version. The small one is quick and perfect if you need a small something for Valentine’s Day. The larger one you can give to your sweetheart!
 And we have snow here in Georgia! My Christmas tree is still sitting on my back porch and it is starting to get a dusting of snow. The kids got out of school early and we are still waiting to hear about tomorrow. There is ice forming on the roads and the main roads outside our neighborhood have already had gravel/sand put on them. I’m still waiting on Greg to get home – he decided to stop and get gas for the car before coming home.
We don’t get much snow so I haven’t really looked closely at a snow flake – but today I had on a black coat and went to get the mail and snow flakes were falling on me. I looked and saw perfect little six point star snowflakes – it was so cool – they were tiny – but more than just little blobs – actual little snowflakes! And they were so pretty.
I found a new blog today (1/9) called Our Creative Corner and they had a 3-D challenge so I added this to their challenge link.
Thanks for stopping by!

Jan 7, 2010 | Create with Connie & Julie, Occasion Mini 2010, Valentine's Day |
Thank You for ALL the wonderful comments on my project yesterday!!!
It was such an exciting day to see all the visitors to my blog and read what everyone had to say. I will be picking the winner from my blog later today for the free pass to the class. If you missed your chance to get in on my drawing visiting the main Create with Connie & Julie Blog or the featured team member for today – which is Julie.
Here is a sneak peek at Julie’s Project:


I hope you are enjoying the projects that have been shared so far – I know I am!
I’ll have a few more details and pictures of my Hugs & Kisses Holder later today. Several people had questions so I hope that I can clear those up. So come back.
If you would like to get email updates from my blog so you don’t have to remember to come back – sign up by clicking the link in my right hand side bar. It will pop up a box to enter your email address. Then you will receive and email. Click on the link in the email to confirm your subscription. On days that I post you will receive an email in your INBOX. I post almost everyday – or try to.
Again that you so much for all the kinds words – this is so much fun!
Jan 6, 2010 | Big Shot, class, Create with Connie & Julie, Designer Series Paper, Occasion Mini 2010, SU Ribbon, Valentine's Day |
It’s Preview week over at Create with Connie & Julie, and I hope that you have been over there to see the preview projects that have been posted. There have been some cute Valentine Projects already shared by our wonderful team! So go check it out if you haven’t already. Connie has a new project posted on the Create site today and I have my own project to share with you here today since it is my turn to give away a FREE Pass to the Create with Connie & Julie class. How exciting is that?!? Read below for all of the details on how to enter for your chance to win, and then you can see more pictures and the supplies I used to create this project at the bottom of the post.

The Occasions Edition site will run from January 3 – March 6. Each week we will focus on a different collection of products that can be found in the Occasions Mini Catalog or Sale-A-Bration brochure. Our goal is to show you some new and unique ways to use Stampin’ Up!’s fabulous products. Every day there will be a new project posted and each week there will be at least two tutorials available for you to download. Our exclusive projects will include cards, scrapbook pages and 3D items, the quick and easy ones and the more complex larger projects.

To find out more about the site and to order a subscription, please visit us at Create with Connie & Julie.
Would you like to win a subscription to the Create with Connie and Julie site? Each of the team members will be giving away subscriptions on their blogs this week. To enter to win, all you have to do is leave a comment on our team members’ blog on the day that we are featuring them. It’s MY turn today to give away a free subscription, so leave a comment here on my blog (click on Comments right at the bottom of this post!). All the winners will be announced on Friday January 8! If you’ve already joined, we will refund your subscription price!
The free subscription give away has ended – thanks to all of those that participated.
And now more about my cute little project – I had something different in mind and when I started with my first idea things just started heading in a different direction. I ended up with this cute little Hugs & Kisses holder using some new Stampin’ Up! products from the Occasions Mini Catalog instead.

 Are you wondering where the “hugs & kisses” phrase came from on the little tag? It’s on the I {Love} Love Jumbo Wheel. I just used a Real Red Stampin’ Write marker to color just that part of the wheel – wheeled it on Whisper White card stock and punched it out with the large oval punch. Cute isn’t it? You have a whole bunch of different ways to say “Love” using the parts of that jumbo wheel.
 To make the little holder I cut a Scallop Square using my Big Shot and the clear die. Then I used my paper trimmer with the scoring blade to score in between every three scallops in both directions – it creates a tic-tac-toe board. Then on the four corners make a diagonal score from the outside corner to the inside corner. Now fold on all the score lines – punch holes in the four diagonals and pull a piece of ribbon through to tie it shut.
Stampin’ Up! Supplies:
Stamps: I {Heart} Hearts, I {Love} Love Jumbo Wheel
Ink: Real Red ink & Stampin’ Write marker, Chocolate Chip ink
Card Stock: Real Red, Whisper White
Accessories: Sending Love Specialty Designer Series Paper, Big Shot die Cut Machine, Scallop Square Clear Bigz Die, Red Gingham Ribbon, Stampin’ Sponge, Paper Trimmer w/Scoring Blade, 1/8″ hand held punch, Heart to Heart Punch, Small Heart Punch, Large Oval Punch, Scalloped Oval Punch, Stampin’ Dimensionals
I hope you like it! We will be making this project at my January I {Heart} Hearts class.
Leave me a comment today for a chance to win a Free Pass to the Create with Connie & Julie class – good luck!
Jan 5, 2010 | Birthday, Designer Series Paper, Occasion Mini 2010, SU Ribbon |
One more quick post – I was trying to complete another challenge that has a deadline of today and then decided to double it up for one that has a deadline of tomorrow. So I’m going to go ahead and post it tonight so I can submit it to both of those blogs. I’m not a 100% happy – i already thought of one change that it probably needed but I’m not going to do that now. I want to go watch Ga Tech in the Orange Bowl and I only have a few more minutes before that starts.
Ok – challenge #1 is from the Artistic Avenger Blog and it was to use a Christmas stamp set in a non-Christmas way.
And the second challenge is the Stamping 411 Blog sketch challenge – the sketch this week looks like this:
And here is the card I made real quick – it uses the Punch Pals stamp set – it is the Christmas set with the snowman, tree, penguin, and several others that fit various Stampin’ Up! punches but I created a Birthday card with it. For the sketch I turned it on its side since I used the tags and they fit better in that direction.
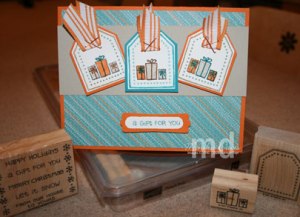 The colors are Pumpkin Pie, Taken with Teal, Sahara Sand, and Whisper White. I used the new Sweet Pea Designer Series paper with it too – I had to get a new product in there also.
And one non-su product would be the orange staples that hold the ribbon on.
It needs some work still….off to link to the challenge blogs and then on to the football game.
Jan 5, 2010 | Demonstrator, Occasion Mini 2010, Sale-A-Bration 2010 |
 It’s Sale-a-bration time at Stampin’ Up! Today is the first day of the Occasions Mini Catalog and the Sale-A-Bration brochure. You can order from the Occasions Mini Catalog through April 30th – I have added a link to it on my side bar. I also sent some out in the mail and I got mine yesterday so your should be there soon. If you are one of my customers and yours didn’t come in the mail – let me know.
 You will be able to earn free Stampin’ Up! product from the Sale-A-Bration brochure through March 31st. Buy $50 in product and you get to choose a free item from the brochure – this year you have four brand new stamp sets and you can choose the traditional wood mount or the new clear mount option (you’ll need clear blocks if you get the clear mount); you have a 6×6 paper pack, and a new border punch to choose from. And Stampin’ Up! added a great new option – there are more than 50 stamp sets from the regular catalog that you can choose from too! I think that is a great option since everyone likes different styles now there is even more to choose from. Take a look – there is a link on my side-bar and I sent them out in the mail too.
I’ve already been working with some of the new items – a perk that Stampin’ Up! Demonstrators get – the chance to pre-order before hand. Oh and there is a recruit special too – so if you have considered joining Stampin’ Up! as a Demonstrator (or if you haven’t) – I would love to have you join my team – my girls tell me I’m great – so I’m sure I am – right – they wouldn’t say it if they didn’t mean it – right? Here are the details:
Sale-A-Bration Recruiting Promotion
Promotion Dates: January 5-March 31, 2010
Promotion Details
During Sale-A-Bration, new recruits will get 15 percent off the price of the Starter Kit (Standard or Digital+), plus, a FREE stamp set (valued up to $47.95) from the current catalogs!
| Starter Kit | Regular Price | Sale-A-Bration Price (15% off) |
| Standard Starter Kit | $199 | $169 |
| Digital+ Starter Kit | $185 | $157 |
Isn’t that a great offer! Call or email me if you want more information – I’d love to get together with you and talk about this awesome opportunity. And you don’t have to live near me to join my team – I can support you even if you can’t come to my home. Think about it and let me know!
Have a wonderful day!
Join me for Create with Connie & Julie – sign up today! This week we are giving away Free passes to the class – each team member has a different day that they are giving away a free pass so make sure to visit each day to see who is giving away a pass. Just a hint – you really should stop by my blog on Wednesday…..

 This is my original Hugs & Kisses holder – Click Here – for the original post.


 And we have snow here in Georgia! My Christmas tree is still sitting on my back porch and it is starting to get a dusting of snow. The kids got out of school early and we are still waiting to hear about tomorrow. There is ice forming on the roads and the main roads outside our neighborhood have already had gravel/sand put on them. I’m still waiting on Greg to get home – he decided to stop and get gas for the car before coming home.








