Feb 6, 2010 | Big Shot, Create with Connie & Julie, Occasion Mini 2010, Sale-A-Bration 2010 |
It’s Saturday and time for another challenge at Create with Connie & Julie! This week our challenge is a COLOR challenge – Pumpkin Pie, Old Olive, Melon Mambo and Crushed Curry. The featured items this week are from the Stampin’ Up! Sale-a-Bration brochure – Good Neighbors stamp set and the Welcome Neighbor Designer paper pack.
Congratulations to last weeks winners – Robin Gregor was first place and Sandra Hansen was second place and Jeannine Norder earn an Honorable Mention. Thanks for playing along last week!
 This was a hard challenge for me – putting these colors together is not in my comfort zone. So I went through a few different versions before settling on this one.
I used the Welcome Neighbor Designer paper pack for the flower – I’m not sure how well you can see it in the photo but there is a layer of Pumpkin Pie, then Crushed Curry and then Melon Mambo. All three sizes of the flowers have all three colors in the layer. Then I added a Pumpkin Pie Corduroy Brad in the center. The flowers are the Flower, Daisies #2 Bigz die for the Big Shot.
Then the designer paper pack is also the striped paper strip and the little butterfly. I also used the Good Neighbor stamp set on this card – can you see it? I used one of the trees stamped in Old Olive ink as the leaves under the flower.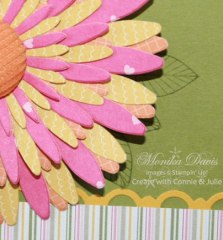
Here is a full list of Stampin’ Up! supplies for this card:
- Old Olive card stock and ink
- Crushed Curry card stock
- Welcome Neighbor Designer Paper pack (SAB)
- Scallop Trim Border Punch (SAB)
- Whimsical Words stamp set (SAB)
- Basic Black ink
- Good Neighbors stamp set (SAB)
- Pumpkin Pie Corduroy Brad
- Big Shot Die Cut Machine
- Flowers, Daisies #2 Die
- Beautiful Wings Embosslits Die
- Stampin’ Dimensionals
And here is a look at the rest of the Create team:
Connie
Julie
Mary
Kerin
If you haven’t checked out the Create with Connie and Julie site yet now is the time to do it! We feature new Occasions Mini product every week.  There is a new project posted every day and there will be a minimum of two fabulous tutorials each and every week. We like to have lots of fun so we have challenges and prizes for our subscribers. Our sites stay up long after the session is done so you will always have access to the site and the tutorials. For more information and to see our Preview Week projects please visit the Create with Connie and Julie site.
Thanks for stopping by today! Happy Stampin’!

Feb 5, 2010 | Big Shot, Occasion Mini 2010, Valentine's Day |
I have a few more Valentines to share. These are swap cards that my upline, Wendy, got at the Leadership conference. I was busy this week on projects for the Create with Connie & Julie class. My project posted today on the class blog – but you have to be a member of the class to access it. Tomorrow I’ll be posting my challenge project for the week. And tonight is my stamp club so I was finishing up projects for that too. I’ll share those with you next week so you can get a peek at the awesome projects we make at stamp club. If you live near me I’m looking for more people to join my Stamp Club – I’ll be drawing for the new hostess schedule and our next meeting will be in March.
So here are the Valentines –


There are so many creative Stampin’ Up! Demonstrators all over the world. It is so fun to see everyone’s ideas. If one of these creations belongs to you please leave me a comment and I’ll add your name to your creation.
Thanks for stopping by today!
Feb 4, 2010 | Big Shot, Cards, Occasion Mini 2010, Valentine's Day |
Well I don’t have any new creations for you today. I have been busy with some other things so I don’t have a project that I made to share with you. I do however have some swap cards to share with you. I did not make any of these and unfortunately they aren’t even my swaps so I didn’t receive them and therefore don’t have them to look on the back and see who created it. So if you created one of these swaps ( or know who did) please leave me a comment so I can tell everyone it is yours. My upline, Wendy Randall, had these displayed when I was at her house. She probably got them all when she went to leadership in January. I didn’t go this year – I know I missed a lot of great information, visiting with friends and learning new stuff. I do plan to go to convention.
Enough jibbering – here are the cards.


Have a great day – I’m trying…. it is raining here again and we are supposed to get several inches by the end of tomorrow. Ughh…
Feb 3, 2010 | Holiday Mini Catalog 2009, Occasion Mini 2010, Simply Adorned Jewelry |
Did you notice the Simply Adorned Jewelry in the Stampin’ Up! Occasions Mini Catalog (or the Holiday Mini Catalog)?
We were finally able to order the jewelry at the beginning of January. I got one charm and one chain and I love them!
I have the 1″ x 1-1/4″ rectangle charm and the 24″ chain. I was worried about it bothering my neck – over the years I seem to have developed a metal allergy and most things make me start itching and I have to take them off – so far this chain has not bothered me at all and I have been wearing it. The chains are Stainless Steel and come in two lengths – 24″ and 34″ and a bracelet that is 8″.
There are 3 large charms to wear on a chain and 2 small charms that you can add to the bracelet or the chain.
 The great thing about the charms is that they are little lockets with windows and you can create stamped creations to fit inside. Just image you will always have something to match whatever you are wearing! And because these are small it doesn’t take long to stamp something to put inside.
The stamp set I used on this one is the Charming stamp set and it was originally shown in the Holiday Mini Catalog. And yes it is still available. The front of the charm has a beveled edge on the glass.
The back is flat but also glass so you can show a different image on the back side. The design on the back also uses the Charming stamp set and I created it very quickly actually from a scrap that I had lying on the table while working on a card. I just cut it to fit inside my charm.
There is a new stamp set called Tiny Tags in the Occasions Mini that was designed to work with the little charms.
I’m excited about the jewelry and I am working on a class that will be in March. We will create a dozen or more inserts and decorate the box that will hold the chain, charm and inserts. This will be a perfect Mother’s Day gift – or make two and keep one for yourself. I’ll have more information on the class as the date approaches.
I have been busy finishing up projects for Create with Connie & Julie class. I’m posting again this Friday – but you have to be a class member to see the project – so make sure you join – it’s not too late – we are about half way through and all the projects are out there.
Thanks for stopping by today!
Feb 2, 2010 | Occasion Mini 2010, Sale-A-Bration 2010, SU Ribbon |
I did a ribbon share for the new Satin Ribbon in the Stampin’ Up! Occasions Mini Catalog. Every participant gets about 3 yards of each color of Satin Ribbon – there are 9 colors available. I like to present the ribbon shares in a nice way so this time I decided to use the new Glassine Bags that are also available in the Occasions Mini Catalog. And this is what I came up with….
 I cut each ribbon and then wrapped then around my hand. Then tied a piece of crochet thread around each bundle. Each bundle got a tag that was punched in the matching color card stock using the Modern Label punch. I printed labels with the colors and item numbers to put on the tags. Inside each Glassine bag I put either 4 or 5 bundles of ribbon then folded the flap over. I put the two bags together and tied them with a piece of Chocolate Chip Satin ribbon.
 Then I decided to create a tag and decided to use the Sale-A-Bration set Vintage Labels. I have the Clear Mounted set and it was so easy to use and get the “for you” in the center of the label. The label was punched with the Wide Oval punch and I sponged the edges. I punched a 1/16″ hole in the top and tied it to the package with a piece of linen thread.
You could use the Glassine bags for any little gift or a small treat for someone special. Add some ribbon and a tag and your set.
Have a great day today!

 This was a hard challenge for me – putting these colors together is not in my comfort zone. So I went through a few different versions before settling on this one.









