Mar 12, 2013 | Big Shot, Spring Catalog 2013 |
Today was craft day at Aunt Monika’s house! My niece Emily and her roommate Kayla are here for their spring break and today we had craft day. They made these fun canvases to hang in their rooms using the All Dressed Up framelit dies.

Emily and her canvas using the Tea for Two Designer Paper


Kayla and her canvas using the Print Poetry Designer Paper Stack

Then the each made a card and gave advise on something I was working on. It was a fun day. Now I’m headed to the Ronald McDonald House to stamp with the guests that are staying there. We will be making an Easter card that my friend Lieshman designed. Gotta go!

Mar 11, 2013 | Designer Series Paper, My Digital Studio, Sale-A-Bration 2013, Spring Catalog 2013 |
This is an easy Desktop Calendar project that I made earlier this year. My Digital Studio makes it easy to create the 12 month calendar to print at home.

After creating the calender in My Digital Studio – I printed it on Whisper White card stock and trimmed it down. Then layered it on Calypso Coral and So Saffron card stock. And then to a 5-1/2 x 4-1/4 piece of Lucky Limeade card stock.
I decorated the top with a piece of Tea for two designer paper, some Calypso Coral ribbon from the Sycamore Street Ribbon and Button pack from Sale-A-Bration. And finished it with some punched butterflies and a Lucky Limeade brad.

The base of the calendar is a normal size card – 11″ x 4-1/4″ scored at 5-1/2″ and then score a second time on one side at 2-3/4 – this creates the mountain fold that you attach the calendar too. On the bottom of the card I added a piece of Tea for Two designer series paper and then the stack of Post it Notes. The great thing about the size of this calendar is that you can fold it flat and it fits in the medium envelope. Well if your stack of post it notes is really thick it might not fit.
Have a great day!
Mar 9, 2013 | Paper Pumpkin |
Paper Pumpkin is getting ready to launch and bring your Creative Carriage straight to your front door. Be sure to sign up by March 10th if you don’t want to miss a single monthly kit! 
Want more information – go HERE.
Ready to join – go HERE. Be sure to select me – Monika Davis, Woodstock GA – as your demonstrator. Or contact me and I can help you get signed up. It’s easy and it’s going to be a fun ride!
Everyone that joins up with me will get a monthly idea sheet with alternate ideas on using the supplies in your kit plus a bonus project using the stamps and inks that come in the kit. Join me today!
Mar 7, 2013 | Big Shot, Create with Connie & Mary, Spring Catalog 2013 |
Have you played with the new All Dressed Up Framelits from Stampin’ Up!? I wasn’t sure that I wanted these (I have all boys so I don’t do much girly stuff) but once I started to play with them – well it was really hard to resist having fun!
This week at Create with Connie & Mary we were issued a color challenge! And I decided I could use those colors to make a cute little dress project that I think you will love. It’s based on an idea that I saw in a magazine – you may have seen it to. But I of course wanted to use my Stampin’ Up! products and the Dressed Up Framelits to make mine. Here are the colors we are working with this week –

Are you ready to see this little cutie? Here it is –

I’m not sure you can quite tell from this front view but it is actually a little box – I’ll show you a side view in a second. The inside is filled with just a few little kisses that have designer paper on the bottoms.
Here are the details on this box –
- first I cut a piece of Raspberry Ripple card stock and scored it – folded it and placed it so that the dress die did NOT cut through the shoulders – I wanted this part to stay connected like a card.
- I took a second piece of Razzberry Ripple and cut another dress, then cut off just the skirt and embossed it with the Fancy Fan embossing folder – positioned so it did not emboss the scallops at the bottom of the dress – I layered this on top of my folded dress as the top layer
- next I used the Primrose Petals card stock and cut two dresses – cutting away the skirt and glueing those to the inside as a bottom layer on the front and back of the dress.

- for the box I cut a piece of Primrose Petals card stock – it is 2″ x 5-1/2″ – it is scored at 1″ on the short side and 1″, 2-1/2″, 3-1/2″ and 5″ – and made into a tiny box. I glued this to the inside of the folded dress.
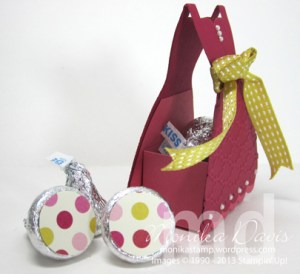
- I tied a piece of Summer Starfruit ribbon around the front of the dress – leaving long tails that I cut at the ends
- I added the tiny pearls along the base of the dress and up at the top for some bling.
- The kisses are covered with paper from the Print Poetry paper stack punched with the 3/4″ circle punch and attached with a glue dot.
- You could make these little dress boxes as party favors for any little girly occasion – change the colors to suit the occasion. Fun!
Visit the Create with Connie & Mary site to see the creations from the rest of the design team and to submit your own creation for this new challenge. I hope you will play along. Every week the top 3 are announced from each challenge – maybe this week it will be you!
Stampin’ Up! Supplies:
- Card Stock: Primrose Petals, Raspberry Ripple
- Accessories: Basic Pearls, Big Shot Die Cut machine, Fancy Fan Embossing Folder, Dress Up Framelits, Summer Starfruit ribbon, Cutter
Have some fun playing dress up!
Mar 6, 2013 | Wildlife |
I am so very ready for spring to be here. The birds are ready too (at least I think they are). Today instead of a stamping project I have photos to share of some of the birds that have been visiting my backyard. The Bluebirds have been house hunting and finally chose a house to build a nest in – I think it is earlier than past years. I have four bird houses up throughout my back yard. And I watched the bluebirds go in and out of all of them. But finally they settled on the same one they normally use each year.

Female Eastern Bluebird building a nest in the bird house
I have spent some morning sitting in the sunroom and watching the birds – and when I have my camera I can sit and wait to get some good photos. I wanted to share just a few of the bird visitors that have been in the yard recently.

The male Eastern Bluebird sitting on my porch rail.

A mocking bird visiting on the porch.

Pine Siskins – tons of them have been here emptying my feeder. Sometimes there are 25 or so on the ground under the feeder.

The little Downy Woodpecker that visits all the time.

The Red-Bellied Woodpecker – I usually have a pair of them in the yard – I’m hoping they will nest in the woodpecker house this year.

A hawk came by last week – I believe this is a Cooper’s Hawk.
It is another cold an very windy day here. The neighbors tree came down last night and broke our fence. It snapped the tree right in half – it was a dead tree and full of holes – I think that is why the woodpecker’s are here all the time they have been feasting on that tree next door – you should see how many holes are in it.
Have a nice day and think SPRING thoughts!


