Mar 21, 2013 | Big Shot, Cards, Create with Connie & Mary, Spring Catalog 2013, Thank You |
I’m wrapping up my stay with Create with Connie & Mary – I have just a couple more projects to share for the weekly challenge team. It has been fun and I’ve enjoyed seeing the creations every week. Thanks for letting me be part of the fun.
This week at Create with Connie & Mary we were issued a color challenge! Daffodil Delight, Marina Mist, and Not Quite Navy – they make me think of summer and water – so naturally I thought of the Oh, Whale! stamp set in the Stampin’ Up! Spring catalog.

Now that I had my colors and knew I wanted to use the Oh, Whale stamp set I had to decide what to do with it. I have wanted for the last few months to make the little envelopes that are shown in the Sale-A-Bration brochure. I had many people ask how are those made. Well it’s really hard – you use the Big Shot and the Scallop Envelope Die and fold in the top, then the bottom, then one side and it’s done. Really – that easy! Not hard at all. The little envelope is just folded up so the decorative flap becomes one of the sides that is tucked in.

Here are the are some more details –
- Cut Daffodil Delight card stock with the scallop envelope die and the Big Shot. I went ahead and folded it all together the way I wanted to make the pocket. Then ran it through with the Cloudy Day embossing folder. Then I went back and added a little bit of Tomobow glue to hold it all shut – I guess I could have added that before embossing – but I didn’t do it that way.
- I stamped the whale in Not Quite Navy on Whisper White card stock and cut it out with the Happy Whale Clearlits die – isn’t it the cutest thing? I added a tiny silver mini brad for his eye.
- Tie a piece of the Marina Mist Striped Organdy Ribbon around the pocket then add the whale on with some dimensionals.
- I cut a piece of Marina Mist card stock to slide inside the pouch. I added a whale clip to the end of it. And on the card I added a little banner.

- The words are from the Oh, Whale stamp set and then cut with the Itty Bitty Banner framelits.
- Write a sweet little note and give it to someone special!
Visit the Create with Connie & Mary site to see the creations from the rest of the design team and to submit your own creation for this new challenge. I hope you will play along. Every week the top 3 are announced from each challenge – maybe this week it will be you!
Stampin’ Up! Supplies:
- Card Stock: Daffodil Delight, Marina Mist, Whisper White
- Accessories: Big Shot Die Cut machine, Itty Bitty Banner Framelits, Cloudy Day Embossing Folder, Scallop Envelope die, Happy Whale Clearlits Die, Mini Brads, Marina Mist Striped Organdy Ribbon, Elements Cute Clips
Enjoy this week’s projects and I’ll be back one more time for next’s week challenge. If I have an update on the Bluebird I’ll post that later.

Mar 20, 2013 | Cards, Simply Scored, Spring Catalog 2013, Wildlife |
Sale-A-Bration is coming to and so quickly! I haven’t even shared all the things I have made using these stamp sets. Here is another idea for you using the Bloomin’ Marvelous stamp set.

I know I got this idea from somewhere – but can’t seem to find it now – I checked my Pinterest boards but don’t see it on there. So if you know where I saw this let me know. I know I made some changes but the card idea and I’m pretty sure the stamp set was the same.
I’m not sure you can tell in the first photo – you can probably tell better in this one but the front of the card has 1″ cut off of it and the Designer Paper is glued to the inside of the card and peeks through to the front. The 1″ strip that I cut off was used to stamp the butterflies that are punched out and added to the card with Stampin’ Dimensionals.

Here are a few more details for you:
- Card base is Naturals White
- Designer Paper is Tea for Two from the Spring catalog
- Near the fold I did some embossing with the Simply Scored Borders plate
- colors are Calypso Coral, Marina Mist and Wild Wasabi and Early Espresso for the words
- Pearls in the centers of the flowers
And a quick bird update – the Bluebirds are right on schedule – egg #4 came today –

Bluebirds lay 4-5 eggs so we’ll see if she adds one more tomorrow or if she is done. It is supposed to get cold here – we have had nice spring weather and we could get some snow flurries Thursday or Friday – I hope she keeps those eggs warm. I feel like these are really early this year. Let me go see when they were doing this last year. So I wend back and check my blog posts from last spring and on March 18th I was posting about the Chickadees and Bluebirds fighting over the same house. Perhaps the Bluebirds didn’t want that problem this time (they lost out last year) and started earlier to beat them. I guess I’ll have to wait and see where the chickadees go – no nests in the other houses yet.
Have a great day!
Mar 12, 2013 | Big Shot, Spring Catalog 2013 |
Today was craft day at Aunt Monika’s house! My niece Emily and her roommate Kayla are here for their spring break and today we had craft day. They made these fun canvases to hang in their rooms using the All Dressed Up framelit dies.

Emily and her canvas using the Tea for Two Designer Paper


Kayla and her canvas using the Print Poetry Designer Paper Stack

Then the each made a card and gave advise on something I was working on. It was a fun day. Now I’m headed to the Ronald McDonald House to stamp with the guests that are staying there. We will be making an Easter card that my friend Lieshman designed. Gotta go!
Mar 11, 2013 | Designer Series Paper, My Digital Studio, Sale-A-Bration 2013, Spring Catalog 2013 |
This is an easy Desktop Calendar project that I made earlier this year. My Digital Studio makes it easy to create the 12 month calendar to print at home.

After creating the calender in My Digital Studio – I printed it on Whisper White card stock and trimmed it down. Then layered it on Calypso Coral and So Saffron card stock. And then to a 5-1/2 x 4-1/4 piece of Lucky Limeade card stock.
I decorated the top with a piece of Tea for two designer paper, some Calypso Coral ribbon from the Sycamore Street Ribbon and Button pack from Sale-A-Bration. And finished it with some punched butterflies and a Lucky Limeade brad.

The base of the calendar is a normal size card – 11″ x 4-1/4″ scored at 5-1/2″ and then score a second time on one side at 2-3/4 – this creates the mountain fold that you attach the calendar too. On the bottom of the card I added a piece of Tea for Two designer series paper and then the stack of Post it Notes. The great thing about the size of this calendar is that you can fold it flat and it fits in the medium envelope. Well if your stack of post it notes is really thick it might not fit.
Have a great day!
Mar 7, 2013 | Big Shot, Create with Connie & Mary, Spring Catalog 2013 |
Have you played with the new All Dressed Up Framelits from Stampin’ Up!? I wasn’t sure that I wanted these (I have all boys so I don’t do much girly stuff) but once I started to play with them – well it was really hard to resist having fun!
This week at Create with Connie & Mary we were issued a color challenge! And I decided I could use those colors to make a cute little dress project that I think you will love. It’s based on an idea that I saw in a magazine – you may have seen it to. But I of course wanted to use my Stampin’ Up! products and the Dressed Up Framelits to make mine. Here are the colors we are working with this week –

Are you ready to see this little cutie? Here it is –

I’m not sure you can quite tell from this front view but it is actually a little box – I’ll show you a side view in a second. The inside is filled with just a few little kisses that have designer paper on the bottoms.
Here are the details on this box –
- first I cut a piece of Raspberry Ripple card stock and scored it – folded it and placed it so that the dress die did NOT cut through the shoulders – I wanted this part to stay connected like a card.
- I took a second piece of Razzberry Ripple and cut another dress, then cut off just the skirt and embossed it with the Fancy Fan embossing folder – positioned so it did not emboss the scallops at the bottom of the dress – I layered this on top of my folded dress as the top layer
- next I used the Primrose Petals card stock and cut two dresses – cutting away the skirt and glueing those to the inside as a bottom layer on the front and back of the dress.

- for the box I cut a piece of Primrose Petals card stock – it is 2″ x 5-1/2″ – it is scored at 1″ on the short side and 1″, 2-1/2″, 3-1/2″ and 5″ – and made into a tiny box. I glued this to the inside of the folded dress.
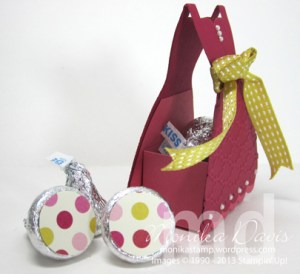
- I tied a piece of Summer Starfruit ribbon around the front of the dress – leaving long tails that I cut at the ends
- I added the tiny pearls along the base of the dress and up at the top for some bling.
- The kisses are covered with paper from the Print Poetry paper stack punched with the 3/4″ circle punch and attached with a glue dot.
- You could make these little dress boxes as party favors for any little girly occasion – change the colors to suit the occasion. Fun!
Visit the Create with Connie & Mary site to see the creations from the rest of the design team and to submit your own creation for this new challenge. I hope you will play along. Every week the top 3 are announced from each challenge – maybe this week it will be you!
Stampin’ Up! Supplies:
- Card Stock: Primrose Petals, Raspberry Ripple
- Accessories: Basic Pearls, Big Shot Die Cut machine, Fancy Fan Embossing Folder, Dress Up Framelits, Summer Starfruit ribbon, Cutter
Have some fun playing dress up!
Feb 27, 2013 | Big Shot, Designer Series Paper, Spring Catalog 2013 |
Stampin’ Up! now has dresses! Paper dresses that is! The new All Dressed Up collection is all ready for you to play.

I used the Dress Up Framelits from the Stampin’ Up! Spring catalog to create these cute little dresses. This Saturday I’m going to have a vendor table at the BUMC Scrapbook Crop and if you plan to attend be sure to stop by so you can make your very own cute little dress! I’ll have these available as Make&Takes at my table.
I used various Designer Series papers to create them – just cut the paper with the framelits. For the dress form I just cut it out of Crumb Cake card stock. Then I just decorated them in slightly different ways – the ones shown in this picture used the following to dress them up
- Basic Rhinestone Jewels
- Basic Pearls
- Baker’s Twine
- Seam Binding
- 1/8″ Taffeta Ribbon
- 1/4″ Stitched Grosgrain Ribbon
- Itty Bitty Punch Shapes
- Mini Silver Brads
- Satiny Ribbon from the Sycamore Street pack
These are just a few ways to dress these up – there are many other things you could do. Fun!
Which one is your favorite? Mine is the Pool Party dress.


