May 8, 2009 | Big Shot, SU Ribbon |
 Here is another project from our weekend retreat. This one was designed by Jill who ended up not able to attend, but
  sent her project anyway. It would make a cute party favor for a birthday party. It is a litttle pound puppy carrier. The idea came from a pattern for a mailbox. You could also use the same idea as a bug catcher – use some mesh on it. Here are the basic instructions:
- Add texture to the body (5″ x 7″ piece of card stock) of the carrier using the Big Shot Die-cut machine and texture plates. Then using an ink pad rub over the texture to further define it.
- Score a 4″ x 5″ piece of card stock at 1/2″ from each side to create the base.
- Apply sticky strip to both sides of the base – the 1/2″ pieces – and attach to the body of the carrier.
- Cut out the ends from a 3 x 3-1/2″ piece of card stock and score each 1/2″ from the bottom. Use sticky strip to adhere to the base piece.
- Use the 1-1/4″ circle punch to punch a window in the door – this is the front.
- Use a Crop-A-Dile to add to Jumbo Brads to the top of the carrier – and tie a 12″ piece of striped ribbon through to create the handle.
- Punch out two word window punches from scrap card stock and adhere with sticky strip to the back of the carrier at approximately 10 and 2 to hold the back shut.
- Punch a small hole in the front door and in the front top of the carrier for the 12″ piece of taffeta ribbon that holds the door shut.
- Add stitching with the white gel pen if desired.
- The small puppy fits inside and peeks out the window.
Isn’t it cute!
We have a soccer tournament this weekend and it is Mother’s Day. I am hoping to have time to post both days this weekend – but if I don’t that just means I was busy. Tonight is Stamper’s Club and I’m finishing up for that. Actually one of the cards we are making tonight – I was inspired by the colors on this pet carrier for the colors on my card. Sahara Sand, Kiwi Kiss and Pacific Point. Isn’t this puppy the perfect Pacific Point color!
Have fun and Happy Mother’s Day!

May 7, 2009 | Blog Tour, Occasions Mini 2009 |
The blog tour was on April 27th and the links were only available for the one day. I printed off the list of blogs from each tour (there were actually 3) so that I could go back to them and them bookmark the ones that I want to return to. 
The next Blog Tour that I am participating in will be on May 15th and 16th – the links will be available for 2 full days. The group is different from the one on the 27th and there will be 20 stops. My featured set will be the Thoughts & Prayers stamp set from the Spring-Summer 2009 Idea Book and catalog. Other demos will feature sets from the Occasions mini or from the Idea Book – you will have the opportunity to see a variety of ideas and stamping styles from around the country. I hope you will join me.
I have made a list of some of the blogs that included my favorite projects from the April 27th tour. I have added the links below so that you can go visit them if you like.
Wagon Full of Fun
Lisa Milliron – Tour 1 Stop 10
Janice Urke – Tour 2 Stop 10
Great Friend
Jenn Diercks – Tour 1 Stop 4
Gretchen Barron – Tour 2 Stop 4
Scene in the Garden
Connie Babbert – Tour 1 Stop 2
Lora Sinkler-Lake – Tour 4 Stop 1
Linda McClain – Tour 2 Stop 2
Forest Friends
Cindy Beach – Tour 4 Stop 13
And Many Mower
Mary Jo Price-Williams – Tour 2 Stop 17
Matchbox Messages
Loni Spendlove – Tour 2 Stop 14
Lazy Days Jumbo Wheel
Teri Wells – Tour 2 Stop 2
Hopefully I have gotten all of the links in here correctly. Have fun browsing some other blogs today.
I was going to post the pictures from last nights projects but decided to wait a few more days – I’ll show them on Sunday.
May 6, 2009 | Uncategorized |
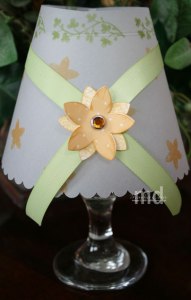 If you need a quick project for Mother’s Day for a gift or table center piece try this idea I learned this weekend at our retreat. Everyone that came brought a project for everyone else to make and this one came from Pat Crown. We cut a piece of Vellum card stock into the shape of a lamp shade and then used the scallop edge punch to carefully go along the curved bottom edge. When you do this you have to line up just a few scallops at a time as you go around the curve it takes a bit of practice. The top of the lamp shade was stamped with the vie from the Fresh Cuts stamp set and the rest of the shade with the small flower image. Use a piece of sticky strip to adhere the shade together in the back by overlapping the edges.
Next we created a molded flower by punching several layers of Whisper White card stock and one piece of Designer Series Paper with the 5-Petal Flower Punch. These were glued together with the Tombo Multi Purpose Adhesive (in the green bottle). Then mold the flower into shape with your fingers and let it dry. A rhinestone brad was added to the center. Wrap ribbon around the shade and attach the flower through the ribbon. You could either attach the flower to the shade with a glue dot so it stays in place or punch a hole with the paper piercer and put the brad all the way through the shade.
 The shade sits on top of a water goblet with a small votive candle inside. You could make these as center pieces for tables at a Mother’s Day Tea, baby or bridal shower or other special event. Make multiple shades for various seasons/occasions and switch them out as needed.
My Mini Mother’s Day class is tonight and I have to finish up the prep work. We are making the bookmark that I showed a few days ago and two other projects. One is a flower pot card which I had planned on for the class and then it ended up being one of the projects we made this weekend too. The other is a little Top Note purse box that we made on Saturday night as part of our STARZ meeting. I decided to use it as the third project – we will stamp a piece of tissue paper to wrap up the bookmark and stick inside this cute purse. I’ll share pictures later or these projects.
Stay dry – we have had lots of rain and there is more to come. Tomorrow I’ll do a bird update. And mark your calendar for May 15th and 16th for the next Blog Tour. My featured set will be Thoughts & Prayers and I already have ideas in the works for the tour and for an upcoming class. Come back for a visit!
May 5, 2009 | Blog Tour, Occasions Mini 2009, SU Ribbon |
 I found these little treat boxes on the Stampin’ Up! Demonstrator website today. They are made using the Eight Great Greetings stamp set from the Occasions Mini Catalog. One is done in Kiwi Kiss and tied with the Satin Kiwi Kiss ribbon and the other is Baja Breeze and the Riding Hood Red Taffeta Ribbon. Both of these ribbons are part of my May ribbon share.
The Eight Great Greetings stamp set has something for almost every occasion – Easter, Thanks, Dad, Wedding, Congrats, Birthday, Mother, Shower. You can create treat boxes like these for occasions all year long by changing the color and ribbons and using a stamp from this set.
 Here are some birthday treat boxes done in Pacific Point with the Pacific Point striped ribbon – also part of the May ribbon share.
The triangle box is the same box we made earlier this year for Valentine treats – a very easy treat box that doesn’t need adhesive to hold it shut – the ribbon holds it shut at the top. To make one cut your card stock into a rectangle and score it in half – this will be the bottom of the triangle. Then mark the center on either end and scor diagonally across the card stock from the center score to the center mark on each side – you will be making four more score lines forming a diamond shape on your card stock. Now fold in on the score lines and punch a hole where the sides meet to tie the ribbon through. The size of your triangle will depend on the size of card stock that you start with. Add your decoration to the front. Have fun making treat boxes!
I have added a new picture to my side bar – it is a reminder that I will be participating in another Blog Tour on May 15th and 16th. I’ll be with a new group of people and some items will be from the Occasions Mini Catalog and others will be from the main catalog. I hope you will join me.
May 4, 2009 | SU Ribbon, Uncategorized |
It is time for the May Ribbon Share – if you love the In-Colors and our Stampin’ Up! ribbon then don’t miss out on this ribbon share. It will include all the In-Color Ribbons that haven’t already been in an earlier share.
Read on for the details.
May 2009 In-Color Ribbon Share

5/8″ Striped Grosgrain Ribbon, Satin Ribbon, Taffeta Ribbon
All images Stampin’ Up! © 2009
Deadline and payment due: Friday, May 15th
Cost of this share: $14 (if you pick it up at my house) –
If you would like me to mail it to you let me know –the shipping cost will be $2.
Please pay by check (you can mail it to me) or cash (you can bring it to me).
What you get: approx. 2 yards of each ribbon – there will be 8 different ribbons included.
Shown on page 178 and 179 in the Spring-Summer 2009 Idea Book:
5/8” Striped Grosgrain Ribbon
Baja Breeze #111375
Kiwi Kiss #111372
Pacific Point #111370
Pink Pirouette #111373
Riding Hood Red #111374
Tangerine Tango #111371
Satin Ribbon
Kiwi Kiss/Very Vanilla #111879
Taffeta Ribbon
Riding Hood red (with Very Vanilla trim) #111365
It should be ready for pick up by the end of May (if it is earlier I will let you know)
Each share will consist of 5 people.
Please email me at [email protected] if you would like to participate.









