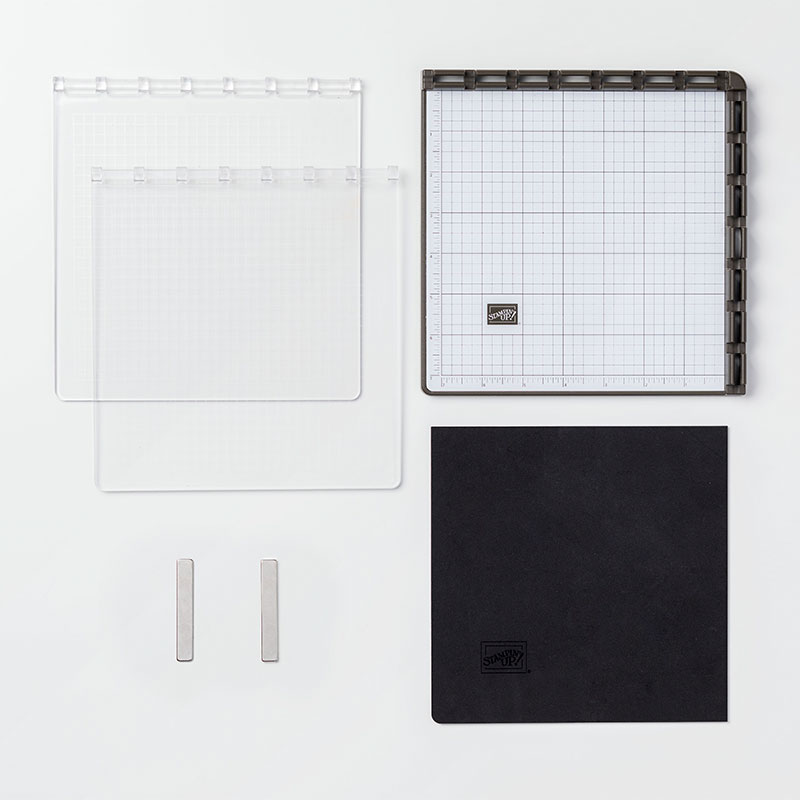
What is a Stamparatus? It’s the Best Stamp Placement Tool on the Market. It’s so popular the first reservation period sold out in under 15 minutes! But now is your chance to reserve yours during the second and final reservation window – Dec. 5 – 30, 2017.
Due to the incredible popularity Stampin’ Up! decided to make a few changes to the reservation process for this second time.
As was previously announced, the second reservation window will remain open from December 5–30; however, during this reservation period we will take as many orders as we receive (yay!) and not close the window until December 30. So whether the total number of reservations is 100 or 100,000, the window will stay open!
Please note the following changes:
Beginning March 19, we will ship Stamparatuses in the order the reservations were received (first in, first out) and continue through the next few months and beyond as product arrives in our warehouse. Because shipment dates are based on manufacturing lead times, not all of the reservations made during the December 5–30 window will ship on March 19 (as was previously announced).
In order to accommodate demand, limits have changed as follows: one reservation per customer and one per demonstrator.
Because we are not limiting the maximum number of reservations for the second window, we will not offer a third window. This is the last chance for you and your customers to reserve a Stamparatus before it becomes available in the 2018-2019 annual catalog.
Watch this video to see how the new Stamparatus works –
The second reservation window opens today – Tuesday, Dec. 5 at 2 PM Mountain Time – That’s 4 PM in the Eastern Time zone. Reservation Window #2 is Dec. 5 – 30, 2017.
You will need to go to my online store – HERE – and make sure you have an online account set up. Click on the reservation button to complete your reservation. Download an instruction sheet here – Reservation Instruction Sheet.
You will need to have a credit card to create your reservation but your card will not be charged now. Be sure your email is accurate. Once the tools are in the warehouse and ready to ship you will receive an email that it is time to complete your order. You will go into your online account and the Stamparatus will be in your shopping cart – DON’T DELETE IT!! You can add additional items to your cart. Add at least one item to bring your total over $50 in February and you will qualify for a Sale-A-Bration item! You can also add a hostess code at that time and update your shipping address if it has changed. Close out your order and your card will be charged at that time and your order shipped.
Are you ready for Christmas? I’m not. We are in the middle of doing some redecorating – replacing furniture which now includes painting all the walls and replacing the baseboards in the main floor of the house. So I haven’t even pulled out any Christmas stuff. Instead I’m trying to find a place to put the stuff that was in/on the furniture I’m getting rid of until the new stuff comes – hopefully before Christmas (but maybe not). On my card today this little dog is ready for Christmas!
This is the Ready for Christmas bundle in the Stampin’ Up! Holiday catalog. It’s the fun staircase stamp set and coordinating thinlits dies. Right now you can still purchase as a bundle and save 10%. In the new year these two will still be available but not as a bundle – only as individual items.
On this card I’ve also used one of the Stampin’ Blends – Bronze color – to color in the little dog. Oh my he looks so good! It was just the perfect color for him and for the Chocolate Chip Cookies.
The plate and sweater are colored in with Stampin’ Write Markers because the colors I wanted to use don’t come in the Stampin’ Blends. I did hear that we will be adding more colors in the future!
The little table is stamped on the Wood Textures Designer Paper Stack – since there is all different sheets with different types of wood you could pick what you want for your table. Then I used the die set to cut it out, and the dog and the cookies.
The Holly Embossing folder was perfect for the background – don’t miss it – it’s in the annual catalog. And the rug is a strip from the Quilted Christmas Designer Paper Stack.
On the inside of the card (and also on the envelope) I stamped a portion of the Christmas Tree.
This card was part of my November Christmas Stamp-a-stack class. Everyone that came made 5 of these during the class.
Don’t miss the Year-End Sales Event going on now. We are saying good-bye to retiring products from the Holiday catalog. Because once January arrives it will be time for brand new stuff in our Occasions Catalog.
There are so many wonderfully creative ideas out there on Pinterest, Instagram, Facebook and other places. I often mark ideas that I love and use them later either as a starting point for something or sometimes they are quite perfect and I stick very close to the original idea I found. Often I’m not exactly sure who created the idea and for all I know they could have copied it from somewhere else. So today’s card is an idea I found online – I believe it came from someone over in Europe as the stamped words on the card were not in English. So it was likely from someone in Germany. I thought it was a clever idea to use some of our all occasion designer paper for a Christmas card idea.
This is the Color Theory Paper Stack and I used these cards in a couple of my classes. The color options included Dapper Denim, Old Olive and Crushed Curry. The Designer Paper is paired with the Santa’s Sleigh Thinlits – the tree and the star die are from that set. But you could do this same idea with just a tree die that perhaps wasn’t even Christmas.
The words are from the coordinating Santa’s Sleigh stamp set. Both of these were from last years Holiday catalog and carried over into our Annual catalog. Cut a strip of the paper and then cut out the two trees and a hand full of stars. Adhere everything to a Whisper White card base and its done.
While you are in my online store be sure to check out the Year End Sale we have going on. Some products are retiring from the Holiday catalog so get them while you can, others are on sale to clean out some inventory and make room for new stuff coming in January!
The new Occasions Catalog and Sale-a-Bration catalogs will be coming out soon. The ones I mailed out will be heading your way later next week. If you aren’t sure if you are on my mailing list send me a note and I’ll check. If I need to I’ll get you one in the mail once I have some here to send back out.
It’s time for the November Paper Pumpkin Thing Blog Hop sharing alternate ideas for the November 2017 kit – Back in Plaid. It’s the companion to the October kit. And it’s the most popular Paper Pumpkin kit we have ever had!
This November kit is so cute as is! The stockings are adorable and perfect for so many things. I want to fill them with little goodies and I’m thinking of leaving them at my neighbors houses. But I wanted to create an alternate idea for you too. And I had a silly idea. I tried coming up with other ideas but kept coming back to this one. It’s a bit “out of the box”. Yes literally we will be using the Paper Pumpkin boxes for this one!
Bean Bags! Yes – Stocking Bean Bags for a Toss Your Stocking Game! It’s the perfect solution if you needed a fun idea for your kids class – a simple game that even the little ones can play. Turn the stockings into Bean Bags. It’s super easy – I actually came up with three different ways to create the bean bags. First for all of them – turn the stockings so the seams are on the inside – you can use a bone folder to help get all the edges pushed out really well. Then fill each one with beans – I just bought dried beans at the grocery store – the cheapest bag I could find. Now you can do any one of these things for closing up your bag.
Use a sewing machine and run a stitch across the stocking near the bottom of the plaid design. Then turn the cuff over the edge.
Use some safety pins and pin the stocking shut along the bottom of the plaid design. Then turn the cuff over the edge. This way you can easily undo it later and use the stockings for something else.
Turn the cuff first and then use thread – I used clear thread. And hand stitch the top shut.
Here is a look at how I set up the game:
I used the October and November Paper Pumpkin boxes to create the boxes for throwing the bean bags into. I used a craft knife to cut right around the Paper Pumpkin logo in the top of each box. I used some Washi Tape on the edges to make them smooth. The Pick a Pattern tape is black and white and coordinates perfectly.
Arrange the boxes however you wish. I placed them end to end. Giving more points if you got the bag in the hole from the box that was further away. I assigned 3 points. Then 2 points for the close box. And 1 point if its just touching the box but not in the hole. You could do the points however you want. I was trying to take my photos and kept throwing the stockings in trying to get more points – I think I played for a good 30 minutes all by myself!
I hope you like this fun out of the box idea!
But I also made an alternate card. I actually used the stamp sets from both kits and added card stock and a couple of other things to create my card.
I went with the Dapper Denim ink in the November kit and focused on the snowflakes in the kits. I drew a grid in pencil on a Whisper White square and stamped the large snowflake on each intersection. I made sure my ink was dry and then erased the pencil lines. I went back and stamped the small snowflake in between. It’s layered on a Dapper Denim card base.
The greeting is stamped on Whisper White and punched with the Everyday Label punch and trimmed to make a narrow label. I added Silver Thread to the back and Rhinestones to the front . Oh and the card base is embossed with the Softly Falling Embossing Folder – that may be a little hard to see in the photo. A quick card that I just finished last night.
If you want to see what I did with the coordinating October kit check it out HERE.
The Paper Pumpkin kits are a fun little escape and everyone comes up with so many creative ways to stretch them. Its a perfect gift this Holiday Season – the kits come with everything and new subscribers will get the clear block in their first box. You can Sign Up yourself or someone else Here. Sign up by Dec. 10th to receive the December kit.
And now it’s time to move on and see the rest of the gang’s creativity! Next up is the funny and creative Dena Rekow. Just click on her name or the next button to visit her blog. She always has me smiling!
Here is the rest of the Blog Hop List in case you get lost along the hop or just want to jump around.
Hi! I am a Stampin’ Up! independent demonstrator in Milton, Georgia. I love being creative and want to share it with you! On my blog I will share creative ideas using Stampin’ Up! products and you’ll also hear about my family and my dogs.
I look forward to helping you get your creative juices flowing!
Click on the Shopping cart to visit my Online Store and order your Stampin' Up! Supplies any time. Earn Stampin' Rewards when you order reaches $20 - be sure to opt in to the rewards program on your account. Any questions click on the email me button above.
Current Catalogs
Join My Stampin’ Up! Team for $99
Join Paper Pumpkin – Your Creative Escape!
For New Subscribers -
Join by the 10th of the month to start your subscription this month.
Prepaid subscriptions now available!
The content in this blog is the sole responsibility of Monika Davis as an Independent Stampin’ Up! Demonstrator. The use of and content of classes, services or products offered is not endorsed by Stampin’ Up!